Showing posts with label black. Show all posts

Wednesday, June 25, 2014

Zoya: Raven & Sally Hansen: Sterling Silver

Swatch & Review


   This was meant to be a base for nail art that never happened.  Well, it did happen, but this manicure didn't last until the time I was ready to do it, and I used a different base color for the art, haha.  So I ended up just swatching Raven, basically!

   Raven is one of my first Zoya polishes, and I realized that I don't remember ever wearing it.  It's a really pretty black with a super-fine shimmer.  However my bottle seems to have some issues, like it wasn't capped tightly.  The formula was off compared my other Zoya pretties, namely in that it did not want to level itself out and didn't wear as well.  I also has some odd bubbles when I added topcoat.  I don't know if that should be attributed to Raven or not.

Tuesday, May 20, 2014

Seraphina Stares at the Stars

Swatch & Review Manicure

And says her prayers
In awe of what she sees
I could never see the things she sees


And she's always far away
In some other place
She likes to make believe
I can't stand to see her in such pain


Even when the world is pushing down
She stands so tall she can almost touch the clouds


Saturday, April 12, 2014

Sunny Layering with L'oreal & Milani

Layering Nail Art / Swatch


   Come on, sunshine!  You're here, you can do it - stay!  Please, please stay... it's so much easier to feel motivated when you're around...  Today I have a simple layering manicure that is bright and cheery!  I managed to knock out 3 untrieds, too!

Monday, November 18, 2013

L'oréal: Drop Dead Gorgeous, The Bigger The Better, & China Glaze: Fade Into Hue

Swatch & Review


   Still plowing through nail pictures taken before Freya was born, here is a manicure that nicely used 3 untried polishes.  The blue creme on my center fingers is China Glaze Fade Into Hue, a perfect periwinkle tone.  Love it!  The glitter over it is the same sauce in the bottle I'm holding; L'oréal The Bigger The Better.  In the bottle it looks uninteresting but it turned out to be black and silver tiny & micro glitter in a clear base.  The coverage was great - my swatch shows 1 coat.  And the outermost black nails are L'oréal Drop Dead Gorgeous, a black polish filled with silvery-white flecks.  In the bottle it looked like these might have some iridescence but it was lost on the nail.  Still, the coverage was great, so I'll keep it for my stash of black-with-something-extra polishes, since I love those entirely too much.  ♥

Thursday, August 8, 2013

Color Club: Beyond and Harp On It with Tape Lightning Bolt Nail Art

Nail Art / Swatch & Review

   I was about to swatch Color Club Beyond when I realized that I never shared Harp On It on my blog, and realized they would pair very well.  Here they are swatched together, with a bit of nail art!


   I'm wearing these polishes without any base or top coat, so you can see how they have a smooth finish and nice shine all on their own.  Harp On It is Color Club's silver linear holographic polish from their first Halo Hues collection.  It took 2 coats for opacity, but the formula is very good.  So long as you keep your brush movements gentle and wait a little while in between coats you won't have any issues with dragging.  Beyond, the linear black holo, is fantastic.  I can't say enough good things about this polish!  I only needed 1 coat and it was totally opaque!  The formula is super-smooth and the rainbow effect is very strong.  I definitely recommend this polish if you're hunting for the ever-elusive perfect black holo, and don't want to spend a fortune.

   The lightning bolt accent nail makes me feel like my nails should be super-powered, haha.  My husband liked it and it was really easy to do!  All you need is a bit of tape and a pair of scissors.  First, start with your completely-dry base color.  This is important, otherwise your polish could be pulled off by your tape.


   Cut a zigzag into a piece of tape and place each piece on your nail to create your desired bolt shape.  Make sure the edges are smoothed down so no polish will seep under.  I'm using painter's tape.


   Paint the open area, and quickly but gently peel the tape off before your polish dries.  That's it!  Enjoy your snazzy nail design!


Saturday, July 20, 2013

Mary Kay Lash Love Lengthening Mascara & Lash Primer

Review

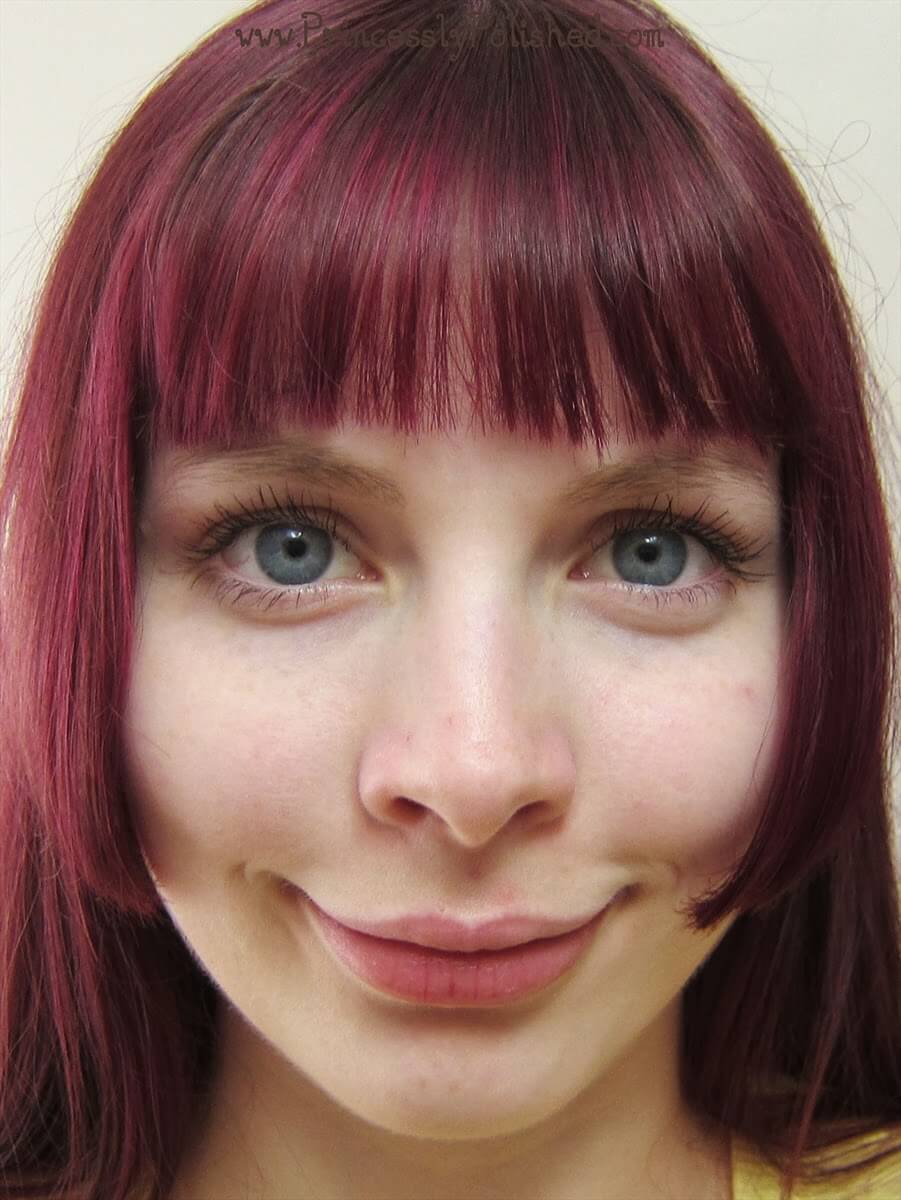
   Good evening, Princesses!  How has your weekend been?  We've finally gotten some rain and cooler weather here.  Today I'm sharing my thoughts on two lash products that I was sent for review via Influenster by the Mary Kay brand, their new Lash Love Lengthening Mascara and Lash Primer.  Here they are being worn together on my curled lashes!


   Like most ladies, mascara is one of my favorite cosmetics!  So I was really excited to get to try these.  (Fun fact: my first ever mascara was a Mary Kay tube given to me by my mother!  Revisiting this brand's lash offerings is quite nostalgic.)  Read on to see how I like them!


 Mary Kay Lash Primer:

   I will admit, I was feeling very apprehensive about this pearly white tube!  A few years ago there was a boom in lash primers, and brands are still releasing them fairly regularly now.  I tried several samples from big name brands and didn't like any of them at all!  The primers always seemed to be goopy and stick my lashes together, which made my lashes turn into "spider legs".  So when I opened the tube and saw that it was a barely-there clear formula, I was intrigued.

Here are Mary Kay's claims taken from the product page description:
   "Add dramatic definition to your eyes to create fuller lashes when used as a basecoat under mascara.  Or wear the clear formula alone for a natural look.
  • Instantly intensifies lash volume and creates longer-looking lashes.
  • Lifts lashes and helps them stay curled longer.
  • Coats without flaking, yet removes effortlessly.
  • Helps mascara wear longer." 
    The formula includes conditioning ingredients such as glycerin, aloe, and a few other conditioners.  Other features are the unique brush - the black and white swirl of bristles aren't just for looks!  The white bristles absorb and deliver the primer, and the black bristles should comb and separate your lashes.

   Application is easy and straightforward.  The brush is average sized and easy to maneuver.  I curled my lashes prior to putting the primer on, and only primed my upper lashes.  I did have some lashes sticking together so I used a lash comb to get them back to feathery fullness.

   I wouldn't call this a wonderful clear mascara on it's own.  I don't think my lashes looked any different wearing only primer, besides holding a curl.  As for helping my mascara to last longer and not flake, well, I didn't notice either of those things happening without using the primer, either.  It may help, but I don't think the Mary Kay mascara needed the help.  I did notice that it made my lashes look thicker once I applied mascara; fortunately not spider leg thick!  Other good things about this primer are that the formula is lightweight and it doesn't make removing your mascara any more difficult!


  Mary Kay Lash Love Lengthening Mascara:

   This mascara was provided in the "I ♥ Black" color; it is also available in brown.  I didn't use any other eye make-up in my photos (besides the primer) so you can see how it makes lashes pop!

Here are Mary Kay's claims taken from the product page description:
   "Long, strong, seriously separated lashes. What’s not to love?
  • Creates bold, instantly intensified length of lashes.
  • Lifts, curls and perfectly separates lashes.
  • Conditions and strengthens lashes.
  • Nonclumping, flake-free formula wears all day for over 10 hours."
    Other features are the inclusion of fibers to physically add more length to your lashes, conditioning ingredients and the spiffy brush head.  It has a slight curve and slightly longer bristles on the convex side.

   Application was easy, with the brush being average sized and having bristles that could reach all my lashes - even the tiny ones! - by turning it the right way.  I really like these molded rubber mascara brushes, I feel like they give better application than the traditional bristly wands (look at the Lash Primer brush, I'm talking about those).

   My lashes were already curled before applying, and the curl held just fine whether I applied the Mary Kay Lash Primer or not.  This mascara does need a few minutes to dry before you open your eyes wide or it will transfer to your lids.  Once it is dry I have not had any trouble with it smudging or flaking, with or without the primer.  The lengthening fibers are subtle and I don't really notice them much.  Overall I find that the only difference using the primer makes to this mascara is that with a primer under it is seems more volumizing.  Lashes appear thicker, and want to stick together more.  This mascara also removes easily!


   Here are a couple pictures of me using these products!  First I used the Lash Primer on my curled upper lashes.  Then I applied the mascara to one eye's lashes to see the difference.


   It's pretty obvious which side has the mascara, isn't it?  I then finished applying the Lengthening Mascara...


   Much better!  Now we can see all those lashes!

   In conclusion, both of these products are solid performers.  Mary Kay's Lash Primer is the best I've ever used, simply because it isn't gross!  It is not a must for me, though.  I don't feel that I need the extra volume it gives, and the good mascaras I use don't flake or smudge anyway.  I will continue to use it on my upper lashes, and I'll try it with some lower-end mascaras to see if they benefit from the primer boost!  I wouldn't bother wearing it by itself; I reach for brown mascara when I want a subtle look!

   Mary Kay Lash Love Lengthening Mascara is very nice.  It doesn't usurp my current favorite, but it is also cheaper per tube.  I will definitely keep using it!  The lengthening fibers don't make a mess of lashes, and it does a good job of grabbing little lashes thanks to the wonderful brush.  It's only fault is a slight tendency to stick lashes together, and the dry time.  I prefer mascaras with a drier formula.  What I like best: it doesn't flake off!


   Many thanks to Influenster and Mary Kay for selecting me to try products in the Glamour Look VoxBox!  These two are definitely my favorite out of the bunch!  Of course, who doesn't love to try new mascaras?  ;)

Wednesday, February 6, 2013

Lush Lacquer: Pink Panther over Zoya: Wednesday

Swatch & Review


   Hello, princesses!  Last week I had very little energy and motivation for painting my nails.  Fortunately there was a side benefit to that; I picked a manicure that I could wear all weekend.  I think this resulted in an awesome combination!  This is one coat of Lush Lacquer Pink Panther over Zoya Wednesday.  Both were sitting in my untrieds - don't they look great together?

   Zoya Wednesday is my kind of green, so I love this creme polish, which does dry a little darker than it looks in the bottle.  It dries shiny without a topcoat but it had a few bubbles in it - odd!  It seemed a wee bit thick so maybe some thinner is all it needs.  It's super opaque at two coats and wears like iron.  The only downside is during removal my skin was stained green, and the "green thumb!" I ended up with wasn't nearly as beneficial as you'd think.


   Pink Panther is a really nice glitter polish for layering.  I was feeling a bit glittered-out, but the combination of matte hexes ended up being a good palette refresher.  It is a fairly simple polish but the mixture and colors are just right.  Coverage was very good at one coat, it was completely smooth under regular topcoat and removal was easy.  I'm really glad that I bought it!

Wednesday, January 30, 2013

Different Dimension: Orbital

Swatch & Review


   Hello princesses!  In contrast to yesterday's bright and springy polish post I have a swatch of Orbital, another Different Dimension nail polish.  Part of Missi's ever-growing space themed polishes, I was honored to name this one!  Isn't it gorgeous?


   Orbital is a black jelly polish filled with a perfect mixture of aqua, pink, and purple holographic glitters.  As you can see from my bottle shot it is filled with about four different sizes in each color.  Sadly pictures don't capture just how awesomely sparkly this is!  Especially in lower light this polish twinkles like a rainbow-hued night sky.


   In these swatches I used three coats of Orbital alone, and one coat of Poshe to top it off.  The formula on this polish is phenomenal.  The glitter stays well suspended, you get plenty of it on each brushstroke, and it spreads over the nail evenly.  The black jelly base is never streaky and even looked decent at two coats, then opaque at three while still having amazing depth of glitter.  It is well behaved, dries fast and doesn't eat topcoat.

   I think this now one of my very favorite Different Dimension polishes based on the beautiful glitter and perfect formula.  I can't wait to try it layered over black, and even just one coat over a grey would be nice!  I definitely recommend this polish, go get a bottle!

Friday, January 18, 2013

Different Dimension: Love Her? I Don't Even Lacquer! over Zoya: Layla

Swatch & Review

   When my nail mail from Different Dimension arrived, chocked-full of nail polishes that I helped name (still in a slight state of disbelief on that), I didn't know where to start.  I felt like I needed more hands right away!  I finally settled on Love Her? I Don't Even Lacquer! for my first mani, since it is the polish that got the ball rolling.


   First off, take a look at the pretty bottle macro!  You might want to click to see larger.  LH?IDEL! is a black and white glitter with a little something extra in the form of holographic microglitter and blue-purple sparks.  You'll find white hearts and tiny glitters, sheer white squares and hexes, and black hearts, squares, and hexes.  This is all floating in a clear base for maximum versatility!


   My base was two coats of Zoya Layla, an insanely-bright-yet-not-neon color that dries to a rubbery finish as seen above.  I don't often reach for such a bright color but I was pleased with how wearable Layla was!  This plain swatch is more accurate of the pink color, as well.


   Now, I know that not everyone likes large glitter on their tips, so the above nails are for those people!  I managed to avoid the hearts not not shaking the bottle at all and using one thin coat of LH?IDEL!  I really liked this look!  Sort of Lisa Frank dalmatian puppy.  Otherwise just leave your bottle upside down for a bit before using to help the heavy heart pieces mix in better.  There are a lot in there, and using that method I ended up with plenty of hearts on my other nails.


   I used the tip of an orange stick to poke some of the unruly hearts into a better place on my nails.  I used one coat of Poshe topcoat on the nails that had no hearts or hearts that laid flat, and two coats for the ones that had more texture.  This polish wore really well and I didn't get a single chip, even when I started picking at it!

   You can get your own bottle of Love Her? I Don't Even Lacquer! from the Different Dimension etsy shop.  What will you wear it with?
   Zoya Layla can be bought from the brand's Online shop.

   Thanks for letting me share this extra-special polish with you!

Friday, January 4, 2013

Butter London: Knackered over Wet 'n Wild: Black Creme

Swatch / NotD

   It took me way too long to get around to wearing this polish after nabbing it from a blog sale.  Butter LONDON Knackered had been on my wishlist for awhile, though I had no idea what the name meant.  It prompted me to look into British slang, and in that way I found that it means basically means exhausted.  Cool!  British slang is fun!  And so is this polish.


   I have to admit that I was knackered when I did my nails.  I used one coat of Wet 'n Wild Black Creme as my base (yes, it really is good - my first time trying it), and one coat of Knackered over top.  I didn't do my best work with this manicure, and I didn't realize how sloppy it was until it showed in the macro shots... yikes!


   Butter LONDON Knackered has a thin consistency that dries pretty fast.  I think it would have looked better with either two coats or a thicker, better-applied coat.  Even so this polish is super gorgeous, looking the most stunning in low light when it's holo microglitter sparkles like crazy and it has more of a blackened smoldering effect.


   The purple-to-green shift this polish has is awesome.  It also shows pale blue in the bottle but I don't really see that on the nail.  I believe that is just from the sheer tint of the polish.  If I use Knackered alone it would look more grey-blue, and not have such a strong color shift.


  The sparkle reminds me of China Glaze Fairy Dust very much.  I expect you could create a similar manicure just by layering Fairy Dust over your favorite duochrome polish.  I loved wearing Knackered so now I'm inspired to create other versions of this manicure through layering.  What do you think of it?

Tuesday, January 1, 2013

Sally Hansen: Black Tie - a special manicure

Swatch / NotD

   While digging through the contents of my SD card last month I found the first manicure I wore after getting married in May.  I didn't even have my nails done on my wedding day because I had just caught the chicken pox.  I was happy to have kept my nails at all after that ordeal!  During April I had been so busy with wedding prep that spiraled into trying-to-keep-my-fiancé-alive that I hadn't worn any polish in quite some time.  So to break my nails into being painted again I chose a lovely black polish...


   This is Sally Hansen's Black Tie.  2 or 3 coats, I don't remember.  I wasn't home when I did my nails so this is without any cleanup, and I snapped my pictures in natural sunlight.  This picture best captures the beautiful duochrome that shines blue and purple amidst the black.


   And look how rounded my nails still were at this point!  I think this fits the description of "squoval", haha.  I keep them much more squared now and I'm loving it!


   This polish was really nice to wear and easy to work with.  The shimmer didn't make it brushstroke-y, but gave it a softened look.  My last picture is with flash.


   I think I've improved considerably within the last half year.  I'm happy to share this little flashback, though.  Not only because Black Tie is a really pretty polish but that this was a sort of monumental nail day.  I was moving past the no-polish days of spring and things were settling into normality.  It may seem like a small thing but sitting down with a polish brush in my hand felt so good right then.  And I'd been married for 2 weeks!  Now it's been almost 8 months, wow! =D

Wednesday, December 12, 2012

Zoya - Storm & China Glaze - Glistening Snow

NotD / Swatch

   I hardly knew what to put on my nails today.  I knew I wanted something sparkly, and I knew I wanted to use some of my untrieds... so I paired Zoya Storm with China Glaze Glistening Snow.  I think they play nicely together!  I suggest clicking the pictures to see them larger!  I recently bought an OttLite, so I used that for lighting today.


   Zoya Storm is a nice glossy black filled with holographic microshards.  I absolutely love this combination!  And I had perfect coverage at 2 coats.  So, this polish is definitely a keeper!


   China Glaze Glistening Snow is very interesting.  I used 3 coats by itself and no topcoat - it has a sand finish!  This might look a little bit like CG Fairy Dust in the bottle, but it is a denser mix of slightly larger (but still micro) glitter in both silver and holo silver.  The multicolor sparkle didn't want to show up in pictures, but it was there!


   This polish looks opaque at 3 coats but my macro shot above reveals some patchiness.  The texture is interesting, matte and gritty, but not sandpaper gritty...  It's different.  This polish dries incredibly fast, being a clear matte.  I had my third coat done after doing my first of Storm on the same hand!

   So, this is my black and silver "rainbow" manicure.  What do you think of it?  =)

Tuesday, December 4, 2012

Naild'It - Summer Lovin' Melon & China Glaze Sunshine Pop

Swatch & Review

   Channeling my inner summertime was very easy yesterday.  I ate lunch outside sitting in sunny 52° weather, completely atypical of December 3rd in any other year of my life.  And with China Glaze Sunshine Pop and Naild'It Summer Lovin' Melon on my tips, it still doesn't feel like winter at all.


   This was my first time using Sunshine Pop.  It is a bright yellow with silver-white shimmer.  Basically China Glaze Happy-Go-Lucky with a slight frost.  The bright yellow isn't the kindest to my skintone but I love it anyway!  My first coat of Sunshine Pop was was a thick, streaky mess.  It had issues with bubbling and I was almost ready to call it quits right there.  I kept my wits about me, dropped some polish thinner into the bottle, shook it again, and was able to continue without bubbles, fortunately.  It still took two more coats to be decently opaque, and then it had more frosty brushstrokes than I liked.  I immediately followed with my fast drying topcoat and that evened it out wonderfully.  In the end I love it!


   What do you think?  It isn't the best formula I've had to work with, but I think it is worth the three coats.  Topcoat made all the difference in my attitude going from "meh, it's so-so" to "wow, candy-colored-sunny-bright-goodness!"  And I knew it would also be a protective barrier between the glitter that was about to go over top.


   I was fortunate to win a bottle of Naild'It polish from Kim at OverallBeauty.  She offered it as a prize in a water marble contest. Summer Lovin' Melon is my first bottle from the brand.  It is full size (15ml) and has silver printed labels, but some words aren't easy to read.  I really like the sturdy bottle shape, but at first the stubby handle looked goofy to me.  The brush and handle are perfectly good, though.  Now I love how the handle is flat on top.  All I had to do was turn the bottle upside down (I think I left it for a half hour?) before using it and I had no issues getting the glitter out!

   In fact, a lot of times I was wiping glitter back in.  The formula is very thick.  This helps the glitters not to slide around when applied but you do need to watch out for brush overload!  Looking at the bottle it can be hard to tell what is hiding in there.  I didn't realize that it includes black circle glitter until one came out on my brush, and then another, and another!


   I used two coats of Summer Lovin' Melon, but would be happy with one, as well.   The glitter is easy to apply and only needs dabbing to cover thin spots.  The large black hearts and circles were often on the brush without me realizing.  There are black squares as well, but these seem more sparse in the formula.  The other colors are large pink and orange hexes, white bars, striped matte red hexes, satin green, purple, light pink and white hexes.  Microglitter comes in red, too.  I chose a yellow base to show everything off, but next time I'll try a watermelon pink to get it's namesake look.


   I had to photograph both of my hands to show how colorfully my nails turned out.  Yes, this is a chaotic polish, but it is fun and eye-catching.  I just wish I would have had sunshine when it came time to do these pictures!


    A word on topcoat.  I used two coats of Gelous and then a coat of my thickened fast-dry top coat.  While not a topcoat-thirsty glitter the larger pieces will stick out.  I sealed them in this way and there are only a couple spots that have a bump.  This doesn't bother me any, but it is worth noting.  This ended up being a very thick manicure but that is what I was going for - my nails have been "tough as nails" since applying it.  (From start to finish I did 10 coats of my nail polishes on each nail...)

  In the end I have been pleasantly surprised by this busy glitter polish.  Judging by other swatches Online I thought it would apply as small glitter with a stray heart here or there, but that wasn't the case.  It was easy to work with, and is my first polish to contain those awesome circles.  Right now the Naild'it etsy shop is closed, but you can buy these from various indie polish e-tailers.  They go for about $10-$11 from what I've seen.  Honestly that is steep for me so I'll probably hold off on these unless I really love the color.

   I hope you found this manicure helpful.  Let me know your thoughts in the comments!  =)