Showing posts with label np-shimmer. Show all posts

Tuesday, May 20, 2014

Seraphina Stares at the Stars

Swatch & Review Manicure

And says her prayers
In awe of what she sees
I could never see the things she sees


And she's always far away
In some other place
She likes to make believe
I can't stand to see her in such pain


Even when the world is pushing down
She stands so tall she can almost touch the clouds


Saturday, April 12, 2014

Sunny Layering with L'oreal & Milani

Layering Nail Art / Swatch


   Come on, sunshine!  You're here, you can do it - stay!  Please, please stay... it's so much easier to feel motivated when you're around...  Today I have a simple layering manicure that is bright and cheery!  I managed to knock out 3 untrieds, too!

Friday, December 13, 2013

Sally Hansen: Sparkling Water #TripleShine Nail Polish

Swatch & Review / Nail Art

   This was one of the items provided for review in my Violet VoxBox from Influenster. They would like us to share a "shining moment" we had while wearing the polish.  I didn't actually get to wear this for very long, but I did dress Sparkling Water up with some pearl-chain nail stickers.  As I was finishing my manicure, I had a realization...

   Are nail stickers "cheating" when it comes to nail art?  Should they even count?  Yes.  Just because you make a cake using a box mix instead of from scratch, will someone claim that you didn't bake a cake: you cheated?  No, you just made what you currently had time and ability to do.  We all admire the hand-piped frosting flowers, the mind-blowing 3D fondant creations that make their way to Pinterest collections... but sometimes you have to be content with sprinkles.  In the end it's tasty, you did make cake.
    With nail stickers and decals... they are quick and easy to master, but do take skill to apply in a creative, eye-pleasing way.  So what if I didn't sit down with a tiny brush and make each dot myself.  I still chose where I wanted the design, carefully cut them to the proper length, and carefully applied them with tweezers.  That's all I had time for.  And you know what?  It was pretty, I enjoyed the look - I did nail art.
   Now, let's get to what we're really after: a proper swatch and review of Sally Hansen Sparkling Water!

Friday, September 6, 2013

Nyx Advanced Salon Formula Nail Polish - the Pastels!

Swatch & Review

   It's no secret that I looove Nyx products.  I have a whole slew of their eyeshadows, lipglosses, and of course nail polish.  When it comes to the polish I mainly have bottles from their cheaper Nyx Girls line.  I don't often see anything about these Advanced Salon Formula polishes.  So, I've been really curious about their quality.  Finally I decided to just go for it and try all of the pastel colors.  That is, the colors that have "pastel" in their name, and happen to go in sequential numerical order...


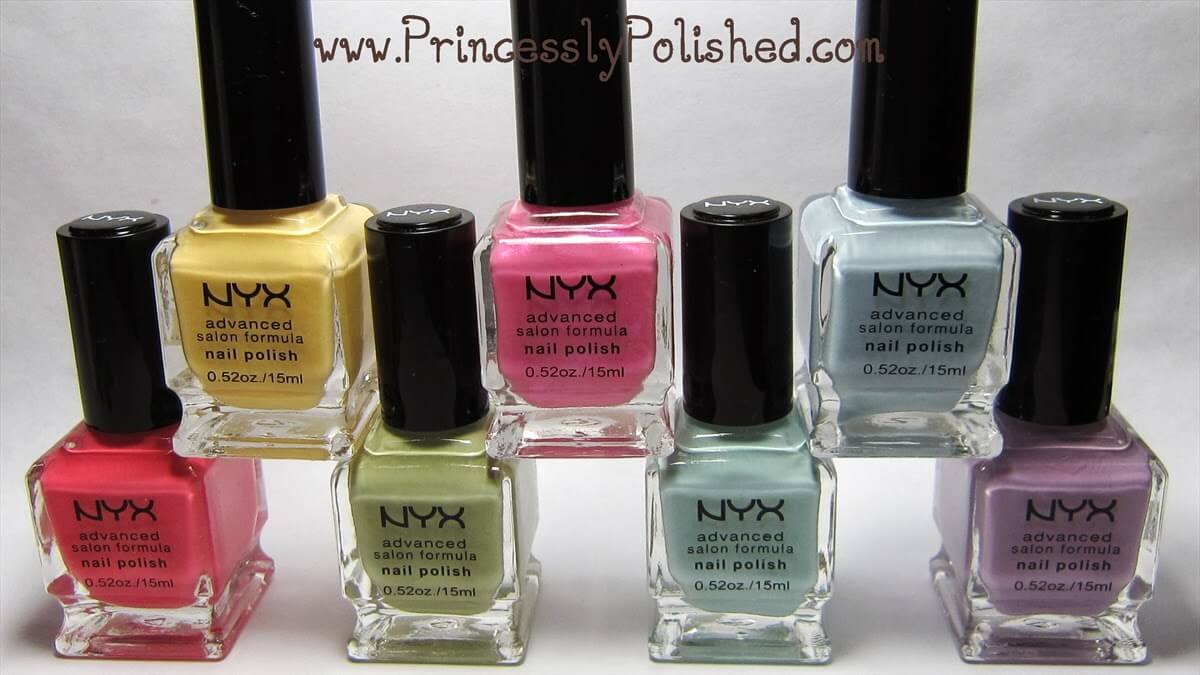
   I present to you swatches of Nyx Advanced Salon Formula: Pastel Yellow, Pastel Pink, Pastel Blue, Pastel Coral, Pastel Pistachio, Pastel Mint, and Pastel Lavender.  Let me start off by saying that I added a bit of nail polish thinner to all of the polishes because they were slightly thick, and I wanted them to be flowing a little better!  Not sure if this was because of sitting around or if these are all normally thick polishes.


Pastel Yellow

3 coats, plus topcoat

   This buttery yellow wanted to photograph a bit more vivid than it looks in person.  I had to use 3 coats for opacity, it looked streaky otherwise.  My topcoat helped to level the color out better.  I can't fault a pastel yellow for being a 3-coater, they usually are.  The color is very nice (a bit warmer than China Glaze Lemon Fizz).
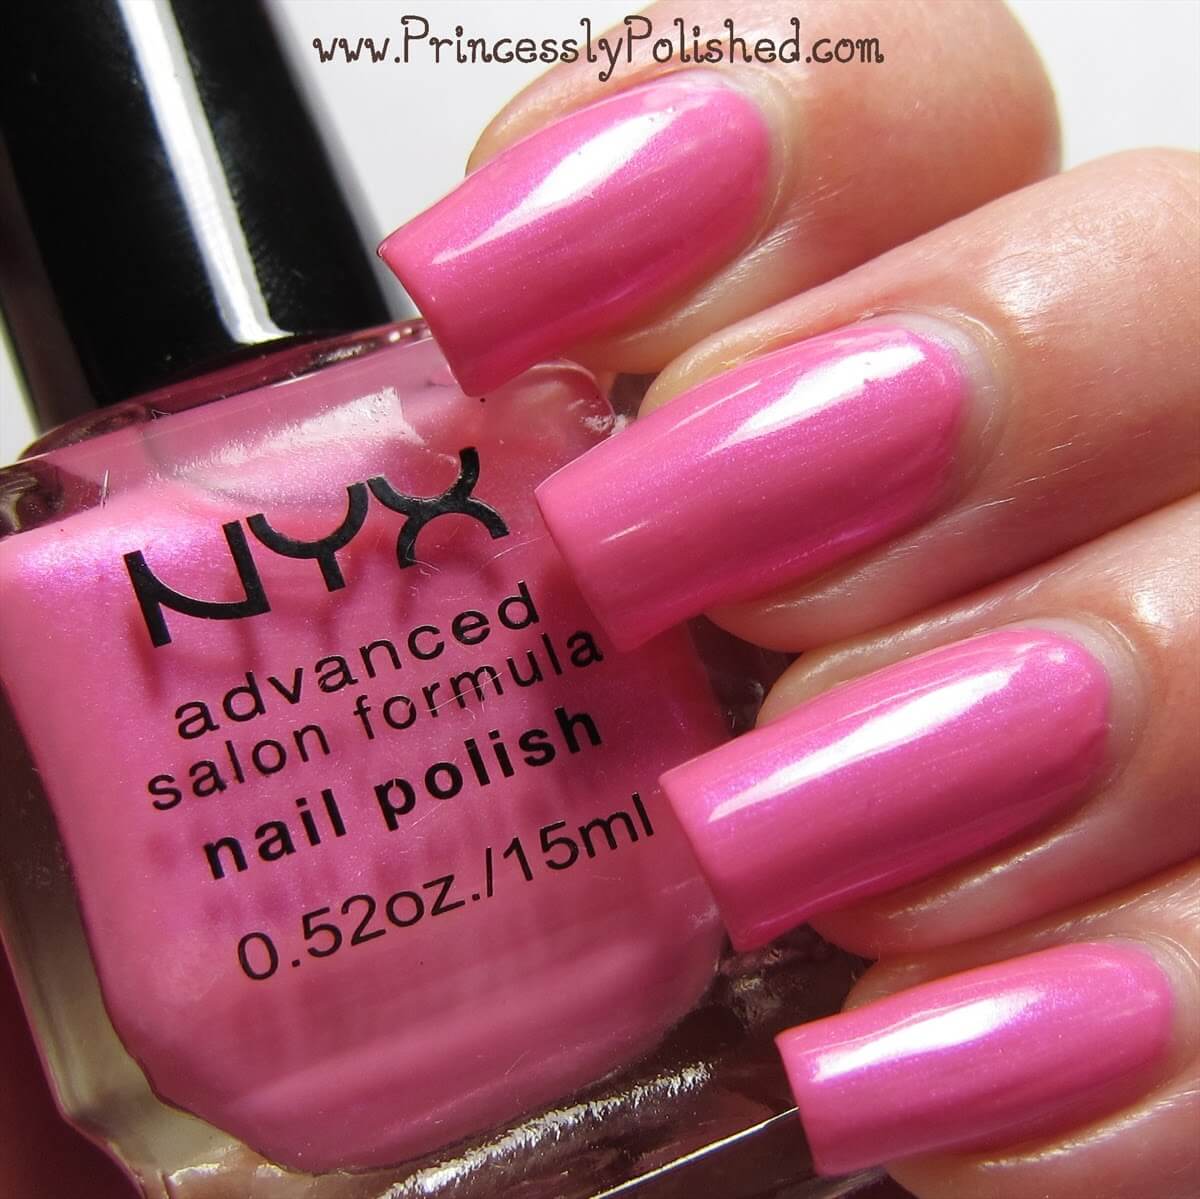

Pastel Pink

4 coats alone

   This polish stands out as the lone shimmer in this group of pastels.  I could tell from the Online swatch that it wasn't going to be a plain creme finish, and was hoping for a hidden-shimmer creme instead.  This is more of a pink jelly with ultra fine pinky-purple shimmer.  I was surprised by how much I ended up liking the shimmer and even the color (I'm picky about pink polish), but the formula leaves much to be desired.  This wasn't as thick as the other pastels, but it was super sheer.  It went on streaky, patchy, blah...  Took 3 coats to look decent and 4 for me to be happy with the effect on my nails.  Shorter nails could be okay with 3.  I'm torn about this one. The squishy jelly effect is pretty, and the shimmer is brushstroke free... but I don't have patience for 4 coats of one polish!


Pastel Blue

2 coats, plus topcoat

   This is one of the colors I was most hopeful about, and I wasn't let down.  It is the best polish out of this pastel bunch.  Despite how pale a blue it is I only needed 2 coats, and it was the most willing to self-level out of all these colors.  I added topcoat and that only made it look more perfect!  I really love this light powder blue, and I think it will be a great base color for nail art.
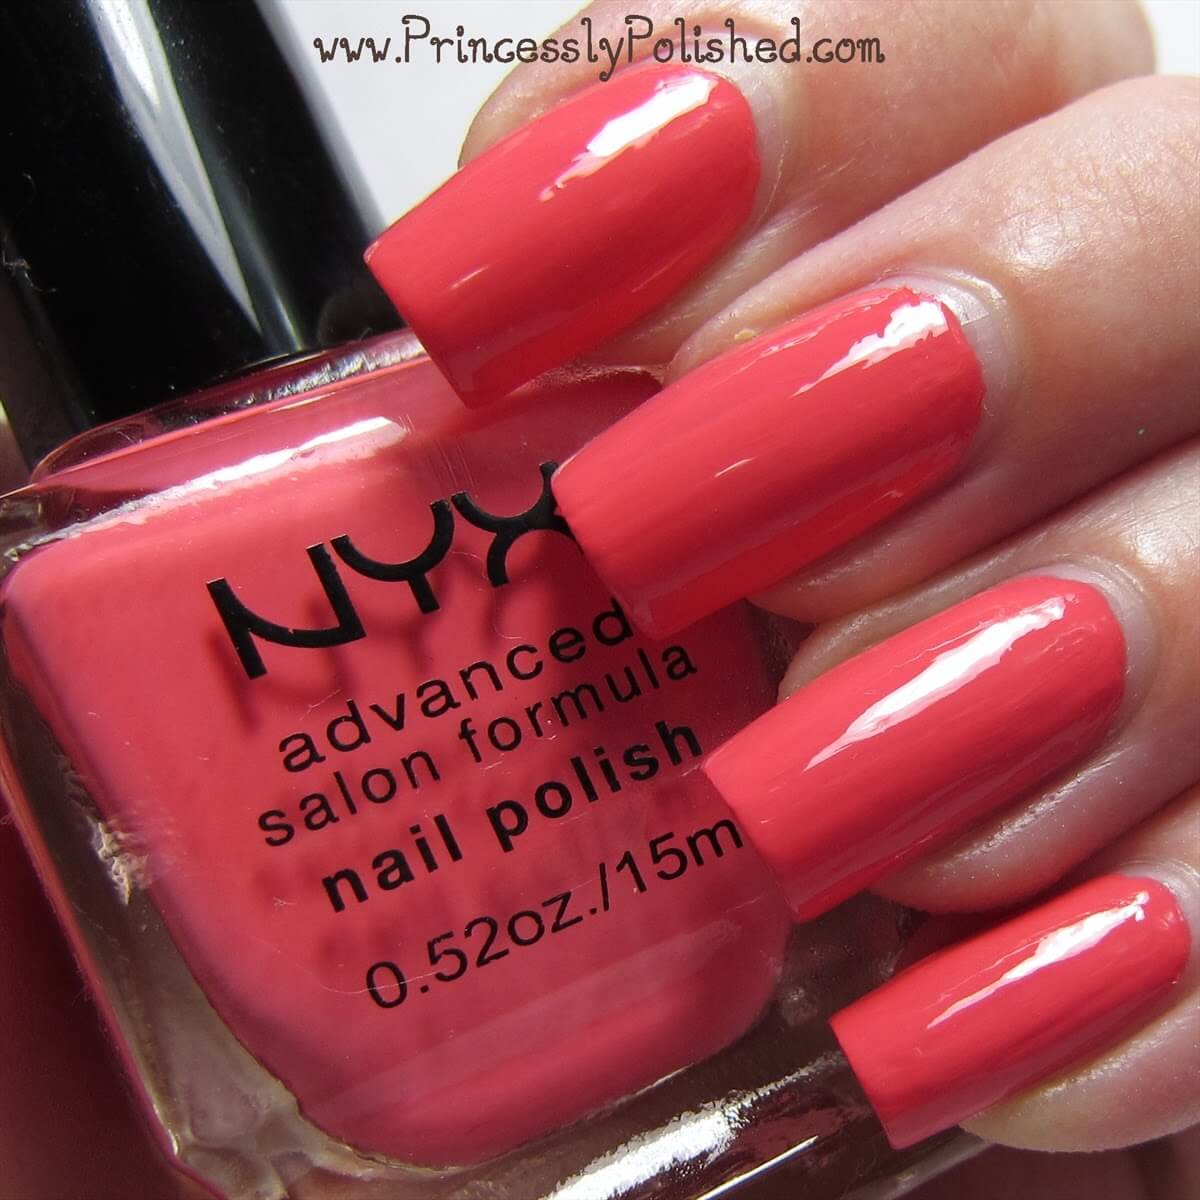

Pastel Coral

2 coats, plus topcoat

   I don't often go for coral, but I did want to add a not-too-bright shade to my stash for nail art.  This color fits the bill nicely.  It's a pigmented true coral without being an eye-searingly bright shade or too warm for my skin.  On the note of pigmentation, this one did want to stick to my cuticles at removal time.  It took a little more remover than the other shades did to completely rid myself of its coral tinge.  This polish was thick and didn't want to self-level, so topcoat is a must.
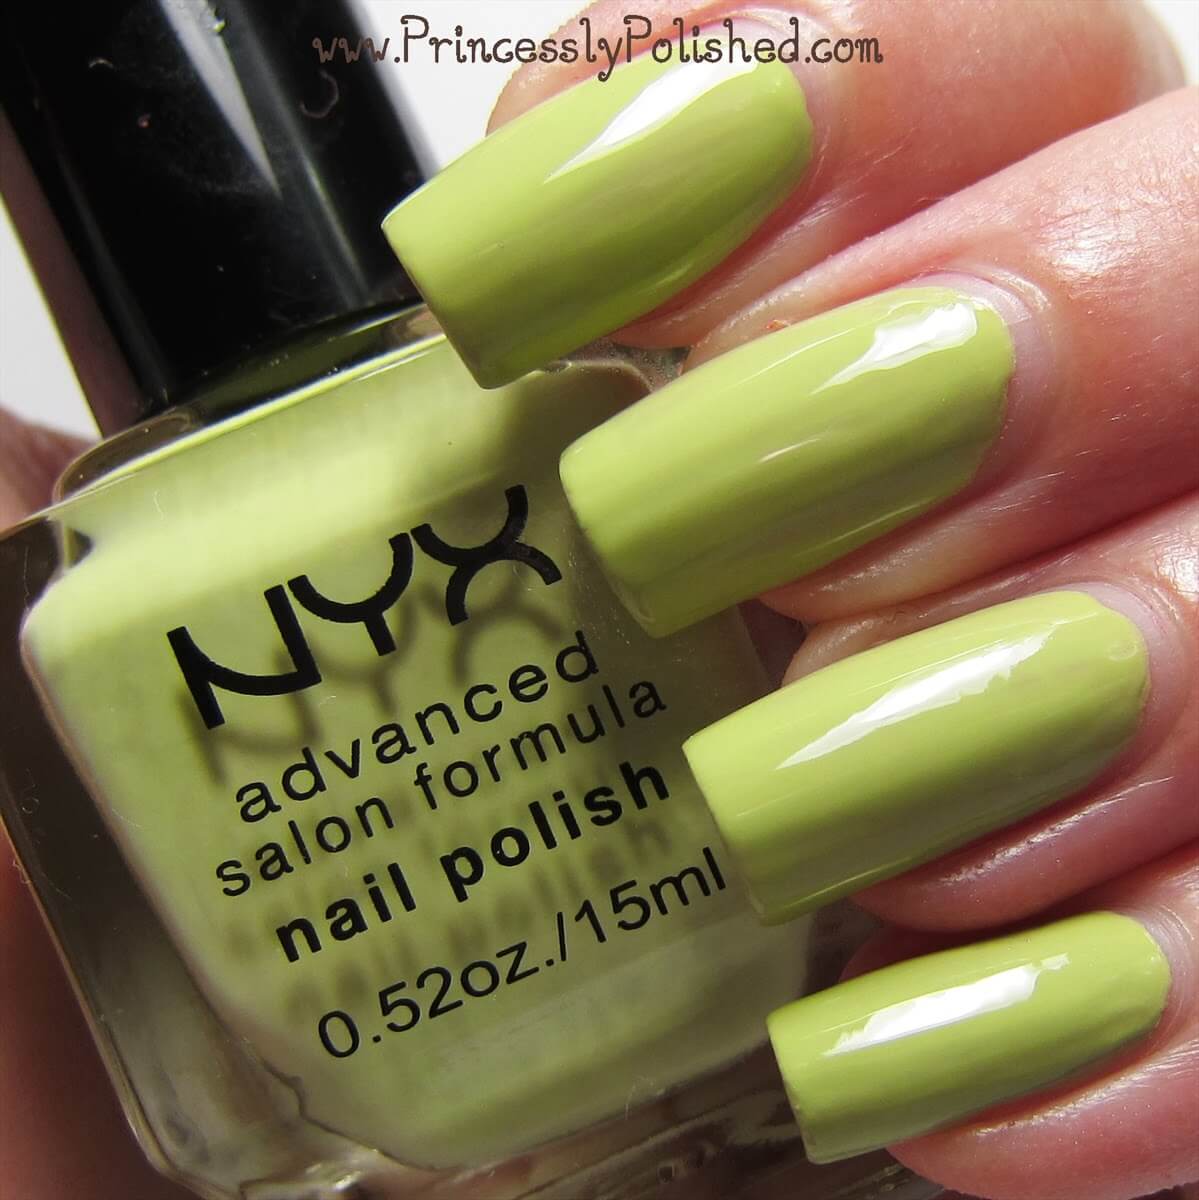

Pastel Pistachio

2 coats, plus topcoat

   This really is pistachio green!  While the color names aren't super creative at least they are spot-on...  The coverage was good for a light green, good at 2 and surely better with 3 coats.  It is also on the thick side and needed topcoat to level it out more.  So, not the perfect polish but fully tolerable for a shade that is usually finicky.
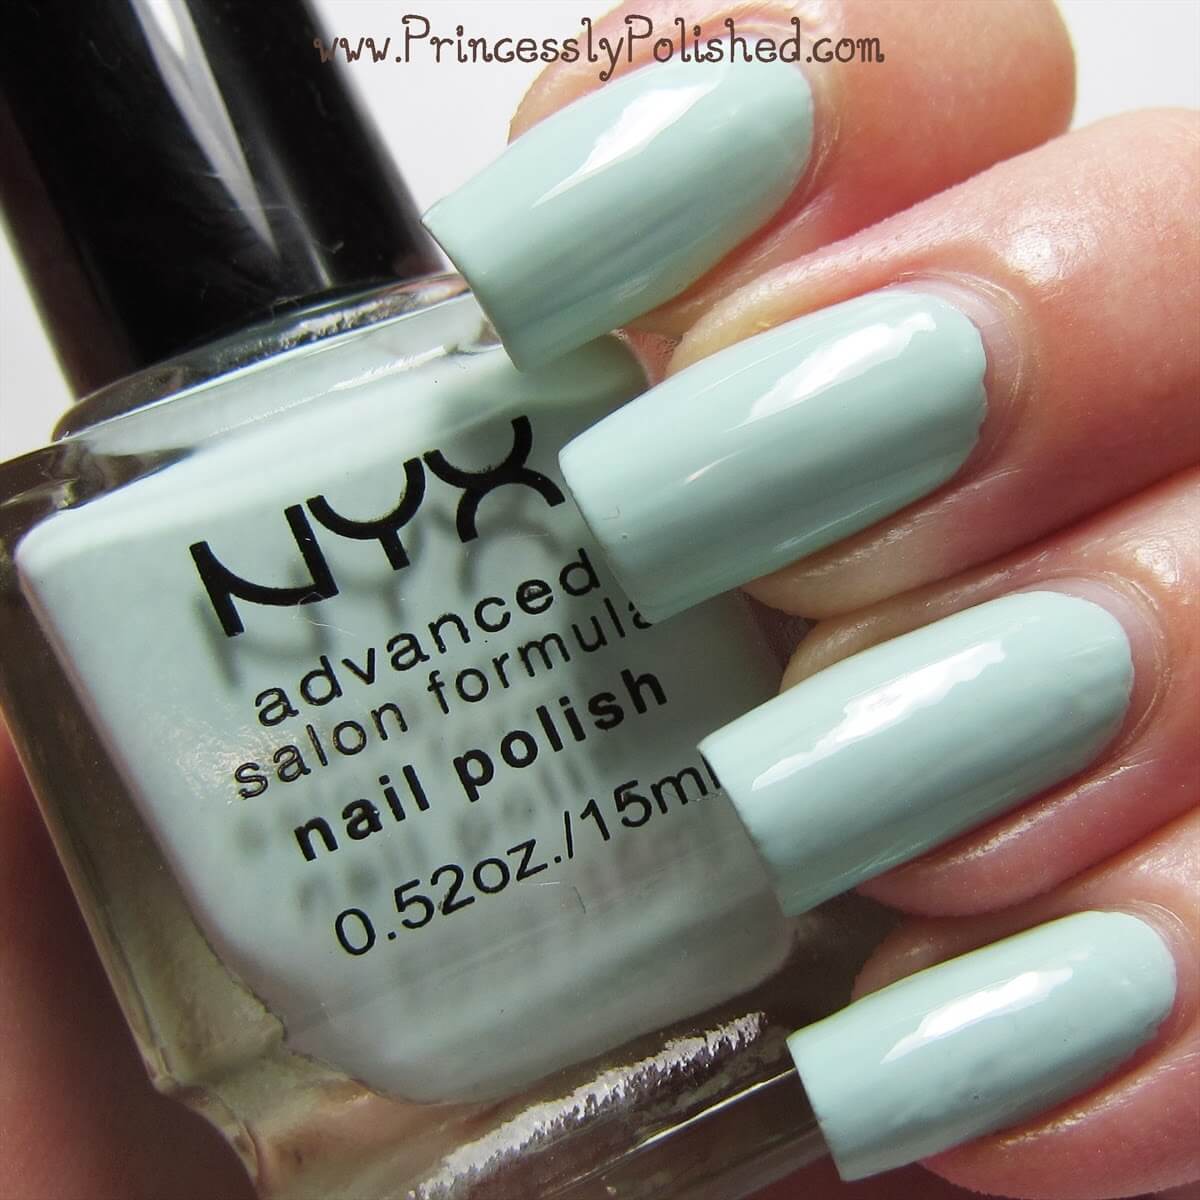

Pastel Mint

2 coats, plus topcoat

   Nyx gave us blue, green, and blue-green here!  Sitting next to Pastel Blue this definitely has a minty green cast, so it isn't too confusing.  I like the shade but can't say that is the most spectacular mint ever.  It did have good coverage, though.  It also leveled out with topcoat.


Pastel Lavender

2 coats, plus topcoat

   This is a red-toned (but not pink-y) pastel purple.  I have several lavender shades but can't think of an exact dupe for this one.  I really like the color and I think it would work for most skin tones.  Once again this polish was quite pigmented and only needed 2 coats, but needed topcoat to level it out better.


   Here is what I can say about all the polishes:  They have very low odor; I hardly noticed any polish smell at all.  They remove easily.  I love the square bottles which are sturdy and store wonderfully.  The wide, flat brushes are easy to work with.  (Pastel Pistachio and Pastel Mint each had a stray long bristle, but I didn't need to trim it before use.)  And yes, they all had to be thinned.  (Pastel Pink was the least thick of all, but it was also a shimmery jelly instead of a creme.)  Rather than be watery pastels these seem to be so loaded with pigment that they are thick and not really good at leveling themselves out.  I can't really be upset about needing topcoat with most of these when I always use it anyway, but of course I'd prefer for these to have a smoother finish.  I am most impressed by the fact that I couldn't find dupes for any of these in all the pastel polishes I already own!

   They are pastels, though, and it probably isn't good to judge an entire line by just these.  Am I inspired to buy the rest of the Advanced Salon Formula line?  No.  But I will pick a color up if I'm curious about it... and it doesn't have a dupe for half the price in the Nyx Girls line.  What do you think?  If you own any Advance Salon Formula polishes let me know which ones they are and what you think of them, thanks!

Tuesday, August 27, 2013

Laquerlicious - Diamond Diva

Swatch & Review

   This mini might be my favorite of the three I was sent for swatching.  It's hard to say - I'm bad at choosing favorites.  But there is something special about this polish from the All Things Diva Laquerlicious collection.


   First off, it doesn't really make me think of diamonds.  Oh, it certainly brings to mind jewels with it's gorgeous sparkle, and I know that diamonds come in more than clear, but I mostly think of tasty jam when looking at this!  Perhaps jam with crushed up gemstones in it, yes.  But that really isn't important.  What is important is that it is pretty!

   I used 3 coats of Diamond Diva by itself for this swatch.  It was wearable at 2 but the jelly base had a couple sheer spots, so the look of 3 was better.  You could definitely layer this glitter polish over a similar berry-hued shade for opacity, but the depth of three coats on it's own is fantastic.  Diamond Diva wants to dry to a satiny matte finish, I added 2 coats of topcoat to give it a glassy finish that really brought the sparkles out.


   The color of this polish can look a bit different depending on lighting, but it is always a rich, cool-toned color.  I'd describe it as magenta/fuchsia jelly with a bit of shimmer and a lot of microglitter.  The glitters are in shades of pink, purple, and blue, as well as a bit of iridescent glitter that shines orange.  It has a whole rainbow of jewel tones going on!

   Diamond Diva has the same slightly stronger-than-usual smell that Divine Doll has, and I'd say that application is the same, as well.  It does best when you work with it quickly but gently, and give it a few minutes before doing another coat.  By itself it has a slightly lumpy texture from the glitter, but it smooths right out with topcoat.  I love it!  What do you think?
 
   As always thanks for stopping by and having a look!  =)

Laquerlicious Links:

Monday, August 26, 2013

Laquerlicious - Divine Doll

Swatch & Review

   Hey everyone, important quick updates before I get into this swatch post.  First, my computer's screen is still being flaky.  It has decided to work for a bit right now so I took advantage of that by editing as many pictures as I could.  Replacing a bunch of parts has done nothing to keep it working and it appears that it must be a glitch caused by static, instead.  My husband is trying to find a permanent solution.  I'm just going to say that editing my photos on a CRT monitor (or our TV) is not my thing.  I've had a stern talk with my computer about it's behavior, so hopefully things will improve soon.

   Second, and more serious, my pregnant mommy check-ups are now happening twice-weekly.  The great news is that I'm basically feeling fine, and the baby seems to be good, too.  I'm being monitored closely because of my low amniotic fluid level, which can turn into a serious complication.  At any one of these check-ups there is the possibility that I'll be kept at the hospital, probably until our baby is delivered.  At this rate it's not looking like I'll reach my Sept 21st due date.  Personally I'm doing everything I can to hydrate myself and praying that the level will go up!

   So basically, if the blog suddenly goes silent, don't worry too much.  I'll try to keep updates going on Instagram if I can't post them here, so be sure to follow me there.


   Now on to the more frivolous and fun stuff.  ;D  Recently Michelle of the etsy shop Laquerlicious Unity moved some beautiful polishes into the clearance section of her shop, so this prompted a little spree on my behalf!  She was generous enough to send along a few minis, two of which are from her new All Things Diva collection, for swatching and sharing on my blog.  I'm really excited about the colors she surprised me with, because they are shades that I was curious about!


   First I tried Divine Doll.  The shop description is perfect: "a shimmery grape purple with an aqua shimmer and caramel and teal micro glitter" - yep, that's exactly what it is!  The purple tends to looks a bit like a blurple thanks to the aqua shimmer, and it's loaded with small glitters.  I used 2 coats for full coverage.  Application was a tad bit finicky but typical of this type of polish.  For best results you need to work quickly, applying a thin-ish first coat.  It wants to dry fast so if you mess with it too much the heavy shimmer pigment and glitters will start to drag and make bald spots.  So give that first coat a moment to dry and set up on your nail.  Then the 2nd coat applies perfectly!


   I took a bottle shot to try to show off the pretty glitters better.  Between the color purple and the heavy shimmer my camera was at a bit of a loss while photographing my nails.  I love the caramel and teal glitters in this polish!  They really pop, and I don't have anything like this shade in my collection.  This polish is a color combination that I would have never thought of, but totally works!  I was also very happy that it was friendly to my pale skin tone.  May I also point out that this super-duper shimmery polish shows not a single brushstroke?  Hooray for being frost-free!


   Being glitter-heavy, it does have texture when dry.  Not gritty texture, though.  I used 1 coat of Poshe to top this manicure off, and while it wasn't glassy smooth, I didn't notice my nails having texture.  Also, removal... actually not bad!  I soaked a cotton pad with remover, held it on my nail for a few minutes, and most the glitter wiped right off.  I advise against scrubbing at the glitter; then it does turn into a sparkle-splosion on your hands.

   The only complaint that I could mention about this polish is that it has a stronger smell than the other Laquerlicious shades I've tried.  It has the regular polish smell and a little something more.  A sort of sweet, chemical-y odor.  I'm guessing that these might use a different base to suspend all the shimmer, and that would be the cause for a different smell.  (My full-size bottles just smell like typical glitter polish!)  The smell disappears when you apply topcoat, so it is only a temporary suffering!

   Thanks for reading, princess!  Be sure to check out the Laquerlicious shop, and stay tuned for another awesome All Things Diva polish coming up next! =)

Laquerlicious Links:

Tuesday, August 6, 2013

Black Cat Lacquer: Let Them Eat Cake and Essie: Vanity Fairest

Swatch & Review / NotD


   Good day, fellow princesses!  I have a delicate nail look to share today featuring two pretty polishes.  The above photo are my nails modeling 1 coat of Black Cat Lacquer over 2 coats of Essie Vanity Fairest.  I loved wearing this manicure!  Onwards to my reviews!

   I placed my first order with Black Cat Lacquer at the very end of December, and had four pretty polishes show up in January.  I tried a few times to get them swatched, but never did because of the smell.  This was honestly the first time a polish smelled so bad that I couldn't stand to use it.  My bottle of Let Them Eat Cake (and the other 3 colors I bought at the time) goes beyond the usual "smelly polish" scent and heads straight into exterior house paint territory.  I'd know - my day job is selling and tinting paint!  I decided to set them aside until warm weather when I'd try again with open windows.

   It appears that these late-2012 polishes were either made with a different base or perhaps a bad batch of base.  Searching didn't give me any official information other than a few January 2013 reviews and reader comments noting a very strong smell.  A review on one blog said the Spring 2013 colors did not have the awful smell of the previous collection, yay!  In order to attempt to find out the real story I sent Black Cat Lacquer a message asking "Has your polish base changed since last year?"  This is the entire reply I received:
Hello!
Thank you for your inquiry! The base we use has your run of the mill nail polish odor, thanks!

Sabrina R.
Black Cat Lacquer
   So, um, not exactly all-conclusive.  I'm hoping the stink is now a non-issue, at least with colors from 2013.  I have added a few more BCL polishes to my wishlist with cautious optimism, though I'm not entirely sure what to do with the ones I already have...

   You see, Let Them Eat Cake is an awesome glitter topper - clear base, pastel hexes in pink, blue, and yellow-green.  A whole lot of cute tiny white glitter and a smattering of holographic bits.  It's pretty, I loved wearing it, but my bottle smells so bad!  I don't know if it is worth keeping in my collection if I can't stand the smell of it.  We shall see.  I didn't have any other issues with the polish; it mixes easily and the formula and application is perfectly fine.  BCL is also 3-free and cruelty free, which is great!


   Above are my nails with 1 coat of Essie Vanity Fairest.  This is a polish I found for $1.00!  I tried looking for swatches but none showed the super-pretty glass fleck shimmer it contains.  It is very hard to capture finishes like this, but I think I have done a decent job.  It shows quite well on my thumb, which is wearing 3 coats:


   I really like this polish!  The formula is great and the sheer finish works with 1, 2, or 3 coats depending on the look you want.  It dries quickly and has a good amount of shine without topcoat.  I'm glad that I happened upon it by chance in June.  =)


   Thanks for reading!  If you have any advice on what to do about the stinky glitter polishes, I'd like to hear it.  Do you own any Black Cat Lacquer polishes?  If so, which one and how does it smell like to you?  If not, they can be found at http://www.BlackCatLacquer.com/.

Wednesday, July 17, 2013

I♥NP Angel Burp over Essie Sweet Talker

Swatch & Review / NotD

   My town is currently experiencing a heat wave, with temperatures hitting 90 every day this week.  (In our little arctic suburb, this is a big deal.)  I don't complain about the weather, but I will admit that it has sapped my creativity the past few days!  I come home from work and crash; it's too warm to get up and do things until 8pm when the sun is going down.  So rather than paint my nails last night, I waited and did them this morning.


   I used I♥NP Angel Burp and Essie Sweet Talker.  I looove this easy-on-the-eyes cotton candy combination!  My nails feel so delicate and pretty.  Both of these polishes were untrieds for me, so let me tell you about them~


   Story time!  Essie Sweet Talker is from their 2010 foray into retail sales.  (In fact, it was an exclusive color, so all bottles of Sweet Talker should have a white printed "Essie" on the side, and a sticker with the name on top.)  This color landed on my wishlist right away when I was first getting into polish, and I managed to track down a bottle (along with a bunch of other colors) on eBay.  Then it was put away in a box, where it sat, and sat... and sat.  I have a few Essie polishes I love, but I learned that more often than not I don't like the brand's formula, so I allowed myself to be distracted by other polishes for quite awhile.  I was afraid Sweet Talker would be sheer, pool-y and need at least 3 coats.  Today I'm happy to say that it exceeded my expectations.  I used 2 careful coats, giving it time to dry in between.  It is actually a bit on the thick side - I'll add a bit of polish thinner to my bottle.  The aqua microshimmer in the bottle isn't as visible on the nail, but it doesn't disappear, either.  And I love the pastel blue.  I want a straight-up creme in exactly this color!


   I♥NP Angel Burp is a really pretty glitter in a shimmery clear base.  On my thumb I'm wearing 2 coats, the other nails had 1 coat.  The formula was a bit thick and I did get some teeny bubbles when I was squishing glitter around with my brush - these really only show in pictures.  I topped it off with 1 coat of Poshe and don't have any texture from the glitters; they are thin and lay very flat!

   And what pretty glitters they are.  Satin pink squares and hexes mixed with iridescent squares!  (I'll definitely be combining this with Nyx Girls Dreamy Glitter sometime for a manicure filled with pink pastel shape goodness.)  The iridescent squares shine with a whole rainbow of soft hues, not just the peachy-pink that you see in the bottle!  If you don't already have this glitter and you love it as much as I do, be quick!  This is another discontinued I Love Nail Polish shade, but I saw it is still available at http://www.ilnp.com/ as of today!

Monday, February 11, 2013

Different Dimension: All Red-y In Love Glitter Gradient

Nail Art / Review


   This was actually a practice session that I felt turned out well enough to share.  I love glitter gradient nail art, but I'm not very good at doing them!  In particular the gradients that start at the cuticle and fade out.  Different Dimension All Red-y In Love is packed with glitter and easy to work with, so I think I did okay this time!  My base was two coats of China Glaze Frosty, a pretty white shimmer that is quite sheer.


   This macro shot of All Red-y In Love shows off the glitter, but none of my pictures is showing just how extremely sparkly it is!  A mix of red, pink, and silver holo glitters, including a dash of holographic red hearts.  I had left my bottle upside-down overnight before using it and had no trouble getting to the hearts that way.

   All Red-y In Love is one of the nail polishes I named!   If you'd like a bottle you can find it in the Different Dimension etsy shop.  =)

Tuesday, January 29, 2013

Different Dimension: Vervain

Swatch & Review


   Today I'm sharing another polish that Missi from Different Dimension sent me for review: Vervain.  I didn't actually name this one, but it reminded me of the same flower that she did name it after!  I was browsing the Internet looking at flowers for spring time polish name inspiration when I saw this picture:

Image source: BHG

   Verbena and vervain flowers come is several colors, but I think this white and purple type is the prettiest.  Let's take a look at a bottle shot of this polish!


   It contains small purple holographic hexes and large purple hexes.  The large size glitters are more sparse and you won't end up with as many on your nails as they appear in the bottle, but they are there.  Most of mine ended up buried in the layers of polish.  The milky white base is hiding a very beautiful purple micro-fleck shimmer.  This likes to hide and I couldn't see it on the nail at all, but if you enlarge this bottle shot you can see it in about the middle-right area.


   I wore 4 coats of Vervain for these swatches.  The formula was a bit more tricky that usual for Differnent Dimension.  It was also sheer and that is what it took to get rid of my VNL, but if you're okay with some VNL it was looking good at 3 coats.  If you're totally obsessive over opaque nails or "saving" on your glitter polish you could layer 1-2 coats over white.  That would (probably) still end up being 4 coats of polish, though.  I really like the depth of all the glitter.  I just wish you could see the pretty shimmer!  I have a hunch that you could layer it over another color to get that shimmer to be seen - any suggestions?

   As always Different Dimension polishes are available on etsy!

Monday, January 21, 2013

Laquerlicious: Rainbow Sugar over China Glaze: Sweet Hook

Swatch & Review

   I hope you're in the mood for adorable glitter, because that is what I'm bringing you today.  I was sent a mini bottle of Laquerlicious Rainbow Sugar to try out and review, and for starters I'm wearing it over two coats of China Glaze Sweet Hook, one of my favorite pastel cremes.


   As far as I could tell Sweet Hook was the closest color to the jelly in Rainbow Sugar.  I wanted my nails to resemble the polish in the bottle as closely as possible this time.  Rainbow Sugar is a very sheer jelly glitter, and I'm sure it could be layered over any color, or even used for a funky French manicure (which I really want to try now).


    Speaking of the glitter, I love the mix of colors in this polish!  It is a wonderful blend of pastels and brights, and the finishes are satin or matte so they go together really well.  The hex and square shapes definitely lend themselves to the sugar sprinkle look, too.  The glitter isn't super dense, but I only used one coat and really liked the feel of it.  I did have to fish for the glitter a little bit but I think a major reason for this is working with a mini brush.  The glitter was easy to place and didn't have issues clumping in one spot.  To top off all the glittery goodness this polish has a fine light blue shimmer through it, and it spreads perfectly on the nail for a really nice finish.


   Laquerlicious polishes are sold on etsy.  So far I'm loving the ones I'm testing, what do you think?

Thursday, January 17, 2013

Laquerlicious: Melted Ice Cream over Sinful Colors: Mint Apple

Swatch & Review

   Today I'm sharing a pretty polish from Laquerlicious.  I bought a couple colors that were being discontinued and Michelle (creative genius behind the brand, and yes she leaves the C out of the name intentionally) was kind enough to include 3 minis for me to sample and share on the blog!

   Melted Ice Cream is a blend of shredded glitters in a clear base.  They all have a satin or matte finish, and the colors are black, white, lavender, baby pink, and cherry pink.  Shredded glitter can be finicky but I'm happy to report that I had no issues with rogue glitters trying to stick straight off my nail!  How much I had on each brushload was hit or miss, but that could be in part from working with a mini bottle.  It covered well and I simply dabbed a little extra on the few bare-looking spots that I had.


   This polish really ended up winning me over.  (Even with its abstract 80's confetti vibe.)  It looked cute in the bottle but I wasn't sure if I'd like it on my nails.  Well, I love it on my nails!  The mix of colors is great, especially over my chosen base color...


   Sinful Colors Mint Apple was a polish that I kept seeing, picking up, and putting down.  I really liked it but I already have so many minty green colors, right?  Well, I've finally come to accept the fact that I've turned into a minty/murky/pale green collector and finally snagged it for a whopping $2.  The color is beautiful and the shimmer is wonderful.  Mint Apple is one of those special polishes that looks the same on your nails as it does in the bottle.  It stands out from my other minty colors.  It is a bit sheer, and I did 2-3 coats depending on the nail.
 
   If you're following me on Instagram you probably already spotted this combo, as I posted it with a new tag: #NailsandNintendo  I'm holding my DS in that shot.  I'm not much of a gamer but I love my DS, partly for the fact that I covered it in roses and jewels, yes.  If you paint your nails and you own anything Nintendo related be sure to join in the fun!  =)


   You can buy Laquerlicious polishes on etsy, they are $8.50 for a full-size bottle.  If you would like to own Melted Ice Cream, be quick!  It is on sale for $6.50 and once it's gone, it's gone.  Michelle's customer service is great and the shipping is fairly priced, so I definitely recommend her shop.  You'll be seeing a few more of her polishes on my blog soon!  Thanks for reading!

Monday, December 17, 2012

Zoya - Zuza with Glitter Gradient!

NotD / Swatch

   Really loving the manicure that I have on today!  It gathered compliments from little girls to little old ladies.  Definitely feels like I have a fairy-princess nail thing going on.  And it was super easy!

   I started off with 2 coats of Zoya Zuza.  This is a very pretty aqua/turquoise polish with silver shimmer.  The formula was excellent, and could even be a one coater if I used thick coats, but doing two thinner coats was easier to control.


   Next I grabbed one of my most favorite purple glitters, That Is So Fetch! by Different Dimension.  (Full review here!)  Because my nails are long I started out just painting the free edge.


   I did a second coat starting at about the mid point of my nail to the tip...


   And tada, it's done!  Finished with a topcoat and ready to enjoy.


   What are some of your favorite glitters to use in gradients?  =)