Wednesday, May 29, 2013

My New Favorite Glass Nail Files: From Design Glassware by Mont Bleu!

Beauty Tool Review

   Today I'm sharing two fantastic products that I was sent for review purposes from Design Glassware by Mont Bleu .  They contacted me asking if I'd be willing to test and share their tools, and of course I said yes!  In addition to the files shown above I was also sent tweezers, which will get their own review posted separately.


   I'll start off by saying that I live in the US, and Mont Bleu is located in the Czech Republic.  Their website is easy to navigate and has quick currency conversion for worldwide shoppers.  (In view of fluctuating currencies I will only mention the approximate prices in USD.)  While 2-day rush shipping is available I was happy to see that the shipping on the above 3 items was less than $5 if you could wait for Priority Airmail!  That is a fair price, and competitive with US-based businesses.  These items also arrived well-packed in a box with plenty of bubble wrap, so they were safe and sound in their individual cases.

   Mont Bleu has opened their Online shop, aptly named Design Glassware.  They specialize in items decorated with Swarovski crystals and have a wide range of decorated files.  So, lets take a look at what they sent me!

   If you're not familiar with the benefits of using glass files, here is a quick run-down.  The abrasive surface files your nails in a gentle way, and is generally faster than using an emery board.  Being made of glass, they can be washed to keep them sanitary.  They don't wear out and need replacing, and they are stylish.  Glass nail files are an eco-friendly, long term investment!


Foot Scraper File - product page (about $21 USD)

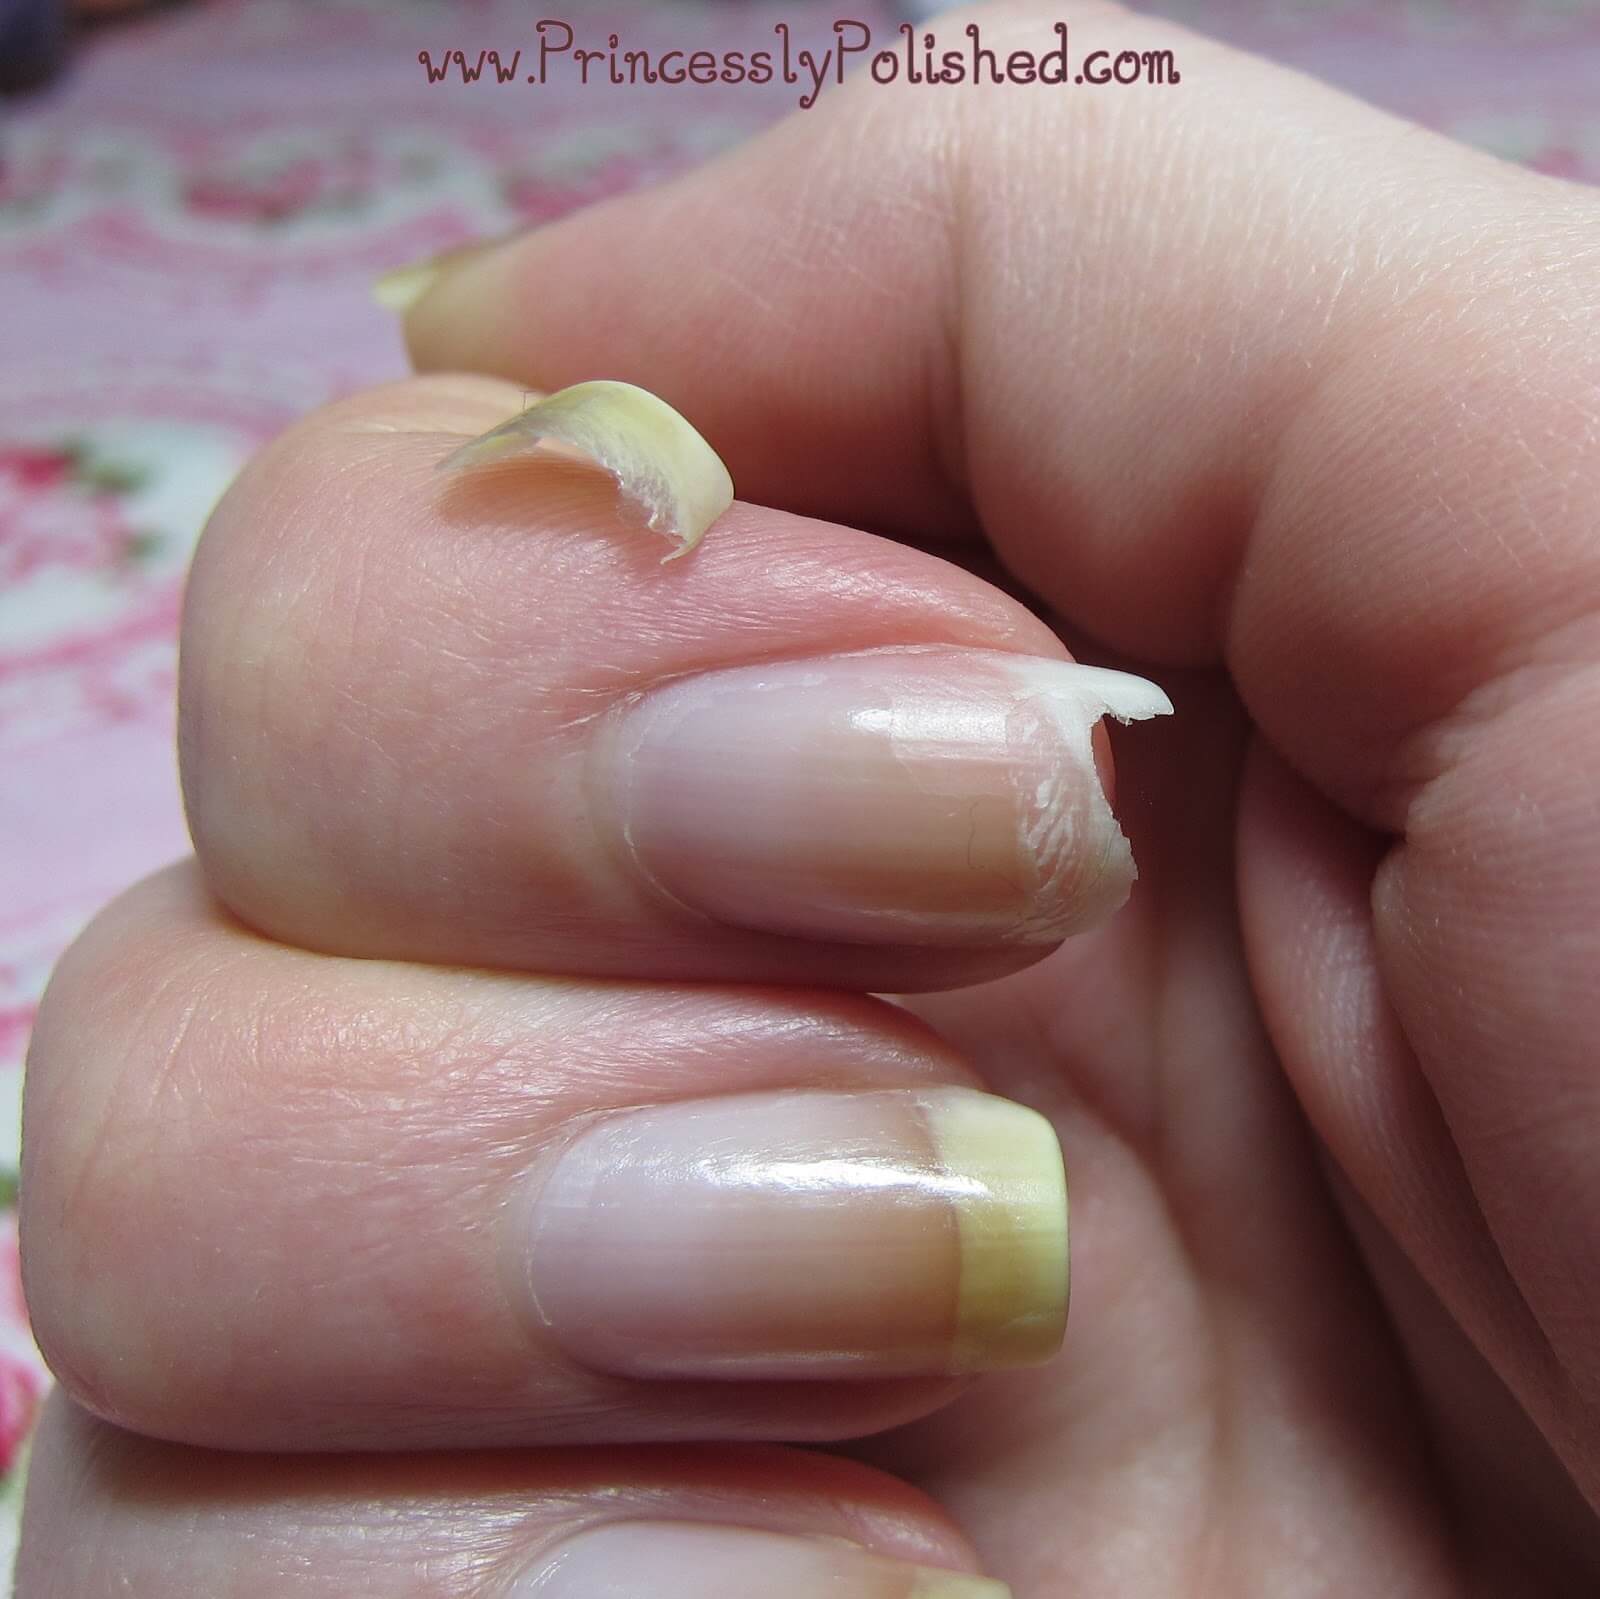
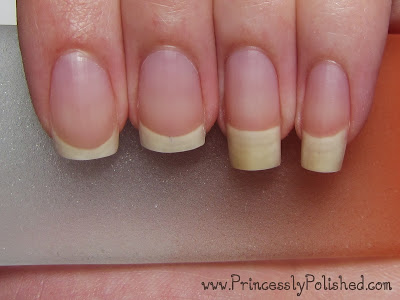
   Alright, I'll admit that the extra-large orange file is not intended for nails... it is meant for removing callouses.  However, I don't really have much by way of rough foot skin.  What I do have are fingernails that fare best with filing to remove length, rather than typical trimming.  Filing off length is a time-consuming process, and the average glass fingernail file is not beefy enough for the task.  When I received this foot file I was excited to try it on my nails.

   The file has a lot of heft to it compared to the usual nail file, but is easy to hold.  While one side is more abrasive than the other, both qualify as 'high grit'.  The edges are rounded and abrasive, as well.  Care should be taken that you don't accidentally scratch anything by being clumsy with it, and I'll be sure to keep it in it's clear case when I'm not doing a manicure.

   Recently my nails grew out very long without any breaks.  They were sort of fantastic, but on the verge of being dangerous.  It was the perfect time to try this file!


   This big tempered glass file works perfectly for my needs.  It removes length very quickly and it won't get worn out with continued use.  I definitely prefer it over the emery boards I had been using.  I also tried washing it and it came clean with a quick rinse under water.  Considering the time saved filing and the fact that I won't have to keep buying disposable files this product is definitely worth the price!


Crystal Glass Nail File - see the collection (about $13 USD)

   I didn't find the exact color and design of file they sent me for review, but they have a variety of designs to choose from.  I like the happy yellow crystals on my file, and they really pop when stored in the velvety black sleeve.  The tempered glass has a very fine abrasive grit.  I found it to be very effective for filing without having to use much force, and a very light touch is all I needed for buffing the edges of my nails.  The file is slim, easy to use and rinsed clean easily.  This is a high-quality nail file and reasonably priced for being decorated with Swarovski crystals.


   By the end of my manicure session my nails were happy and I was converted to these glass files.  I have other "no name" glass files in my stash that were just... okay.  These I'll be reaching for again!

   I am very impressed with these products from Mont Bleu.  I may not have ever found anything like the foot file if they had not contacted me, and now I don't ever want to be without it!  I highly recommend checking out their shop; they have all sort of goodies.  What item catches your eye?
   Disclaimer:  These products were sent to me free in exchange for an honest review.  This in no way affected my opinion of them!  All thoughts in this post are my own.  See my full disclosure here.

Friday, May 24, 2013

Pastel Flowery Water Marble & Glitter Nail!

Nail Art

   Quite often when I do nail art my hands don't match.  Partly from "creativity", partly from getting to experiment more per manicure!  So after finishing my right hand in a rainbow gradient I decided to use a mix of all those colors for my left hand.  In case you missed all the water marble fun in my last post, here is the right hand design:


  I'm getting a little better at making the designs and figuring out placement on my nails.  I'm really happy with how my thumb turned out as I didn't think I'd get that much of the design on my nail.  =)  The colors I used were China Glaze Light As Air, Something Sweet, Peachy Keen, Lemon Fizz, Re-fresh Mint, and Bahamian Escape.  I had already painted my nails with two coats of Zoya Purity to give them a nice blank canvas, so they came out true to bottle color.

   Anyway, back to my left hand!


   It was pretty easy deciding which colors to pair up on my nails.  Index finger got the secondaries: purple, orange, green.  Middle finger had pink, yellow, and blue, though yellow and blue tried to create green.  My pinky was done in green, purple, yellow and pink.  Love it!  I was brave and tried to use all the colors on my thumb.


   All the colors are there, but sadly Bahamian Escape blurred into an odd dusty color between Lemon Fizz and Peachy Keen.  Also, a piece of fuzz stuck into my nail!  Bummer!  Six colors in one marbled nail is a bit much, four or less works better.

   As an accent nail I used my new unnamed Claire's polish over the white base.  (See swatches of the collection it came from.)  I did two coats and this ultra-cheap glitter did not disappoint!  It has a perfect rainbowy mix of colors over white.  I'll definitely be using this glitter polish again.  Anyone know of a dupe for it?


   This is my favorite water marble so far, and I really enjoyed wearing it this week!

Wednesday, May 22, 2013

Vacation's-End Water Marble Manicure Party!

   Greetings fellow Princesses!  How has your month of May been?  My husband and I are back from our travels and it has been back to "the real world" for us.  At the beginning of this week my Mom helped me arrange (or pulled me into) a really fun get-together where I was expected attempted to be a good teacher and show some friends how to water marble your nails!  I knew it was going to be fun no matter what, but I was really pleased with how everything turned out!  =)

   First off I spent time before the party practicing my marbling skills.  This was helpful because I needed to feel comfortable, and I was able to test polishes to bring with me to the party.  I tried to make many different styles of marble designs to show what a variety you can get.  Everybody got to look at these beforehand for some inspiration.


   There were six of us altogether, so I set each of us up with a dish of filtered water and the necessary tools.  I talked about the process, then had everyone stand close by as I did my first nail.  That was all it took!  Everyone rushed back to their nail stations and started doing their thing!  These were the results.  (Please keep in mind that these are candid, before-clean-up shots that I snapped in fairly poor indoor lighting!)


Miss Heather's Nails
Colors Used:  China Glaze Four Leaf Clover, Sally Hansen Mint Sorbet, and her own coral from Spoiled
   These colors really pop together!  Heather says she is inspired to let her nails grow longer to do more marbling, but in my opinion this shows how great marbling can look on short nails, too.  Lots of great swirls here!  (One of the highlights of the party was when she forgot to mask off her thumbnail and her whole thumb came out with a beautiful swirly design.  I assured her it happens to everyone eventually!  Water marbling is messy business, and when you get a lot of polish on your hand it's easiest to let the polish dry on your skin, then wash it off with soap and water.)


Grammee's Nails
Colors Used:  China Glaze Aquadelic and Sinful Colors Hazard, with China Glaze Riveting accent nails
   My grandmother is awesome.  Not one of those ladies to go get a boring manicure from a salon, she does her own nails and comes up with great layering combinations.  Now, she water marbles!  (Yes, I have had quite the influence on her.)  Her nails look great and she's definitely getting the hang of it!  I can't wait to see what she tries next.


Michelle's Nails
Colors Used: China Glaze Blue Iguana, 108 Degrees, and Senorita Bonita, also as a solid color
   My friend and fellow polisher Michelle snapped up these sparkly glass-fleck hues that look fantastic together, and especially good on her!  She did the more conservative "marbled nails as accent nails" approach, which left her with more time for clean up afterwards.  I'm inspired to try a manicure like this some time!


Mom's Nails
Colors Used:  Essie French Affair, Bachelorette Bash and Little Brown Dress
   She started off with her own Zoya colors that refused to marble on the water, so I switched her to some of my Essie polishes that would give a similar look.  (The sad truth is that not every polish works for water marbling.)  Fortunately these shades are super easy to marble with and she ended up happy!  I think we could vote her nails as Most Swirly; she went for an every-nail-unique look.


Ruth's Nails
Colors Used:  Sally Hansen Lacey Lilac, Zoya Caitlin and her own Wet 'n Wild dark purple
   Ruth got away before I could take a pre-clean up photo.  Don't let her professional after shot fool you - she had the most polish on her hands!  ;D  But wow, this sure doesn't look like a first time water marble, either - these nails are great!  And rather than fight with marbling her thumbs she painted them solid.


   Everyone did a fantastic job, had a great time, and all agreed that they wanted to keep going after they had ran out of nails to marble.  Success!  It made me really happy to be able to do this with my friends and family.  Oh, I that's right, I did my nails, too.  By the end of the party I only had about 3 nails done on my first hand because I tried to be there to get people more supplies and advice as needed.  This was the result on my right hand:


   I was going for a marbled rainbow gradient, and I'm pleased with the effect, though I think I could have picked some better colors.  The colors, from top to bottom are China Glaze Light As Air, Something Sweet, Peachy Keen, Lemon Fizz, Re-fresh Mint and Bahamian Escape.

   I also want to take a moment to thank my Mom for hosting the party, those who supplied the tasty snacks we had, and everyone who enjoys these awesome nails!  If you haven't tried water marbling yet, do!  If you already know how, host your own party!  =)

Friday, May 17, 2013

Claire's Sugar High Nail Polish Set

Swatch & Review

   At the end of April I managed to score this really awesome set of glitter-filled polishes for a mere $1.00 from Claire's.  Clearance shopping is my favorite type of shopping!  While I feel a little bad about showing off something that is probably going to be hard to find (and not all stores do the $1.00 sale at the same time), these were too intriguing not to share.  Here is the picture straight from Claire's website:

Image credit: claire's.com product page
   It isn't very color accurate, but it shows you what the polish packaging looks like, and if you can't find the set locally you may be able to snag them Online!


   I did swatches on a nail wheel at both 1 and 3 coats, so let's take a look at each polish by itself!  The polishes don't have any individual names, so I'll just be calling them by color.

Neon Pink Rainbow:
 

   This color is pretty awesome.  I'm not a fan of neon colors but the addition of multicolored glitter in two different sizes works surprisingly well.  It dries fast to a matte neon finish.  I left my swatches matte, but I'll try it with a shiny topcoat when I get around to wearing it.


   I was afraid neon polish and glitter would be a horrible mix, but this was surprisingly easy to work with.  The base polish has a transparent quality, so either plan to use at least 3 coats or layer it over your favorite neon pink polish.  I didn't have any problems getting the glitter to spread, but I was also sure to take time between coats.

Toxic Monster Green: 


   This grass green polish is loaded with two sizes of metallic rainbow glitter, but the colors that stand out the most are orange, fuchsia, red, and silver.  It gives off a tossed salad vibe.  This polish seems the least glitter-packed out of the entire set, with more large glitter than small glitter.


   The green base of this polish is a sheer jelly so it would definitely need to be layered over another green to look it's best, but that also keeps it looking shiny.  I was happy with the glitter coverage and the fact that it didn't get lost in a too-thick creamy polish.

Aqua Rainbow Reef:


   I think this polish should qualify as mermaid approved!  Once again it ended up being a sheer jelly polish so unless you actually are a blue-tinged mermaid girl it will probably need an opaque base color to be looking it's best.


   The glitter in this polish was a tiny bit more finicky to work with than in the other colors, but I was still pleasantly surprised by the consistency and ease-of-use.  Everything dried looking shiny, too.

Cool Pink Rainbow:


   I thought this might be a rebottling of Claire's polish Candy Shop, but this is clearly a paler base color.  I had passed on Candy Shop because that warm pink would have majorly clashed with my skintone.  This one is much more french manicure friendly.


   I ended up liking this one even more than I thought I would, probably because it manages to look different from LA Colors Candy Sprinkles.  Being jelly based but not patchy should make it a good one-coater for a glittery french manicure, too.

Rainbow Iridescent:


   Swatched last and expected to be least favorite out of the set, this polish was a surprise winner.  I swatched it over a half-black nail, but what I really want to try this over is white, because the large glitter pieces reflect a whole rainbow of pastel colors.  I only bothered doing one coat because I don't think this polish would benefit from layering like the others do.


   It's quite packed with glitter!  I spot the full roygbiv of iridescent glitter in there, and in a pretty even ratio, too.  Generally these polishes lean distinctly toward one color, and it gets a little boring.  The clear base makes it very versatile, so this one is a keeper!


   This set ended up being fantastic, and I would recommend picking it up even if it is only marked down to $5.00. Claire's mini size is 7.5ml, pretty generous, and these don't seem to be available in full size as singles.  I was leery of the polishes being low quality, gloopy messes but that wasn't the case at all.  My one peeve would be that these don't contain any mixing balls to stir the polish, but so far there haven't been settling issues.  These are definitely candidates for using on my Peel-Off Aqua Base Coat for easy removal.  These aren't gritty but they do have glitter texture, so use topcoat accordingly.  Hopefully you can find them if you fall in love with them like I did!

Friday, May 3, 2013

Back From My Break... To Go On Vacation!

   Hi there, do you remember me?  Rochelle, that girl who was doing something I think we call "blogging" at the beginning of the year?  Yeah, I've been away for awhile.  I apologize for my unexplained absence, but I promise it was for good reasons!  I'm keeping this post short, but I do have some nails to share:


   I did these nails at the end of April.  A super quick manicure of China Glaze Fairy Dust and nail stickers!  Fairy Dust is far more pretty in person than in pictures - it has so much sparkle!


   And one thing I'd like to share about my blogging break is that it included my nails, as well.  I wasn't sharing any manicures on Instagram simply because I wasn't painting my nails - I could hardly even keep them shaped!  Check out what I deem my Most Hideous Nail Break Ever, which happened in March:

Yikes!  That really hurt!

   My nails are doing so much better now, and are finally stain free.  I'm hoping to keep them that way!  I'm sure that will only last until I'm craving a good black polish manicure (and then another, and another) though, haha.


   Anyway, what's this business about me going on vacation?  Didn't I just take 2 months off?  Am I ever going to blog for real again?

   Yes, I will be blogging again!  I have some fun reviews to do and plenty of polish to swatch.  In fact, I have a few posts scheduled to go Online while I'm on vacation, so it shouldn't be too quiet around here.  Some of the posts will be special announcements, too.  =)

   I'll also be sharing vacation photos via Instagram as I travel, so follow me there if you're interested in some East coast scenery.


   Thanks for sticking around during my long break, and hello to the new followers of my blog, too!  I wasn't logging on to my blog every day, but every time I did I saw that I'd had a gain in either followers or page hits.  That's pretty awesome, and it means a lot to me.   See you again soon!