Showing posts with label pink. Show all posts

Friday, June 27, 2014

Rainbow in the Clouds Manicure

Nail Art


   Here is a manicure I created using the new Sally Hansen Color Foil polishes.  They were perfect for this technique, which is much simpler to create than you might think!  Yes, this is the art that was originally meant to go over Raven.  But this base color was more fun - it glows in the dark!

Friday, June 13, 2014

Glow-in-the-Dark Galaxy Manicure

Nail Art


   Hello!  This is a big post for me, and I don't just say that because it's image heavy!  This is my first-ever "galaxy nails" attempt!  Which turned out quite nicely... for a first attempt, at least!  I've been inspired by all the beautiful galaxy and nebula manicures, in particular the ones that play around with colors beyond the typical spacey black, blue and green.  Thus my choice of a deep burgundy and pink scheme!

   Read on if you'd like to see a bunch more pictures (including glowing ones!) and hear about what I used.  I was surprised by how easy this ended up being, though I didn't take a picture of what  used, it was a combination of dotting tools, make-up sponges and a thin nail art brush.

Friday, March 14, 2014

ILNP: Absolute Zero & Zoya: Emme

Swatch & Review

   I'm currently getting over a cold (which is why I missed posting on Wednesday), while also dealing with a really cute baby that has decided not to stay asleep at night for the past two weeks.  My husband and I have been in a perpetual state of running-on-empty.  I've been depressed about my inability to get things done, but looking on the bright side (literally, since the sun is out and our snow is melting!) I do have a lot to be thankful for.  My very supportive husband, a generally healthy family, and getting to watch all the amazing accomplishments of our baby girl.  Little Freya will turn 6 months old tomorrow, is getting used to being spoon-fed, loves to sit up on her own, and yesterday she said her first word: "mama".

   The manicure I'm sharing today is one that came from poking halfheartedly through my untrieds, and then being surprised with how much I enjoyed wearing it.  The nail polish from I♥NP is called Absolute Zero, and it was an exclusive color only available with pre-orders some time back.  In all honesty I wasn't too enthused about it, navy blue isn't my thing, but I did pre-order some polishes, thus it ended up in my collection anyway.


   My swatches show 1 coat plus topcoat; I'm especially impressed that I only had to use 1 coat for a nice rich finish.  Absolute Zero has a slightly metallic and holo-infused finish.  It ended up being quite pretty in person and had a lot of life on the nail.    Sadly it doesn't come across very well in my pictures, and it also didn't seem to get along with my Poshe fast-drying topcoat, which was causing the polish to pull up around my cuticles.  I also found I had tipwear much faster with this manicure than I normally do with any other ILNP color.

Friday, February 21, 2014

ILNP: Washing Ashore & Zoya: Bobbi

Swatch & Review


   I've been so busy lately that I have fallen into a 1-mani-per-week routine.  Fortunately when I'm wearing polishes this gorgeous I'm happy to have them on my nails for a week!  Let's take a look at ILNP Washing Ashore and Zoya Bobbi, shall we?

Monday, January 13, 2014

ILNP: Animal Cookie over Zoya: Rocky

Swatch & Review


   How awesome is this combination of polishes?  ILNP Animal Cookie is one of the first polishes I saw from the brand, and it immediately landed on my wishlist.  It took awhile for me to get it it, but it was worth waiting for!  I used one coat for my swatch, and the glitter spread nicely.  I dabbed a little extra into a few bare spots and then it was perfect.  The mix of white and pink glitters pops over my base of Zoya Rocky.  Rocky is a semi-dusty turquoise blue creme, and I only needed two coats.

Friday, November 22, 2013

Nfu-Oh #62 and China Glaze: Hello Gorgeous!

Swatch & Review


   Sunlight picture, yay!  I've already shared Nfu-Oh #62 before on my blog, but I've had these polishes for so long that my nails and photography skills have improved to the point that I really ought to reswatch them all!  Anyway, #62 is the linear holographic polish.  It takes 2 coats.

   China Glaze Hello Gorgeous! can be built up into a textured glitter polish because the soft pink glitter nicely hides any bare patches!  I used 3 coats by itself (no topcoat, no "underwear") for a look very similar to what I did with China Glaze Glistening Snow.  Next time I wear this I'll try it as a single-coat topper over a dark color.

Tuesday, September 10, 2013

Laquerlicious: Melon Sorbet with Watermelon Nail Art!

Nail Art / Swatch & Review

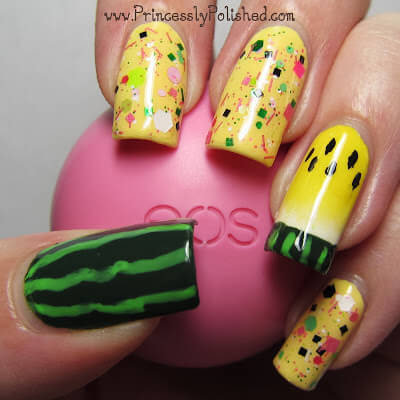
   Good day, Princesses!  Last month when my Laquerlicous polishes arrived in the mail I was immediately inspired by this one.  It was calling out to me from the bottle and I knew I needed to use it in a melon-y manicure ASAP.  I wanted to make the glitters pop, so I couldn't do just a regular pink/red watermelon design.  I thought of trying a nice cantaloupe color, but there is a funny thing about watermelon...


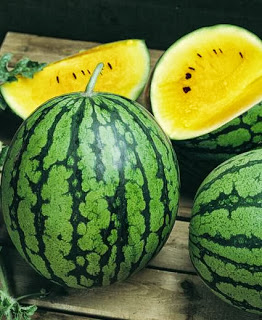
   It's a fruit, it's a vegetable.  It's not technically a melon.  And when it grows without the red pigment-giving antioxidant lycopene... it comes in the most lovely shades of yellow!

Photo source: whataboutwatermelon.com

   I must admit to feeling quite clever about remembering that yellow watermelons are indeed "a thing".  You see, I've never actually found one in person.  They just aren't common in our area.  I'd love to try a slice, though!  They sound like they taste fantastic...  Anyway, nail polish, yes.


   Laquerlicious Melon Sorbet is such a fantastic glitter topper.  I mean, just look at this macro!  It is full of satin and matte shapes in happy shades of pink and green, along with a dash of black and white.  It's the perfect blend of color variety and glitter sizes, easy to work with, and has perfect topper coverage at one coat.  Each nail ends up looking totally unique (without looking chaotic) and there is no need to do glitter fishing.  Though I did fish out the pastel pink circle for my index nail - I saw it in the bottle and I wanted it!  I could go on, but that would probably be cruel.  Right now this polish is on clearance, and there aren't many bottles left.  I'll just say that if you missed this one, I feel very sorry for you.


Details on the nail art:
   Pastel yellow glitter nails: 3 coats China Glaze Lemon Fizz and 1 coat Laquerlicious Melon Sorbet.  Topped with 1 coat of Gelous and 1 coat of Poshe.  (Only used Poshe for the other nails.)
   Melon slice accent nail: Lemon Fizz base with China Glaze Happy Go Lucky sponged at the cuticle for a riper, sweeter-looking melon, black seeds using a nail art striper (L.A. Colors Black), and Zoya Purity sponged at the tip for a realistic fade into the rind..
   Melon rinds:  Base color is Zoya Hunter with squiggly lines done with a bright green nail art striper (L.A. Colors Mint Green).

   I'm a nail-art novice, so I am really happy with how these turned out!  I actually wore these nails at the end of last month; editing the pictures now and seeing them again made me happy all over again!  It's only summer for another week, so it was a perfect time to get my melon on.  Haha.


   If you'd like to see more about yellow watermelon, check out this article on wiseGEEK and this recipe for, what else?  Yellow watermelon sorbet!  Also, if you've ever had the chance to eat yellow watermelon please leave a comment telling me about your experience!  Until I find it myself I'll have to live vicariously through others.  =)


   This might be my last blog post for a little while.  My previous OB appointment revealed that I can basically go into labor at any time (Yay!  ...I think?), and if I don't by this weekend I'll probably be induced (having issues with low fluids again, thus the constant monitoring).  In fact, as this post is going live I'm heading off to one more appointment, where I guess they could say "we're keeping you now".  But I'm hoping that doesn't happen...  Either way, I don't know that I will have much of a brain for blogging.  Most of my time off this week has been spent cleaning, packing, and napping.  ^-^  Until we see you again, hugs and kicks-es from the baby and I! ♥

Friday, September 6, 2013

Nyx Advanced Salon Formula Nail Polish - the Pastels!

Swatch & Review

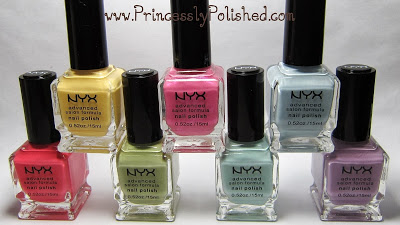
   It's no secret that I looove Nyx products.  I have a whole slew of their eyeshadows, lipglosses, and of course nail polish.  When it comes to the polish I mainly have bottles from their cheaper Nyx Girls line.  I don't often see anything about these Advanced Salon Formula polishes.  So, I've been really curious about their quality.  Finally I decided to just go for it and try all of the pastel colors.  That is, the colors that have "pastel" in their name, and happen to go in sequential numerical order...


   I present to you swatches of Nyx Advanced Salon Formula: Pastel Yellow, Pastel Pink, Pastel Blue, Pastel Coral, Pastel Pistachio, Pastel Mint, and Pastel Lavender.  Let me start off by saying that I added a bit of nail polish thinner to all of the polishes because they were slightly thick, and I wanted them to be flowing a little better!  Not sure if this was because of sitting around or if these are all normally thick polishes.


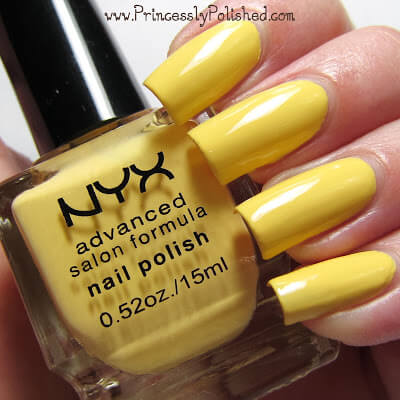
Pastel Yellow

3 coats, plus topcoat

   This buttery yellow wanted to photograph a bit more vivid than it looks in person.  I had to use 3 coats for opacity, it looked streaky otherwise.  My topcoat helped to level the color out better.  I can't fault a pastel yellow for being a 3-coater, they usually are.  The color is very nice (a bit warmer than China Glaze Lemon Fizz).


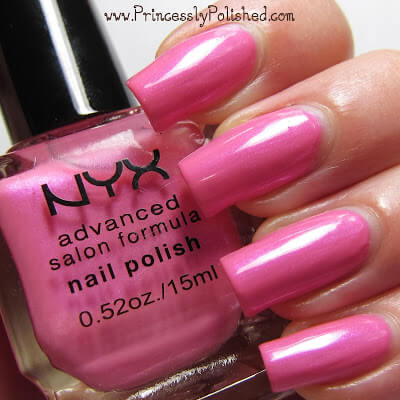
Pastel Pink

4 coats alone

   This polish stands out as the lone shimmer in this group of pastels.  I could tell from the Online swatch that it wasn't going to be a plain creme finish, and was hoping for a hidden-shimmer creme instead.  This is more of a pink jelly with ultra fine pinky-purple shimmer.  I was surprised by how much I ended up liking the shimmer and even the color (I'm picky about pink polish), but the formula leaves much to be desired.  This wasn't as thick as the other pastels, but it was super sheer.  It went on streaky, patchy, blah...  Took 3 coats to look decent and 4 for me to be happy with the effect on my nails.  Shorter nails could be okay with 3.  I'm torn about this one. The squishy jelly effect is pretty, and the shimmer is brushstroke free... but I don't have patience for 4 coats of one polish!


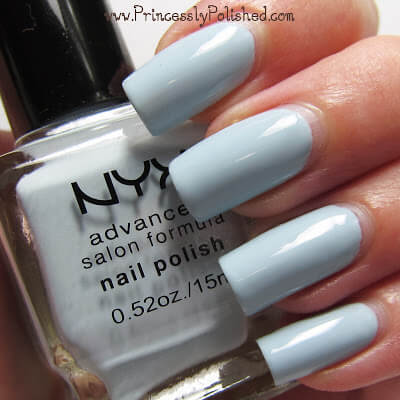
Pastel Blue

2 coats, plus topcoat

   This is one of the colors I was most hopeful about, and I wasn't let down.  It is the best polish out of this pastel bunch.  Despite how pale a blue it is I only needed 2 coats, and it was the most willing to self-level out of all these colors.  I added topcoat and that only made it look more perfect!  I really love this light powder blue, and I think it will be a great base color for nail art.


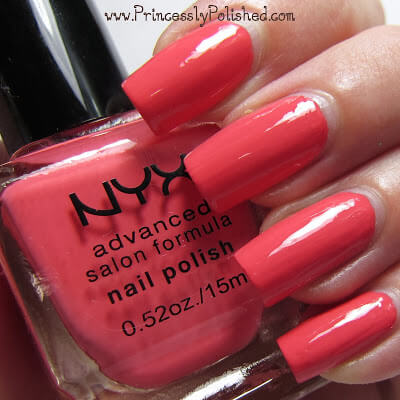
Pastel Coral

2 coats, plus topcoat

   I don't often go for coral, but I did want to add a not-too-bright shade to my stash for nail art.  This color fits the bill nicely.  It's a pigmented true coral without being an eye-searingly bright shade or too warm for my skin.  On the note of pigmentation, this one did want to stick to my cuticles at removal time.  It took a little more remover than the other shades did to completely rid myself of its coral tinge.  This polish was thick and didn't want to self-level, so topcoat is a must.


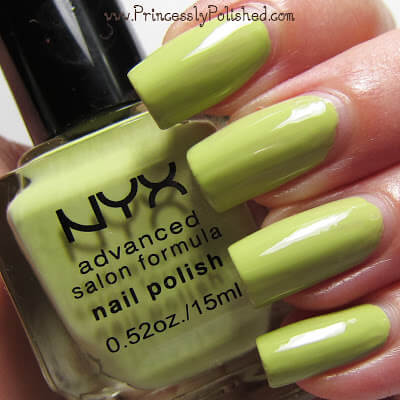
Pastel Pistachio

2 coats, plus topcoat

   This really is pistachio green!  While the color names aren't super creative at least they are spot-on...  The coverage was good for a light green, good at 2 and surely better with 3 coats.  It is also on the thick side and needed topcoat to level it out more.  So, not the perfect polish but fully tolerable for a shade that is usually finicky.


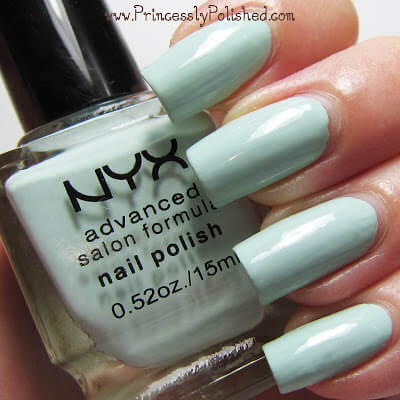
Pastel Mint

2 coats, plus topcoat

   Nyx gave us blue, green, and blue-green here!  Sitting next to Pastel Blue this definitely has a minty green cast, so it isn't too confusing.  I like the shade but can't say that is the most spectacular mint ever.  It did have good coverage, though.  It also leveled out with topcoat.


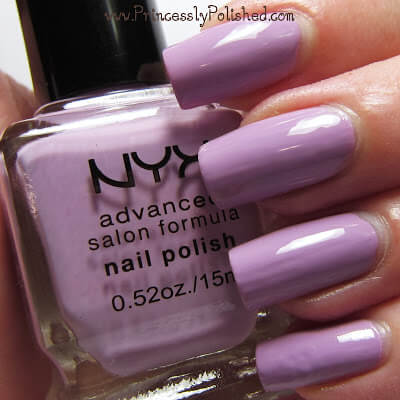
Pastel Lavender

2 coats, plus topcoat

   This is a red-toned (but not pink-y) pastel purple.  I have several lavender shades but can't think of an exact dupe for this one.  I really like the color and I think it would work for most skin tones.  Once again this polish was quite pigmented and only needed 2 coats, but needed topcoat to level it out better.


   Here is what I can say about all the polishes:  They have very low odor; I hardly noticed any polish smell at all.  They remove easily.  I love the square bottles which are sturdy and store wonderfully.  The wide, flat brushes are easy to work with.  (Pastel Pistachio and Pastel Mint each had a stray long bristle, but I didn't need to trim it before use.)  And yes, they all had to be thinned.  (Pastel Pink was the least thick of all, but it was also a shimmery jelly instead of a creme.)  Rather than be watery pastels these seem to be so loaded with pigment that they are thick and not really good at leveling themselves out.  I can't really be upset about needing topcoat with most of these when I always use it anyway, but of course I'd prefer for these to have a smoother finish.  I am most impressed by the fact that I couldn't find dupes for any of these in all the pastel polishes I already own!

   They are pastels, though, and it probably isn't good to judge an entire line by just these.  Am I inspired to buy the rest of the Advanced Salon Formula line?  No.  But I will pick a color up if I'm curious about it... and it doesn't have a dupe for half the price in the Nyx Girls line.  What do you think?  If you own any Advance Salon Formula polishes let me know which ones they are and what you think of them, thanks!

Wednesday, August 28, 2013

My Picks From the L.A. Girl 3D Effects Holographic Collection

Swatch & Review

   I have several polishes to share today, princesses!  Prepare your eyes for a feast of sparkly goodness!  If you were a fan of the jelly-with-holographic-microshards beauties Aurora, Blaze and Storm that Zoya released you will like these, too!  I couldn't resist trying these new L.A. Girl polishes, and seeing how they compare...

From left to right: L.A Girl 3D Silver, Teal Dimension, Brilliant Blue, Sparkle Ruby, and Dazzling Pink

   The 3D Effect collection has 3 more polishes that I did not pick up: Electric Coral (I'm not really a coral-wearing girl), Purple Effect (looks like an exact dupe of Zoya Aurora, which I already own), and Black Illusion (a dupe for Zoya Storm, again I already own that polish).  All of them include the same silver holographic microshard glitter in a jelly base, except for 3D Silver, which is a clear-based glitter.  On to the swatches!

Top to bottom: Teal Dimension, Brilliant Blue, Sparkle Ruby, Dazzling Pink


Teal Dimension 

   I used 2 coats, no topcoat.  This is a true, deep teal color.  It reminds me of jewels and peacock feathers!  The jelly coverage is fantastic while still being sheer enough to show off a lot of holographic sparkle.  Very beautiful and a great color for heading into fall and winter.


Brilliant Blue 

   I used 2 coats, no topcoat.  Deep sapphire blue.  It brings to mind the night sky or ocean depths.  Not normally a color I would grab but the finish and look of this is irresistible!  It should be perfect as a base for nail art or sponged into a galaxy manicure.  I think the darker jelly base gives an illusion of less or smaller pinpricks glitters.


Sparkle Ruby 

   I used 2 coats, no topcoat.  Deep burgundy-red.  I absolutely love this color and was really surprised not to find any swatches of it while picking colors to buy from this collection!  The darker base makes it look less glitter-packed, but it sparkles beautifully.  And yes, Sparkle Ruby seems to be an exact dupe for Zoya Blaze!


Dazzling Pink 

   I used 2 coats, no topcoat.  Fun, flamingo-ish, warm toned pink.  This color was the most sheer and could probably use 3 coats.  It really shows the glitter!  I was on the fence about ordering this color because I'm picky about pinks, and sadly I don't think this one is the right shade for me.


L.A. Girl 3D Silver, 2 coats alone and 1 coat over black


3D Silver 

  Again, no topcoat used.  If you love the glitter but don't like any of the colors in this collection, this would be the polish to get.  It isn't going to have quite the same depth as the jelly-based colors, but it layers over any color to create an effect that looks the same from arm's-length away.  This is definitely a topper, I imagine it would take 5 coats to try to get the glitter opaque by itself.

   I'm going to talk about formula now because these all had the same formula!  In most reviews I found the swatcher said the polishes were thick, but that was not the case for me.  They aren't thin and runny, but they are very easy to use.  I didn't have any issues with pooling, dragging, or glitter being uneven.  Also, they dried fast.  I didn't use topcoat because they dried to a perfectly smooth, glassy finish all on their own.  Durability was good; I only had minor tip wear after a full workday.  Removal was a breeze, as well.  In my opinion these are all real winners.

   As for the glitter particles themselves, they are fantastic.  The fact that they are tiny irregular shapes makes the polishes interesting and unique.  The rainbow sparkle is hard to capture in photographs, so please believe me when I say it is there!  And in some lighting these polishes give a very faint linear holographic effect.  Otherwise I would classify these as scattered holo nail polishes.


   While this collection may not be L.A. Girl's most original batch of creations, it worth noticing.  If you were left wanting more by Zoya's holographic jellies last year, take a look at these.  (Don't bother buying repeats of the identical colors, though.)  If you like delicate sparkly toppers, pick up 3D Silver.  If you like solid-performing polishes that can be found for $5 a bottle or less, definitely hunt these down!  Here is the official webpage for this 8-polish collection.  I hope you found my swatches helpful.  =)

Tuesday, August 27, 2013

Laquerlicious - Diamond Diva

Swatch & Review

   This mini might be my favorite of the three I was sent for swatching.  It's hard to say - I'm bad at choosing favorites.  But there is something special about this polish from the All Things Diva Laquerlicious collection.


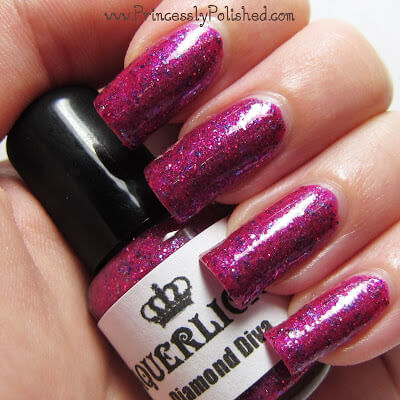
   First off, it doesn't really make me think of diamonds.  Oh, it certainly brings to mind jewels with it's gorgeous sparkle, and I know that diamonds come in more than clear, but I mostly think of tasty jam when looking at this!  Perhaps jam with crushed up gemstones in it, yes.  But that really isn't important.  What is important is that it is pretty!

   I used 3 coats of Diamond Diva by itself for this swatch.  It was wearable at 2 but the jelly base had a couple sheer spots, so the look of 3 was better.  You could definitely layer this glitter polish over a similar berry-hued shade for opacity, but the depth of three coats on it's own is fantastic.  Diamond Diva wants to dry to a satiny matte finish, I added 2 coats of topcoat to give it a glassy finish that really brought the sparkles out.


   The color of this polish can look a bit different depending on lighting, but it is always a rich, cool-toned color.  I'd describe it as magenta/fuchsia jelly with a bit of shimmer and a lot of microglitter.  The glitters are in shades of pink, purple, and blue, as well as a bit of iridescent glitter that shines orange.  It has a whole rainbow of jewel tones going on!

   Diamond Diva has the same slightly stronger-than-usual smell that Divine Doll has, and I'd say that application is the same, as well.  It does best when you work with it quickly but gently, and give it a few minutes before doing another coat.  By itself it has a slightly lumpy texture from the glitter, but it smooths right out with topcoat.  I love it!  What do you think?
 
   As always thanks for stopping by and having a look!  =)

Laquerlicious Links:

Monday, August 19, 2013

Color Club: Miss Bliss & Eternal Beauty with Cloud Art

Swatch & Review / Nail Art

   First off, huge shout-out to my husband for replacing the inverter board in my laptop.  Now the backlight in my screen lights up again, so I can edit my pictures!  Yayyy...  The timing of that part dying last week was really bad - August 15th was my 2-year blogaversary, and I was too busy to bother trying to make a post on a different computer, or more aptly, a different screen.  (I don't want to edit colors on a screen I'm not used to.)  Anyway, happy belated blogaversary to me - celebrations shall ensue. =)


   Photographs don't do this manicure justice.  I did a little cloud design and it hardly showed in pictures...  I used Color Club Miss Bliss (pink linear holo) and Color Club Eternal Beauty (purple linear holo).  Miss Bliss is a slightly deeper shade of pink than Color Club Halo-graphic, because I love linear holos and the color pink I'm happy to have both in my collection!    But they are quite similar and you really don't need both...

   Anyhow, I can rave about the formulas on these polishes equally.  They were super-smooth to apply and very pigmented - wearable at 1 coat!  I used 2 coats for better depth of color, however.  Miss Bliss is a true pink color, and Eternal Beauty is true purple, not leaning too blue or red.  And they are so full of rainbows.  Simply awesome.  Check out my picture below from before I added the nail art!


   Two more untrieds have become tried and loveds!  What do you think of them?

Friday, July 26, 2013

Different Dimension: Aorta Miss You But I Don't

Swatch & Review


   I was sorting through my Indie polishes when I came across a special bottle that I used but never got around to sharing on my blog - shame on me!  Released at the start of 2013, this is Different Dimension Aorta Miss You But I Don't.  The name makes me giggle, and I'm the one who named it!  This lovely blend of glitters was all Missi's doing, though.  So I feel honored that she thought the name was fitting for it!

   For this quickie swatch I layered one coat of Aorta Miss You But I Don't over Zoya Purity, any I love how it pops on the white base!  There are all sort of pretty glitters floating in a clear base.  The name-inspiring purple hearts, of course, but also magenta circles and larger holographic hexes in pink and red.  What really does it for me is all the pretty microglitter, though!  There is magenta, silver, and even lavender, and it looks sooo lovely together!

   I'm a huge fan of Missi's Different Dimension polish formula.  I ended up wearing this for a couple of days without topcoat. Despite the larger glitters it dries quite smooth; my nails weren't snaggy at all.  A couple larger glitters chipped off but that heart stayed on!  Really impressive all around.  Different Dimension polishes are available on Etsy.  =)
Wednesday, July 17, 2013

I♥NP Angel Burp over Essie Sweet Talker

Swatch & Review / NotD

   My town is currently experiencing a heat wave, with temperatures hitting 90 every day this week.  (In our little arctic suburb, this is a big deal.)  I don't complain about the weather, but I will admit that it has sapped my creativity the past few days!  I come home from work and crash; it's too warm to get up and do things until 8pm when the sun is going down.  So rather than paint my nails last night, I waited and did them this morning.


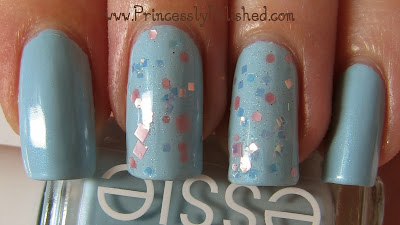
   I used I♥NP Angel Burp and Essie Sweet Talker.  I looove this easy-on-the-eyes cotton candy combination!  My nails feel so delicate and pretty.  Both of these polishes were untrieds for me, so let me tell you about them~


   Story time!  Essie Sweet Talker is from their 2010 foray into retail sales.  (In fact, it was an exclusive color, so all bottles of Sweet Talker should have a white printed "Essie" on the side, and a sticker with the name on top.)  This color landed on my wishlist right away when I was first getting into polish, and I managed to track down a bottle (along with a bunch of other colors) on eBay.  Then it was put away in a box, where it sat, and sat... and sat.  I have a few Essie polishes I love, but I learned that more often than not I don't like the brand's formula, so I allowed myself to be distracted by other polishes for quite awhile.  I was afraid Sweet Talker would be sheer, pool-y and need at least 3 coats.  Today I'm happy to say that it exceeded my expectations.  I used 2 careful coats, giving it time to dry in between.  It is actually a bit on the thick side - I'll add a bit of polish thinner to my bottle.  The aqua microshimmer in the bottle isn't as visible on the nail, but it doesn't disappear, either.  And I love the pastel blue.  I want a straight-up creme in exactly this color!


   I♥NP Angel Burp is a really pretty glitter in a shimmery clear base.  On my thumb I'm wearing 2 coats, the other nails had 1 coat.  The formula was a bit thick and I did get some teeny bubbles when I was squishing glitter around with my brush - these really only show in pictures.  I topped it off with 1 coat of Poshe and don't have any texture from the glitters; they are thin and lay very flat!

   And what pretty glitters they are.  Satin pink squares and hexes mixed with iridescent squares!  (I'll definitely be combining this with Nyx Girls Dreamy Glitter sometime for a manicure filled with pink pastel shape goodness.)  The iridescent squares shine with a whole rainbow of soft hues, not just the peachy-pink that you see in the bottle!  If you don't already have this glitter and you love it as much as I do, be quick!  This is another discontinued I Love Nail Polish shade, but I saw it is still available at http://www.ilnp.com/ as of today!

Monday, July 8, 2013

Holographic Gem Blossoms Manicure

Nail Art / Swatch & Review

   I'm wearing an extremely princess-y manicure today!  I did these nails Saturday after deciding I wanted something holographic and was inspired by some pretty glitter gradients on other blogs.  Then I realized that all the polishes I used were essentially untrieds - swatched but never used in a manicure.  So I'll be talking a bit about them, too.


   So pink, so girly, so great!  For as much as I love pink I don't do pink nails that often.  I have a hard time finding the right pinks for my skintone.  These are the polishes I used:

Color Club Halo-graphic, Milani Pink Flare, Nyx Girls Dynamic Glitter and Salon Perfect Silver Sparkler.

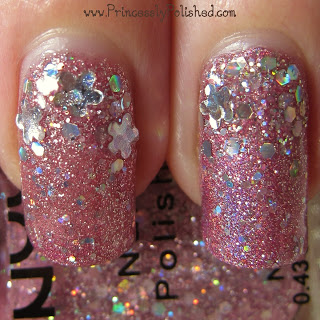
   First let's talk about Color Club Halo-graphic.  How did I let this go for so long without doing a proper manicure with it?  From the 2012 Halo Hues collection, this pink is gorgeous in the bottle and cool-toned enough that I find it wearable.  I used two coats on my thumbs, index and pinky fingers, then my regular Poshe topcoat.  Once the manicure is totally dry the holographic effect comes back 100%.  Application is good for a holographic polish, but isn't very self-leveling.


   Milani Pink Flare is part of the One Coat Glitter line, but it is most certainly not opaque in one coat.  My right hand, pictured above, shows this polish at one coat on my ring finger and at two on my middle finger.  Both have one coat of Halo-graphic as a base/underwear color.  I must say I love this glitter, it is the perfect combination of soft and sparkly.  Different from my expectations but I don't like it any less.

   The photos below show my left hand.  I had the good sense to wrap my tips with Halo-graphic before putting on a coat of Pink Flare, so the sheerness isn't noticeable unless you're really looking.  My middle finger (three flower-shape paillettes) is wearing 4 coats of Milani Pink Flare, and if you look closely you can still see some VNL.  As soon as I saw how sheer it was I put a base coat of Color Club Halo-Graphic down on my ring finger, and only used two coats of Pink Flare.


   For the gradients I used a combination of Nyx Dynamic Glitter and Salon Perfect Silver Sparkler.  I started off by dabbing Dynamic glitter at the cuticles and then placed individual glitters from Silver Sparkler to fill in spaces that needed it.  I also used loose flower paillettes to enhance the gradient nails.  These nails would have had a lot of texture so I used extra topcoat until they were smooth and super glossy!


   The only negative thing about this manicure is that it is SO sparkly that it is hard to photograph!  There is so much glitz that my camera seems to be at a loss about which nail to focus on.  Of course, that quality is also what makes it so fantastic.  I'm really enjoying this glittery, rainbow-filled manicure!  =)