Showing posts with label np-glitter. Show all posts

Saturday, April 12, 2014

Sunny Layering with L'oreal & Milani

Layering Nail Art / Swatch


   Come on, sunshine!  You're here, you can do it - stay!  Please, please stay... it's so much easier to feel motivated when you're around...  Today I have a simple layering manicure that is bright and cheery!  I managed to knock out 3 untrieds, too!

Monday, January 13, 2014

ILNP: Animal Cookie over Zoya: Rocky

Swatch & Review


   How awesome is this combination of polishes?  ILNP Animal Cookie is one of the first polishes I saw from the brand, and it immediately landed on my wishlist.  It took awhile for me to get it it, but it was worth waiting for!  I used one coat for my swatch, and the glitter spread nicely.  I dabbed a little extra into a few bare spots and then it was perfect.  The mix of white and pink glitters pops over my base of Zoya Rocky.  Rocky is a semi-dusty turquoise blue creme, and I only needed two coats.

Friday, November 22, 2013

Nfu-Oh #62 and China Glaze: Hello Gorgeous!

Swatch & Review


   Sunlight picture, yay!  I've already shared Nfu-Oh #62 before on my blog, but I've had these polishes for so long that my nails and photography skills have improved to the point that I really ought to reswatch them all!  Anyway, #62 is the linear holographic polish.  It takes 2 coats.

   China Glaze Hello Gorgeous! can be built up into a textured glitter polish because the soft pink glitter nicely hides any bare patches!  I used 3 coats by itself (no topcoat, no "underwear") for a look very similar to what I did with China Glaze Glistening Snow.  Next time I wear this I'll try it as a single-coat topper over a dark color.

Wednesday, November 20, 2013

I♥NP: Cheshire Blues over China Glaze: Electric Beat

Swatch & Review


   Here's a really great glitter topper from I♥NP!  It's called Cheshire Blues, and it contains pale blue, periwinkle, white and pink glitters.  I was really impressed with this one, because I only used 1 coat on my middle nails and I did not have to fish for glitter!  I was totally surprised when my brush grabbed those 3 heart glitters!  China Glaze Electric Beat impressed me, too.  Perfect shade of blue and a wonderful formula.  Two nails took 2 coats and the others only needed 1!  These polishes are both from older releases but fortunately still available - do you have either of them?

   Also, my blog is getting an overhaul!  I'm doing all the work myself so please tell me if you spot anything that isn't right.  What do you think of it?  =)

Wednesday, September 4, 2013

Laquerlicious - Sapphire Glaze

Swatch & Review

   Good day, princesses!  I have another Laquerlicous creation to share with you today.  Behold the glossy, glittery beauty that is Sapphire Glaze!


   I love this polish!  It's so gorgeous!  In the shop it carries this description: "This polish is in a deep blue base with blue, teal and magenta micro glitter."  That is very accurate.  You can tell there is more than one shade of blue glitter, and the magenta glitters give it a little something special.  The deep blue base often makes the magenta glitter look like a deep purple on the nail, which is awesome in my opinion!


   Looking at the polish in the bottle I thought "well, it's a dark jelly, but I wouldn't be surprised if it took 3 coats by itself".  Not so!  It covers very well and I had no issues with visible nail line or bald spots on my nail.  Despite being packed with glitter the glitter is very easy to work with and spreads evenly.  It does have some texture by itself but it smoothed right out with topcoat, which added to the shiny jewel effect.


   This polish is perfect for princesses who love royal blues and/or having their tips sparkle like gems!  You can find Sapphire Glaze (and a range of other jewel-themed "glaze" polishes) at the Laquerlicious shop.  My thanks to Michelle for sending me this polish to share with everyone on my blog!

Tuesday, August 27, 2013

Laquerlicious - Diamond Diva

Swatch & Review

   This mini might be my favorite of the three I was sent for swatching.  It's hard to say - I'm bad at choosing favorites.  But there is something special about this polish from the All Things Diva Laquerlicious collection.


   First off, it doesn't really make me think of diamonds.  Oh, it certainly brings to mind jewels with it's gorgeous sparkle, and I know that diamonds come in more than clear, but I mostly think of tasty jam when looking at this!  Perhaps jam with crushed up gemstones in it, yes.  But that really isn't important.  What is important is that it is pretty!

   I used 3 coats of Diamond Diva by itself for this swatch.  It was wearable at 2 but the jelly base had a couple sheer spots, so the look of 3 was better.  You could definitely layer this glitter polish over a similar berry-hued shade for opacity, but the depth of three coats on it's own is fantastic.  Diamond Diva wants to dry to a satiny matte finish, I added 2 coats of topcoat to give it a glassy finish that really brought the sparkles out.


   The color of this polish can look a bit different depending on lighting, but it is always a rich, cool-toned color.  I'd describe it as magenta/fuchsia jelly with a bit of shimmer and a lot of microglitter.  The glitters are in shades of pink, purple, and blue, as well as a bit of iridescent glitter that shines orange.  It has a whole rainbow of jewel tones going on!

   Diamond Diva has the same slightly stronger-than-usual smell that Divine Doll has, and I'd say that application is the same, as well.  It does best when you work with it quickly but gently, and give it a few minutes before doing another coat.  By itself it has a slightly lumpy texture from the glitter, but it smooths right out with topcoat.  I love it!  What do you think?
 
   As always thanks for stopping by and having a look!  =)

Laquerlicious Links:

Monday, August 26, 2013

Laquerlicious - Divine Doll

Swatch & Review

   Hey everyone, important quick updates before I get into this swatch post.  First, my computer's screen is still being flaky.  It has decided to work for a bit right now so I took advantage of that by editing as many pictures as I could.  Replacing a bunch of parts has done nothing to keep it working and it appears that it must be a glitch caused by static, instead.  My husband is trying to find a permanent solution.  I'm just going to say that editing my photos on a CRT monitor (or our TV) is not my thing.  I've had a stern talk with my computer about it's behavior, so hopefully things will improve soon.

   Second, and more serious, my pregnant mommy check-ups are now happening twice-weekly.  The great news is that I'm basically feeling fine, and the baby seems to be good, too.  I'm being monitored closely because of my low amniotic fluid level, which can turn into a serious complication.  At any one of these check-ups there is the possibility that I'll be kept at the hospital, probably until our baby is delivered.  At this rate it's not looking like I'll reach my Sept 21st due date.  Personally I'm doing everything I can to hydrate myself and praying that the level will go up!

   So basically, if the blog suddenly goes silent, don't worry too much.  I'll try to keep updates going on Instagram if I can't post them here, so be sure to follow me there.


   Now on to the more frivolous and fun stuff.  ;D  Recently Michelle of the etsy shop Laquerlicious Unity moved some beautiful polishes into the clearance section of her shop, so this prompted a little spree on my behalf!  She was generous enough to send along a few minis, two of which are from her new All Things Diva collection, for swatching and sharing on my blog.  I'm really excited about the colors she surprised me with, because they are shades that I was curious about!


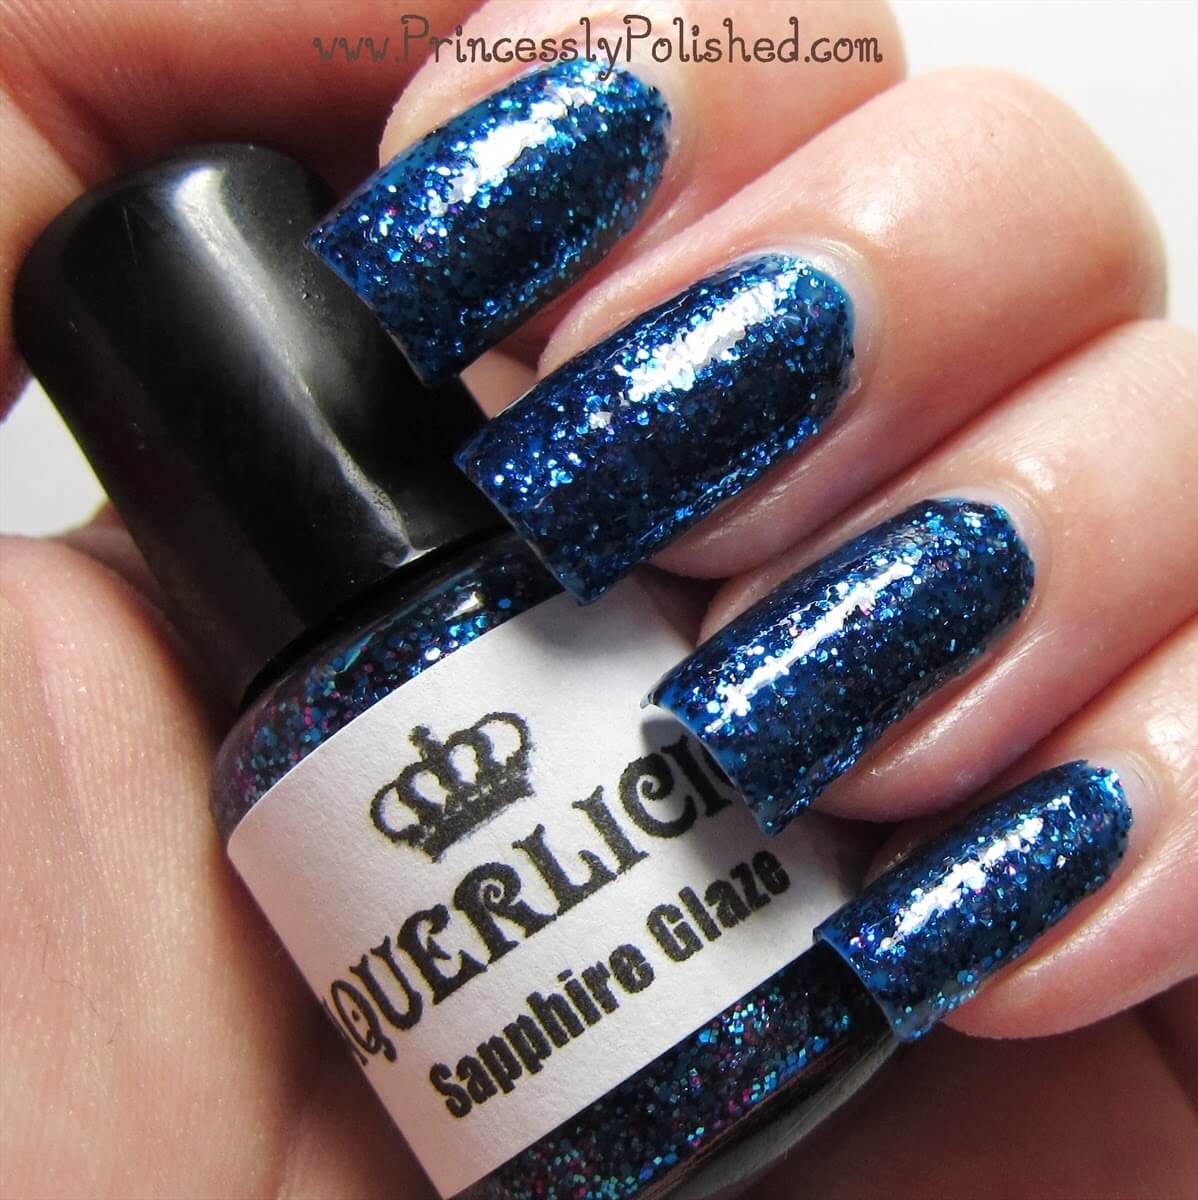
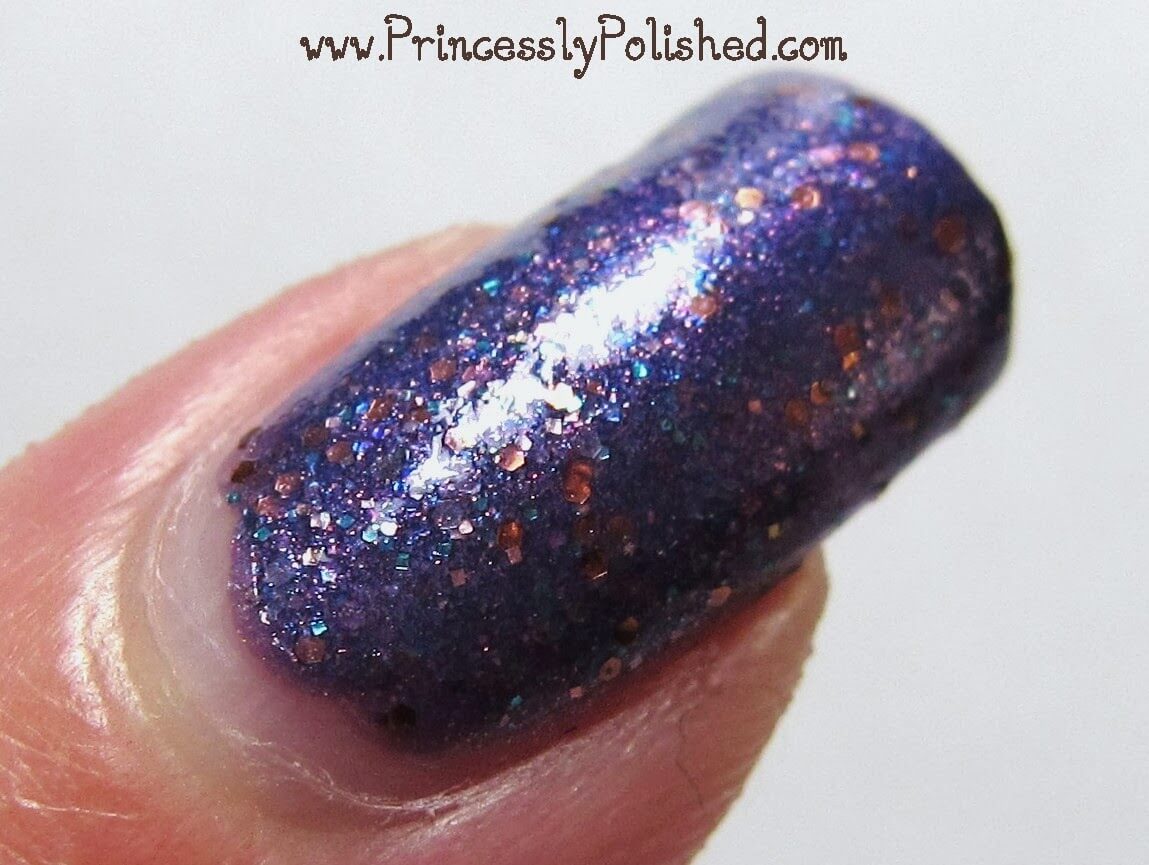
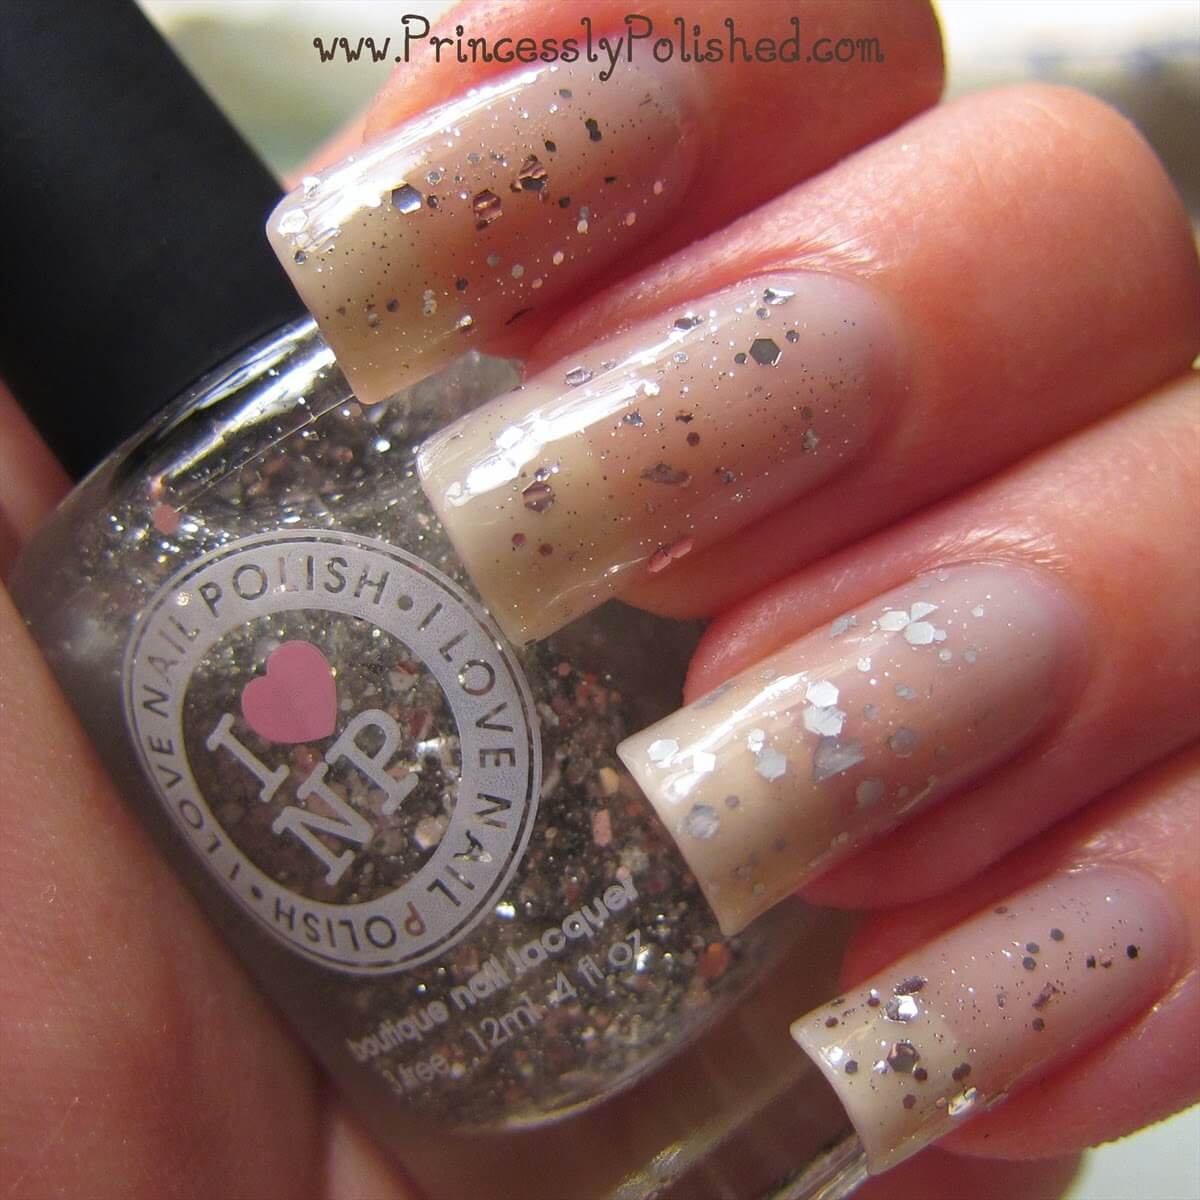
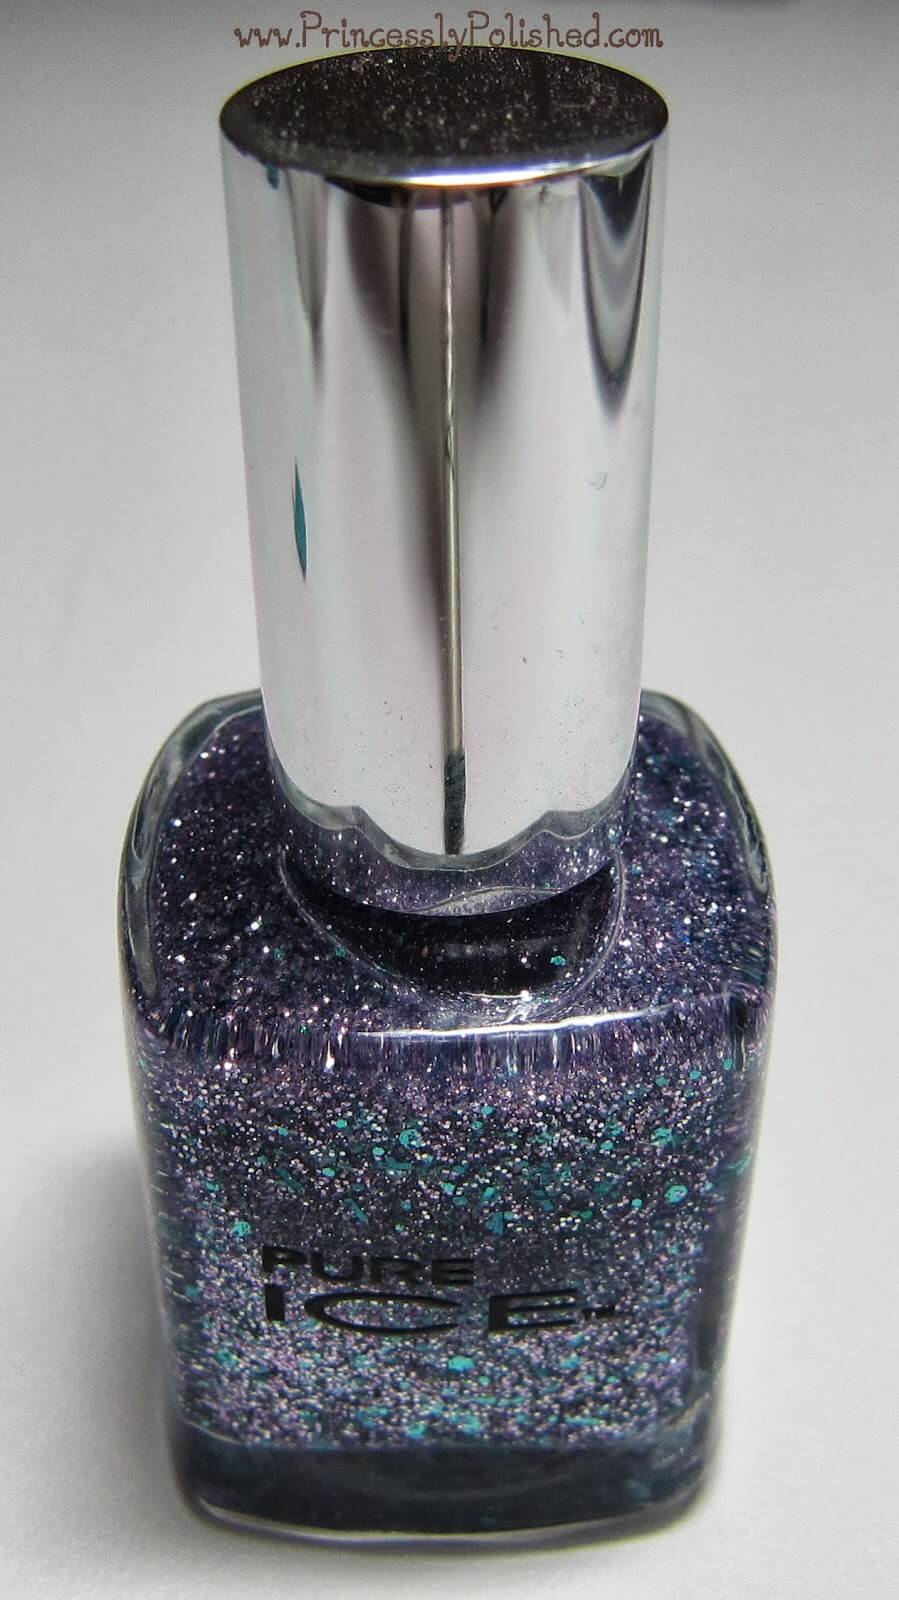
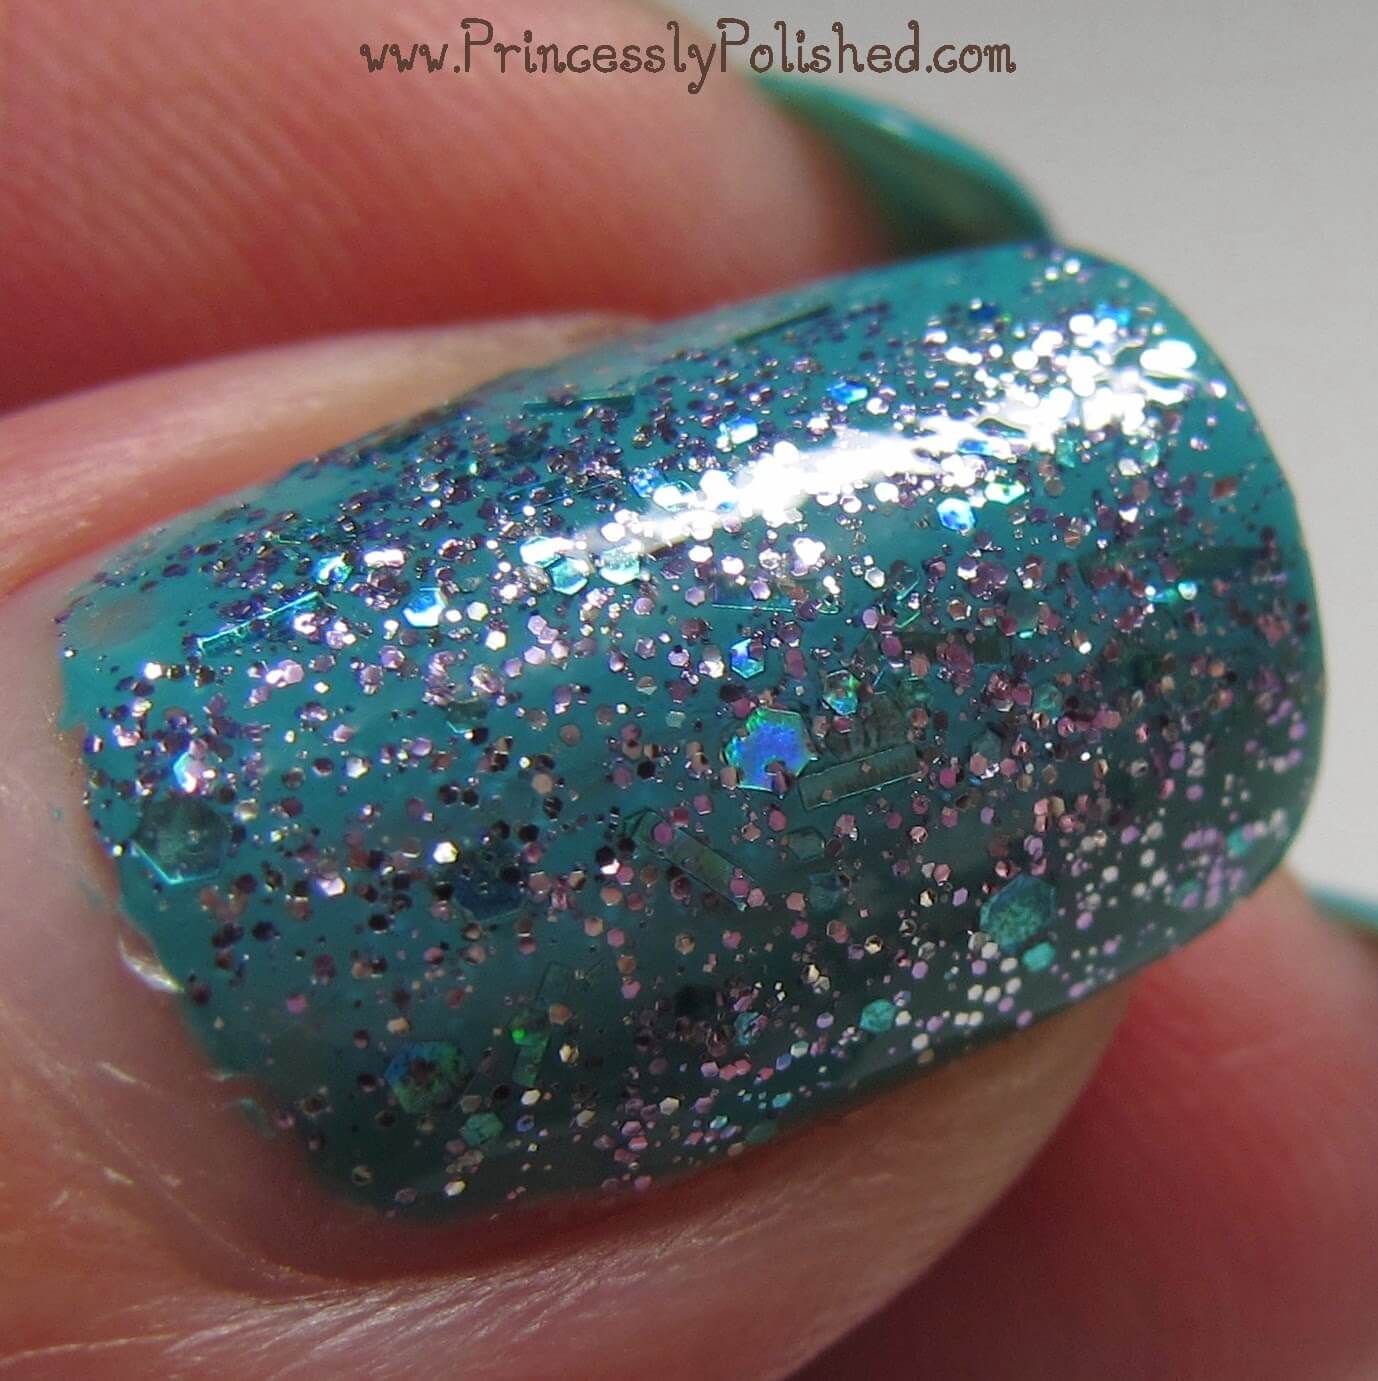
   First I tried Divine Doll.  The shop description is perfect: "a shimmery grape purple with an aqua shimmer and caramel and teal micro glitter" - yep, that's exactly what it is!  The purple tends to looks a bit like a blurple thanks to the aqua shimmer, and it's loaded with small glitters.  I used 2 coats for full coverage.  Application was a tad bit finicky but typical of this type of polish.  For best results you need to work quickly, applying a thin-ish first coat.  It wants to dry fast so if you mess with it too much the heavy shimmer pigment and glitters will start to drag and make bald spots.  So give that first coat a moment to dry and set up on your nail.  Then the 2nd coat applies perfectly!


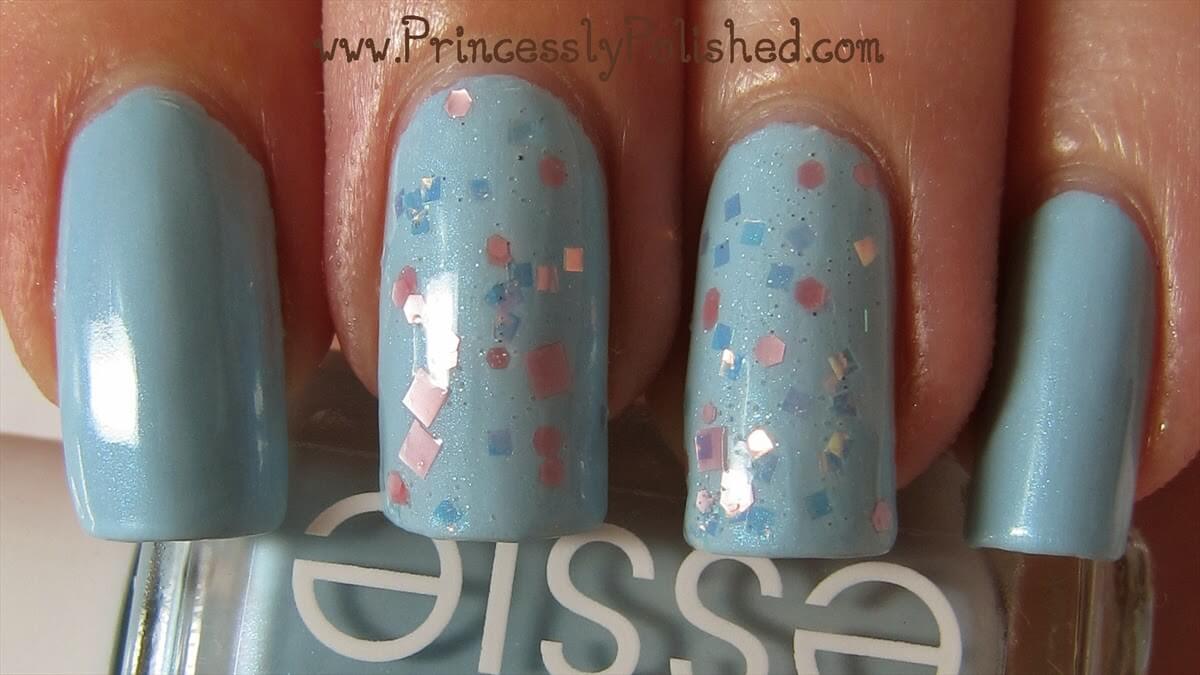
   I took a bottle shot to try to show off the pretty glitters better.  Between the color purple and the heavy shimmer my camera was at a bit of a loss while photographing my nails.  I love the caramel and teal glitters in this polish!  They really pop, and I don't have anything like this shade in my collection.  This polish is a color combination that I would have never thought of, but totally works!  I was also very happy that it was friendly to my pale skin tone.  May I also point out that this super-duper shimmery polish shows not a single brushstroke?  Hooray for being frost-free!


   Being glitter-heavy, it does have texture when dry.  Not gritty texture, though.  I used 1 coat of Poshe to top this manicure off, and while it wasn't glassy smooth, I didn't notice my nails having texture.  Also, removal... actually not bad!  I soaked a cotton pad with remover, held it on my nail for a few minutes, and most the glitter wiped right off.  I advise against scrubbing at the glitter; then it does turn into a sparkle-splosion on your hands.

   The only complaint that I could mention about this polish is that it has a stronger smell than the other Laquerlicious shades I've tried.  It has the regular polish smell and a little something more.  A sort of sweet, chemical-y odor.  I'm guessing that these might use a different base to suspend all the shimmer, and that would be the cause for a different smell.  (My full-size bottles just smell like typical glitter polish!)  The smell disappears when you apply topcoat, so it is only a temporary suffering!

   Thanks for reading, princess!  Be sure to check out the Laquerlicious shop, and stay tuned for another awesome All Things Diva polish coming up next! =)

Laquerlicious Links:

Monday, August 12, 2013

Lush Lacquer: Pebbles with Fishtail Accent - Baby Shower Nails!

Nail Art / Swatch & Review

   Working through more of my untried indie glitters, I created this cute manicure to wear to the baby shower that my best friend held yesterday!  It was such a nice party.  These might not look like very baby-themed nails, but I'm not one for baby motifs.  So I went with nice bright colors, instead.  Also, Lush Lacquer is created by a mother-daughter team, so it totally fits!


   All my nails started out with a base coat of white, which was Zoya Purity.  For my glitter gradient nails I used Lush Lacquer Pebbles.  This is an awesome, colorful matte glitter in a clear base.  It looks way better on the nail than in the bottle, where the colors appear muddled because of the tiny glitter size.  On the nail the yellow, pink, purple and blue really pop!


   The glitter coverage was good, too.  My nails are showing 1 coat at the cuticle/top, 2 coats from the middle down, and 3 at the very tip.  Roughly.  I just dabbed the glitter on carefully to make the gradient effect.  My verdict is that this polish is great!

   For accent nails I tried doing fishtail style chevrons for the first time.  They didn't come out too badly, but 4 colors was way too many for a beginner's attempt!  Definitely going to stick with 2 the next time I practice.  I did a pretty good job matching up the polish colors to the glitter in Pebbles, though.  Here is what I used:

Lush Lacquer Pebbles, China Glaze Happy-Go-Lucky, Zoya Sweet, Pure Ice Fairy Godmother and Sally Hansen Blue Me Away!

   What do you think of these nails?  Do you have any Lush Lacquer colors to recommend?  They can be found in the Lush Lacquer etsy shop!  Thanks for looking.  =)

Tuesday, August 6, 2013

Black Cat Lacquer: Let Them Eat Cake and Essie: Vanity Fairest

Swatch & Review / NotD


   Good day, fellow princesses!  I have a delicate nail look to share today featuring two pretty polishes.  The above photo are my nails modeling 1 coat of Black Cat Lacquer over 2 coats of Essie Vanity Fairest.  I loved wearing this manicure!  Onwards to my reviews!

   I placed my first order with Black Cat Lacquer at the very end of December, and had four pretty polishes show up in January.  I tried a few times to get them swatched, but never did because of the smell.  This was honestly the first time a polish smelled so bad that I couldn't stand to use it.  My bottle of Let Them Eat Cake (and the other 3 colors I bought at the time) goes beyond the usual "smelly polish" scent and heads straight into exterior house paint territory.  I'd know - my day job is selling and tinting paint!  I decided to set them aside until warm weather when I'd try again with open windows.

   It appears that these late-2012 polishes were either made with a different base or perhaps a bad batch of base.  Searching didn't give me any official information other than a few January 2013 reviews and reader comments noting a very strong smell.  A review on one blog said the Spring 2013 colors did not have the awful smell of the previous collection, yay!  In order to attempt to find out the real story I sent Black Cat Lacquer a message asking "Has your polish base changed since last year?"  This is the entire reply I received:
Hello!
Thank you for your inquiry! The base we use has your run of the mill nail polish odor, thanks!

Sabrina R.
Black Cat Lacquer
   So, um, not exactly all-conclusive.  I'm hoping the stink is now a non-issue, at least with colors from 2013.  I have added a few more BCL polishes to my wishlist with cautious optimism, though I'm not entirely sure what to do with the ones I already have...

   You see, Let Them Eat Cake is an awesome glitter topper - clear base, pastel hexes in pink, blue, and yellow-green.  A whole lot of cute tiny white glitter and a smattering of holographic bits.  It's pretty, I loved wearing it, but my bottle smells so bad!  I don't know if it is worth keeping in my collection if I can't stand the smell of it.  We shall see.  I didn't have any other issues with the polish; it mixes easily and the formula and application is perfectly fine.  BCL is also 3-free and cruelty free, which is great!


   Above are my nails with 1 coat of Essie Vanity Fairest.  This is a polish I found for $1.00!  I tried looking for swatches but none showed the super-pretty glass fleck shimmer it contains.  It is very hard to capture finishes like this, but I think I have done a decent job.  It shows quite well on my thumb, which is wearing 3 coats:


   I really like this polish!  The formula is great and the sheer finish works with 1, 2, or 3 coats depending on the look you want.  It dries quickly and has a good amount of shine without topcoat.  I'm glad that I happened upon it by chance in June.  =)


   Thanks for reading!  If you have any advice on what to do about the stinky glitter polishes, I'd like to hear it.  Do you own any Black Cat Lacquer polishes?  If so, which one and how does it smell like to you?  If not, they can be found at http://www.BlackCatLacquer.com/.

Monday, August 5, 2013

I♥NP: Silver Spoons and OPI: My Pointe Exactly

Swatch & Review / NotD

   Here is a quick swatch post of my nails from this weekend.  I did them in our hotel room so I didn't have my usual lighting setup.  Not the best photos but this was a really simple combo, so I'm letting them pass.  I used 2 coats of My Pointe Exactly from the OPI NYC Ballet collection, which is a sheer grey jelly.  My nails were more grey-toned than they appear here.  Then I used 2 coats of I♥NP Silver Spoons, and I used one more coat of My Pointe Exactly on my ring finger to create a jelly sandwich.  These nails were subtle but very shiny!

   My Pointe Exactly is a very good neutral jelly that I am so glad to have finally found in stock on Drugstore.com.  Glad I picked it up because it will definitely see more use in both French manicures and layering for "jelly sandwiches".  Coverage is quite good.  Also, I think I have finally made peace with OPI's wide brushes; we didn't get along before this.  The above photo shows my results without any clean-up!

   Silver Spoons is unique among silver glitter topcoats thanks to those awesome little silver shards!  They aren't gigantic, lay flat and don't create texture on the nail.  (If I could find a topper of just these well-behaved silver shreds I'd be quite pleased!)  The silver microshimmer also has a wonderful sparkle that I love.  I was surprised at needing two coats for good coverage, however.  Sadly this polish is discontinued and gone forever... sorry!

   I wish I could have better captured the sparkle and shine of these nails - you'll just have to imagine it!  The look reminds me of Cinderella for some reason...  What do you think?

Friday, July 26, 2013

Different Dimension: Aorta Miss You But I Don't

Swatch & Review


   I was sorting through my Indie polishes when I came across a special bottle that I used but never got around to sharing on my blog - shame on me!  Released at the start of 2013, this is Different Dimension Aorta Miss You But I Don't.  The name makes me giggle, and I'm the one who named it!  This lovely blend of glitters was all Missi's doing, though.  So I feel honored that she thought the name was fitting for it!

   For this quickie swatch I layered one coat of Aorta Miss You But I Don't over Zoya Purity, any I love how it pops on the white base!  There are all sort of pretty glitters floating in a clear base.  The name-inspiring purple hearts, of course, but also magenta circles and larger holographic hexes in pink and red.  What really does it for me is all the pretty microglitter, though!  There is magenta, silver, and even lavender, and it looks sooo lovely together!

   I'm a huge fan of Missi's Different Dimension polish formula.  I ended up wearing this for a couple of days without topcoat. Despite the larger glitters it dries quite smooth; my nails weren't snaggy at all.  A couple larger glitters chipped off but that heart stayed on!  Really impressive all around.  Different Dimension polishes are available on Etsy.  =)

Wednesday, July 17, 2013

I♥NP Angel Burp over Essie Sweet Talker

Swatch & Review / NotD

   My town is currently experiencing a heat wave, with temperatures hitting 90 every day this week.  (In our little arctic suburb, this is a big deal.)  I don't complain about the weather, but I will admit that it has sapped my creativity the past few days!  I come home from work and crash; it's too warm to get up and do things until 8pm when the sun is going down.  So rather than paint my nails last night, I waited and did them this morning.


   I used I♥NP Angel Burp and Essie Sweet Talker.  I looove this easy-on-the-eyes cotton candy combination!  My nails feel so delicate and pretty.  Both of these polishes were untrieds for me, so let me tell you about them~


   Story time!  Essie Sweet Talker is from their 2010 foray into retail sales.  (In fact, it was an exclusive color, so all bottles of Sweet Talker should have a white printed "Essie" on the side, and a sticker with the name on top.)  This color landed on my wishlist right away when I was first getting into polish, and I managed to track down a bottle (along with a bunch of other colors) on eBay.  Then it was put away in a box, where it sat, and sat... and sat.  I have a few Essie polishes I love, but I learned that more often than not I don't like the brand's formula, so I allowed myself to be distracted by other polishes for quite awhile.  I was afraid Sweet Talker would be sheer, pool-y and need at least 3 coats.  Today I'm happy to say that it exceeded my expectations.  I used 2 careful coats, giving it time to dry in between.  It is actually a bit on the thick side - I'll add a bit of polish thinner to my bottle.  The aqua microshimmer in the bottle isn't as visible on the nail, but it doesn't disappear, either.  And I love the pastel blue.  I want a straight-up creme in exactly this color!


   I♥NP Angel Burp is a really pretty glitter in a shimmery clear base.  On my thumb I'm wearing 2 coats, the other nails had 1 coat.  The formula was a bit thick and I did get some teeny bubbles when I was squishing glitter around with my brush - these really only show in pictures.  I topped it off with 1 coat of Poshe and don't have any texture from the glitters; they are thin and lay very flat!

   And what pretty glitters they are.  Satin pink squares and hexes mixed with iridescent squares!  (I'll definitely be combining this with Nyx Girls Dreamy Glitter sometime for a manicure filled with pink pastel shape goodness.)  The iridescent squares shine with a whole rainbow of soft hues, not just the peachy-pink that you see in the bottle!  If you don't already have this glitter and you love it as much as I do, be quick!  This is another discontinued I Love Nail Polish shade, but I saw it is still available at http://www.ilnp.com/ as of today!

Saturday, July 13, 2013

I♥NP: Once Upon A Starry Night over Pure Ice: Fairy Godmother

Swatch & Review / NotD

   Good evening, princesses!  Here is a manicure that is sure to give you sweet dreams about polish.  ;P  I was fortunate enough to snag Once Upon A Starry Night during I♥NP's clearance sale, and found the limited edition Pure Ice color Fairy Godmother, which pairs wonderfully as a base color.  Also, I think I may have found my "pose" for pictures.  Holding my hand at an angle seems most comfortable.


   I used one coat of I♥NP (I Love Nail Polish - what a great brand name!) of Once Upon A Starry Night, which is a clear-based glitter with a really nice density for using as a topcoat.  The glitters in it are prismatic, silver, blue, and matte white.  It contains holographic silver stars but not very many of them.  Getting one of the stars is a treat, and the nails without stars don't look like they are lacking.  I've had this polish on my wishlist since I first saw it announced last year!  Sadly this shade is now discontinued - sorry!

   ILNP definitely earns their tagline of "boutique nail lacquer": the super cute packaging, the wonderful brush and good formula...  I'm not sure if this bottle is made with the original or reformulated glitter base.  (The suspension base was changed after complaints that the polishes were great but smelled horrible.)  I can say that this does have a polish smell but it is not at all offensive!


   Pure Ice Fairy Godmother is a perfect amethyst shade that will. not. photograph. accurately.  I tried color-correcting the photos and gave up, because by the time the polish was looking right my hands looked fiery.  Yes, this is a cool-toned purple, but it is more red than this.  It's a medium type of purple that isn't too bright, too dark, too pastel or dusty.  It also seems to have a faint hidden shimmer.  I used two coats, and coverage was very good.  The formula is on the slightly thick side.


   These are two really pretty polishes that work great together!  Pure Ice is sold at Walmart, and you can find I♥NP shades at their website:

Monday, July 8, 2013

Holographic Gem Blossoms Manicure

Nail Art / Swatch & Review

   I'm wearing an extremely princess-y manicure today!  I did these nails Saturday after deciding I wanted something holographic and was inspired by some pretty glitter gradients on other blogs.  Then I realized that all the polishes I used were essentially untrieds - swatched but never used in a manicure.  So I'll be talking a bit about them, too.


   So pink, so girly, so great!  For as much as I love pink I don't do pink nails that often.  I have a hard time finding the right pinks for my skintone.  These are the polishes I used:

Color Club Halo-graphic, Milani Pink Flare, Nyx Girls Dynamic Glitter and Salon Perfect Silver Sparkler.

   First let's talk about Color Club Halo-graphic.  How did I let this go for so long without doing a proper manicure with it?  From the 2012 Halo Hues collection, this pink is gorgeous in the bottle and cool-toned enough that I find it wearable.  I used two coats on my thumbs, index and pinky fingers, then my regular Poshe topcoat.  Once the manicure is totally dry the holographic effect comes back 100%.  Application is good for a holographic polish, but isn't very self-leveling.


   Milani Pink Flare is part of the One Coat Glitter line, but it is most certainly not opaque in one coat.  My right hand, pictured above, shows this polish at one coat on my ring finger and at two on my middle finger.  Both have one coat of Halo-graphic as a base/underwear color.  I must say I love this glitter, it is the perfect combination of soft and sparkly.  Different from my expectations but I don't like it any less.

   The photos below show my left hand.  I had the good sense to wrap my tips with Halo-graphic before putting on a coat of Pink Flare, so the sheerness isn't noticeable unless you're really looking.  My middle finger (three flower-shape paillettes) is wearing 4 coats of Milani Pink Flare, and if you look closely you can still see some VNL.  As soon as I saw how sheer it was I put a base coat of Color Club Halo-Graphic down on my ring finger, and only used two coats of Pink Flare.


   For the gradients I used a combination of Nyx Dynamic Glitter and Salon Perfect Silver Sparkler.  I started off by dabbing Dynamic glitter at the cuticles and then placed individual glitters from Silver Sparkler to fill in spaces that needed it.  I also used loose flower paillettes to enhance the gradient nails.  These nails would have had a lot of texture so I used extra topcoat until they were smooth and super glossy!


   The only negative thing about this manicure is that it is SO sparkly that it is hard to photograph!  There is so much glitz that my camera seems to be at a loss about which nail to focus on.  Of course, that quality is also what makes it so fantastic.  I'm really enjoying this glittery, rainbow-filled manicure!  =)

Saturday, June 8, 2013

Pure Ice: Over You and Scream

Swatch & Review / NotD


   Yesterday I wore this manicure as a way to use some of my untrieds.  These are two really nice polishes and I was happy with them, but I wasn't really feeling drawn to the color combo right now, so my nails are bare again today.


   Pure Ice Scream is a really nice blue-green creme polish, sort of a turquoise, teal, or dark aqua color.  It dries just a little bit darker than it looks in the bottle.  It is easy to work with and has really good coverage.  I used 1 coat on all my nails except my ring finger, which took 2.  I also let this dry without topcoat, so you can see it levels nicely and has decent shine.  The only issue I had with Scream was when applying the glitter on some of my nails.  I had to use a light touch or it would start to smear and create bald spots.


   Pure Ice Over You is one of their newer glitter releases, and I really love the colors.  I think I will like this better layered over a pale base color.  It is made up of micro and tiny lavender glitter, and had holographic aqua glitter in small hexes and short, stubby bars.  I really like the bar glitter, it reminds me of splashing water.  I only used 1 generous coat on my nails and was very happy with the coverage.  The glitters spread well and I imagine this could easily be layered up for full glitter-bomb effect nails.  I used topcoat to smooth my glitter nails, and didn't notice any texture after that.  Check out the macro shot below to see it better!


   These polishes impressed me for $2 finds, with good formulas to match their pretty colors.  After realizing how nice Scream was to work with I might have to give a few of their other new creme colors a chance.  So, this is my short and sweet post for today.  As always, thanks for looking!