Showing posts with label rainbow. Show all posts

Friday, June 27, 2014

Rainbow in the Clouds Manicure

Nail Art


   Here is a manicure I created using the new Sally Hansen Color Foil polishes.  They were perfect for this technique, which is much simpler to create than you might think!  Yes, this is the art that was originally meant to go over Raven.  But this base color was more fun - it glows in the dark!

Friday, February 14, 2014

ILNP: Sweet Serenade & Ozotic: 528

Swatch & Review


   12 pictures.  I have a dozen photos to share of these polishes, and I still don't feel like it's enough to show off their pretty color shifting.  I tried a few different types of lighting to show the range of colors, but believe me when I say these two polishes are much more flashy in person.  These nails all started with a black base.

Monday, December 16, 2013

ILNP: My Private Rainbow (Scattered) over China Glaze: Recycle

Swatch & Review


   Hello, princesses!  Are you curious about the I Love Nail Polish scattered-holographic effect topper?  I was, so I bought it and tried it over China Glaze Recycle (which is a perfect grey creme that I should have owned sooner, I used 2 coats).  My Private Rainbow (S) is a subtle rainbow-sparkling polish.  My camera muted the effect, which is a bit stronger than in my photo, but it certainly isn't anything linear.  It's like China Glaze Fairy Dust's even daintier sister.  I really enjoyed wearing it, and can't wait to see what it looks like over more... shall I say colorful? polishes.  What do you think of it?

Monday, August 12, 2013

Lush Lacquer: Pebbles with Fishtail Accent - Baby Shower Nails!

Nail Art / Swatch & Review

   Working through more of my untried indie glitters, I created this cute manicure to wear to the baby shower that my best friend held yesterday!  It was such a nice party.  These might not look like very baby-themed nails, but I'm not one for baby motifs.  So I went with nice bright colors, instead.  Also, Lush Lacquer is created by a mother-daughter team, so it totally fits!


   All my nails started out with a base coat of white, which was Zoya Purity.  For my glitter gradient nails I used Lush Lacquer Pebbles.  This is an awesome, colorful matte glitter in a clear base.  It looks way better on the nail than in the bottle, where the colors appear muddled because of the tiny glitter size.  On the nail the yellow, pink, purple and blue really pop!


   The glitter coverage was good, too.  My nails are showing 1 coat at the cuticle/top, 2 coats from the middle down, and 3 at the very tip.  Roughly.  I just dabbed the glitter on carefully to make the gradient effect.  My verdict is that this polish is great!

   For accent nails I tried doing fishtail style chevrons for the first time.  They didn't come out too badly, but 4 colors was way too many for a beginner's attempt!  Definitely going to stick with 2 the next time I practice.  I did a pretty good job matching up the polish colors to the glitter in Pebbles, though.  Here is what I used:

Lush Lacquer Pebbles, China Glaze Happy-Go-Lucky, Zoya Sweet, Pure Ice Fairy Godmother and Sally Hansen Blue Me Away!

   What do you think of these nails?  Do you have any Lush Lacquer colors to recommend?  They can be found in the Lush Lacquer etsy shop!  Thanks for looking.  =)

Monday, July 1, 2013

Tutorial: Gumball Machine Nail Art


   Hello, dear readers!  I'm so excited to share this post with you!  Not only am I sharing some cute original nail art I did, I'm teaching you how to do it with a tutorial!  This is my first time creating a how-to collage (it took some trial and error), so please give me your feedback!  First off, some information about the polishes I used.

For the gumballs: 
China Glaze Happy-Go-Lucky, Grape Pop, Four Leaf Clover, Suger High; Sally Hansen Sun Kissed and Zoya Breezi

For the gumball machines: 
Zoya Elisa and Pure Ice Silver Mercedes

   Obviously gumballs and their dispensers have a lot of room for creativity with colors, and you could pick pretty much anything you want.  I wanted something easily recognizable so I reached for the classic candy and dispenser colors.  This design works really well on squared nails, and takes advantage of your natural nail shape to create the glass dome of the gumball machine.  All you need are your nail polishes, some dotting tools, and french tip guides.  On to the tutorial!


   Yay, it's easy!  And fun - I had a blast wearing this manicure.  All kinds of people wanted to check these colorful nails out, and they could tell what they were!  To me, that's nail art success.  What do you think?  If you try this please leave a link in the comments below so I can check it out!  =)

Friday, May 24, 2013

Pastel Flowery Water Marble & Glitter Nail!

Nail Art

   Quite often when I do nail art my hands don't match.  Partly from "creativity", partly from getting to experiment more per manicure!  So after finishing my right hand in a rainbow gradient I decided to use a mix of all those colors for my left hand.  In case you missed all the water marble fun in my last post, here is the right hand design:


  I'm getting a little better at making the designs and figuring out placement on my nails.  I'm really happy with how my thumb turned out as I didn't think I'd get that much of the design on my nail.  =)  The colors I used were China Glaze Light As Air, Something Sweet, Peachy Keen, Lemon Fizz, Re-fresh Mint, and Bahamian Escape.  I had already painted my nails with two coats of Zoya Purity to give them a nice blank canvas, so they came out true to bottle color.

   Anyway, back to my left hand!


   It was pretty easy deciding which colors to pair up on my nails.  Index finger got the secondaries: purple, orange, green.  Middle finger had pink, yellow, and blue, though yellow and blue tried to create green.  My pinky was done in green, purple, yellow and pink.  Love it!  I was brave and tried to use all the colors on my thumb.


   All the colors are there, but sadly Bahamian Escape blurred into an odd dusty color between Lemon Fizz and Peachy Keen.  Also, a piece of fuzz stuck into my nail!  Bummer!  Six colors in one marbled nail is a bit much, four or less works better.

   As an accent nail I used my new unnamed Claire's polish over the white base.  (See swatches of the collection it came from.)  I did two coats and this ultra-cheap glitter did not disappoint!  It has a perfect rainbowy mix of colors over white.  I'll definitely be using this glitter polish again.  Anyone know of a dupe for it?


   This is my favorite water marble so far, and I really enjoyed wearing it this week!

Wednesday, May 22, 2013

Vacation's-End Water Marble Manicure Party!

   Greetings fellow Princesses!  How has your month of May been?  My husband and I are back from our travels and it has been back to "the real world" for us.  At the beginning of this week my Mom helped me arrange (or pulled me into) a really fun get-together where I was expected attempted to be a good teacher and show some friends how to water marble your nails!  I knew it was going to be fun no matter what, but I was really pleased with how everything turned out!  =)

   First off I spent time before the party practicing my marbling skills.  This was helpful because I needed to feel comfortable, and I was able to test polishes to bring with me to the party.  I tried to make many different styles of marble designs to show what a variety you can get.  Everybody got to look at these beforehand for some inspiration.


   There were six of us altogether, so I set each of us up with a dish of filtered water and the necessary tools.  I talked about the process, then had everyone stand close by as I did my first nail.  That was all it took!  Everyone rushed back to their nail stations and started doing their thing!  These were the results.  (Please keep in mind that these are candid, before-clean-up shots that I snapped in fairly poor indoor lighting!)


Miss Heather's Nails
Colors Used:  China Glaze Four Leaf Clover, Sally Hansen Mint Sorbet, and her own coral from Spoiled
   These colors really pop together!  Heather says she is inspired to let her nails grow longer to do more marbling, but in my opinion this shows how great marbling can look on short nails, too.  Lots of great swirls here!  (One of the highlights of the party was when she forgot to mask off her thumbnail and her whole thumb came out with a beautiful swirly design.  I assured her it happens to everyone eventually!  Water marbling is messy business, and when you get a lot of polish on your hand it's easiest to let the polish dry on your skin, then wash it off with soap and water.)


Grammee's Nails
Colors Used:  China Glaze Aquadelic and Sinful Colors Hazard, with China Glaze Riveting accent nails
   My grandmother is awesome.  Not one of those ladies to go get a boring manicure from a salon, she does her own nails and comes up with great layering combinations.  Now, she water marbles!  (Yes, I have had quite the influence on her.)  Her nails look great and she's definitely getting the hang of it!  I can't wait to see what she tries next.


Michelle's Nails
Colors Used: China Glaze Blue Iguana, 108 Degrees, and Senorita Bonita, also as a solid color
   My friend and fellow polisher Michelle snapped up these sparkly glass-fleck hues that look fantastic together, and especially good on her!  She did the more conservative "marbled nails as accent nails" approach, which left her with more time for clean up afterwards.  I'm inspired to try a manicure like this some time!


Mom's Nails
Colors Used:  Essie French Affair, Bachelorette Bash and Little Brown Dress
   She started off with her own Zoya colors that refused to marble on the water, so I switched her to some of my Essie polishes that would give a similar look.  (The sad truth is that not every polish works for water marbling.)  Fortunately these shades are super easy to marble with and she ended up happy!  I think we could vote her nails as Most Swirly; she went for an every-nail-unique look.


Ruth's Nails
Colors Used:  Sally Hansen Lacey Lilac, Zoya Caitlin and her own Wet 'n Wild dark purple
   Ruth got away before I could take a pre-clean up photo.  Don't let her professional after shot fool you - she had the most polish on her hands!  ;D  But wow, this sure doesn't look like a first time water marble, either - these nails are great!  And rather than fight with marbling her thumbs she painted them solid.


   Everyone did a fantastic job, had a great time, and all agreed that they wanted to keep going after they had ran out of nails to marble.  Success!  It made me really happy to be able to do this with my friends and family.  Oh, I that's right, I did my nails, too.  By the end of the party I only had about 3 nails done on my first hand because I tried to be there to get people more supplies and advice as needed.  This was the result on my right hand:


   I was going for a marbled rainbow gradient, and I'm pleased with the effect, though I think I could have picked some better colors.  The colors, from top to bottom are China Glaze Light As Air, Something Sweet, Peachy Keen, Lemon Fizz, Re-fresh Mint and Bahamian Escape.

   I also want to take a moment to thank my Mom for hosting the party, those who supplied the tasty snacks we had, and everyone who enjoys these awesome nails!  If you haven't tried water marbling yet, do!  If you already know how, host your own party!  =)

Friday, May 17, 2013

Claire's Sugar High Nail Polish Set

Swatch & Review

   At the end of April I managed to score this really awesome set of glitter-filled polishes for a mere $1.00 from Claire's.  Clearance shopping is my favorite type of shopping!  While I feel a little bad about showing off something that is probably going to be hard to find (and not all stores do the $1.00 sale at the same time), these were too intriguing not to share.  Here is the picture straight from Claire's website:

Image credit: claire's.com product page
   It isn't very color accurate, but it shows you what the polish packaging looks like, and if you can't find the set locally you may be able to snag them Online!


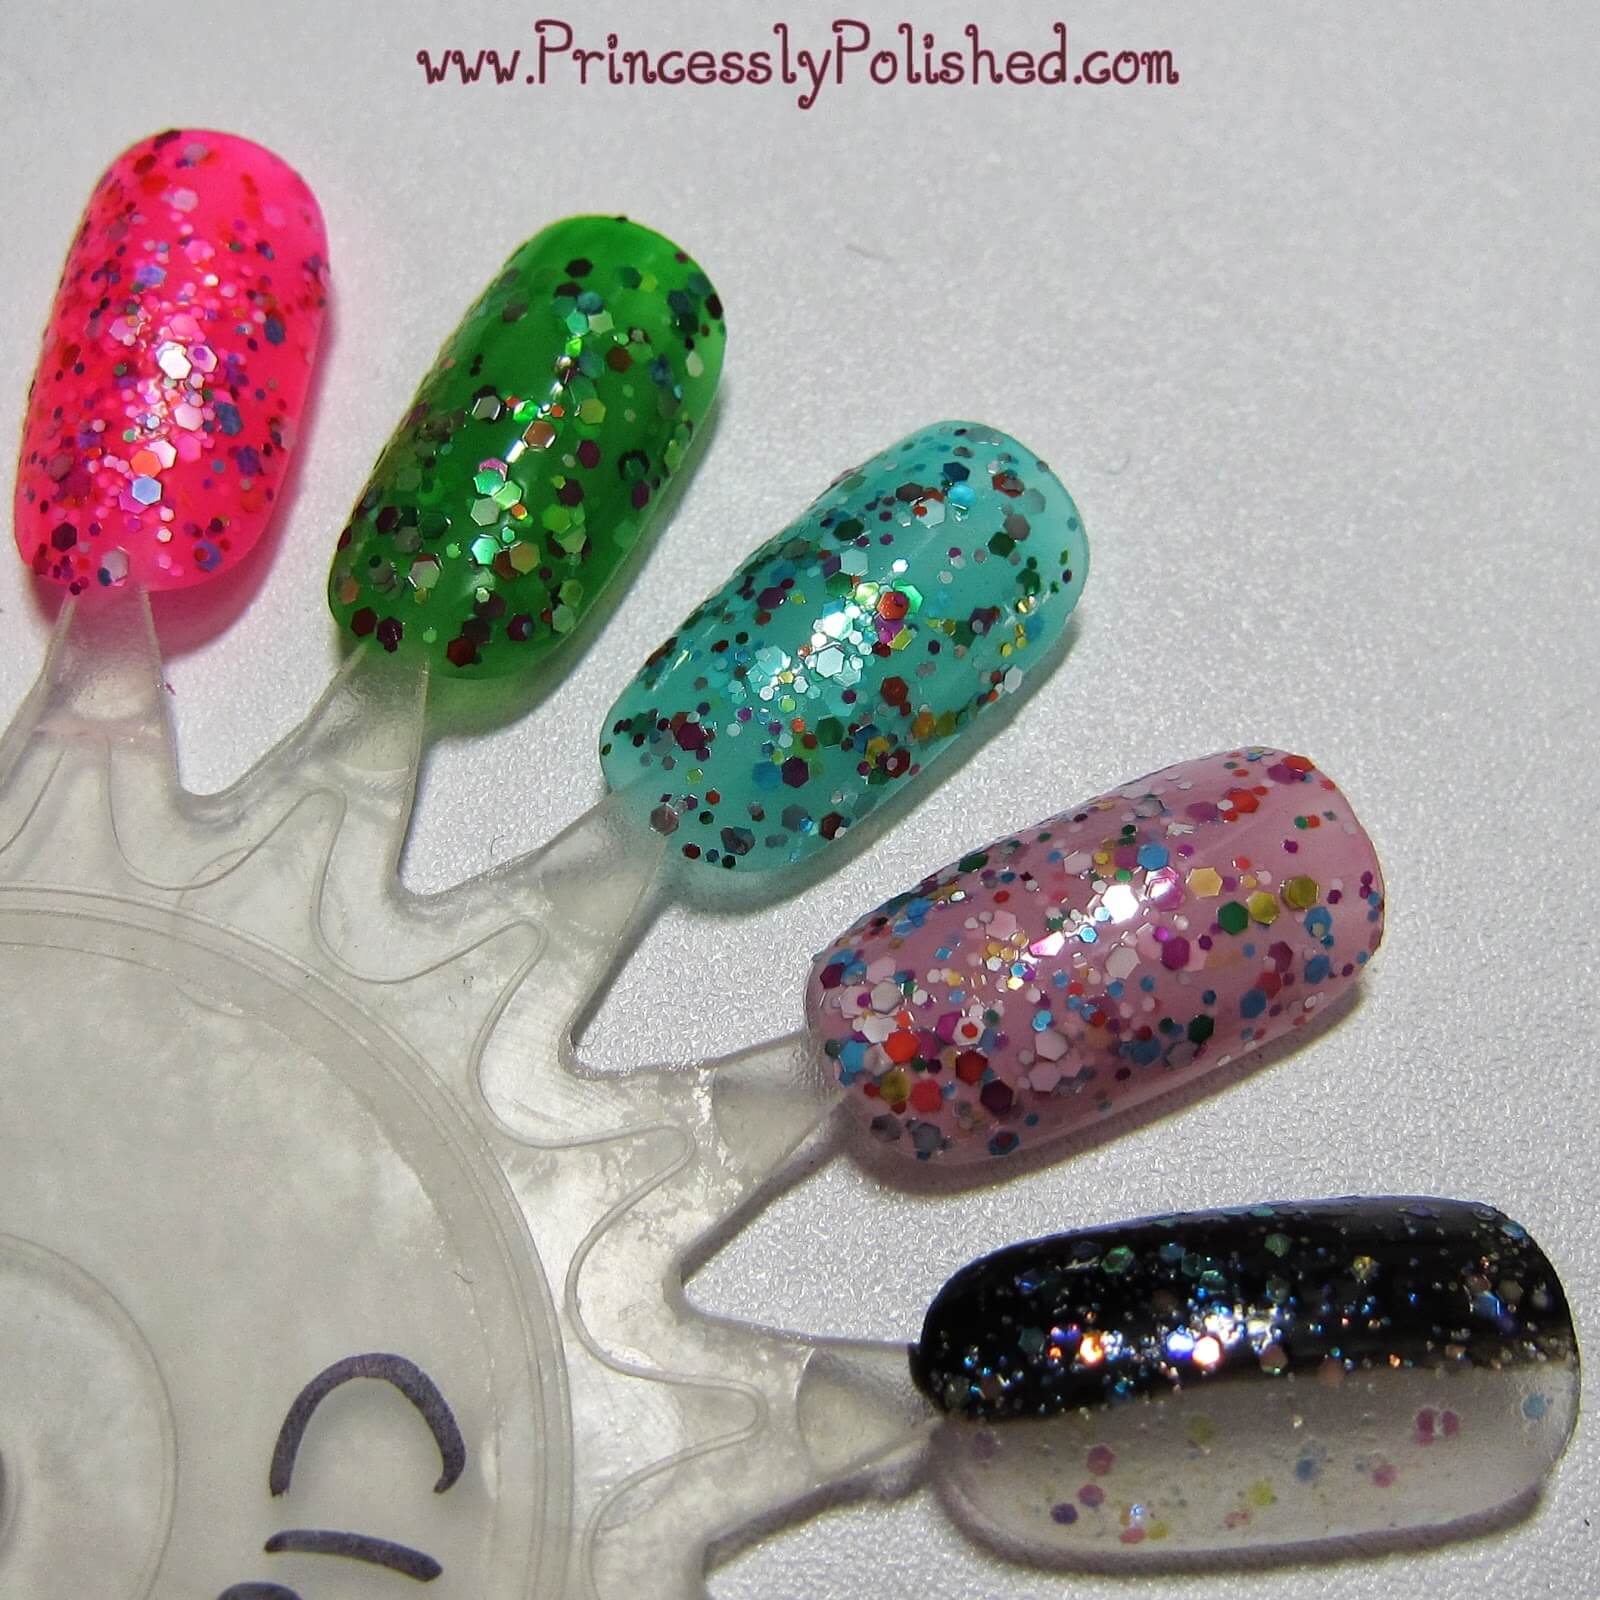
   I did swatches on a nail wheel at both 1 and 3 coats, so let's take a look at each polish by itself!  The polishes don't have any individual names, so I'll just be calling them by color.

Neon Pink Rainbow:
 

   This color is pretty awesome.  I'm not a fan of neon colors but the addition of multicolored glitter in two different sizes works surprisingly well.  It dries fast to a matte neon finish.  I left my swatches matte, but I'll try it with a shiny topcoat when I get around to wearing it.


   I was afraid neon polish and glitter would be a horrible mix, but this was surprisingly easy to work with.  The base polish has a transparent quality, so either plan to use at least 3 coats or layer it over your favorite neon pink polish.  I didn't have any problems getting the glitter to spread, but I was also sure to take time between coats.

Toxic Monster Green: 


   This grass green polish is loaded with two sizes of metallic rainbow glitter, but the colors that stand out the most are orange, fuchsia, red, and silver.  It gives off a tossed salad vibe.  This polish seems the least glitter-packed out of the entire set, with more large glitter than small glitter.


   The green base of this polish is a sheer jelly so it would definitely need to be layered over another green to look it's best, but that also keeps it looking shiny.  I was happy with the glitter coverage and the fact that it didn't get lost in a too-thick creamy polish.

Aqua Rainbow Reef:


   I think this polish should qualify as mermaid approved!  Once again it ended up being a sheer jelly polish so unless you actually are a blue-tinged mermaid girl it will probably need an opaque base color to be looking it's best.


   The glitter in this polish was a tiny bit more finicky to work with than in the other colors, but I was still pleasantly surprised by the consistency and ease-of-use.  Everything dried looking shiny, too.

Cool Pink Rainbow:


   I thought this might be a rebottling of Claire's polish Candy Shop, but this is clearly a paler base color.  I had passed on Candy Shop because that warm pink would have majorly clashed with my skintone.  This one is much more french manicure friendly.


   I ended up liking this one even more than I thought I would, probably because it manages to look different from LA Colors Candy Sprinkles.  Being jelly based but not patchy should make it a good one-coater for a glittery french manicure, too.
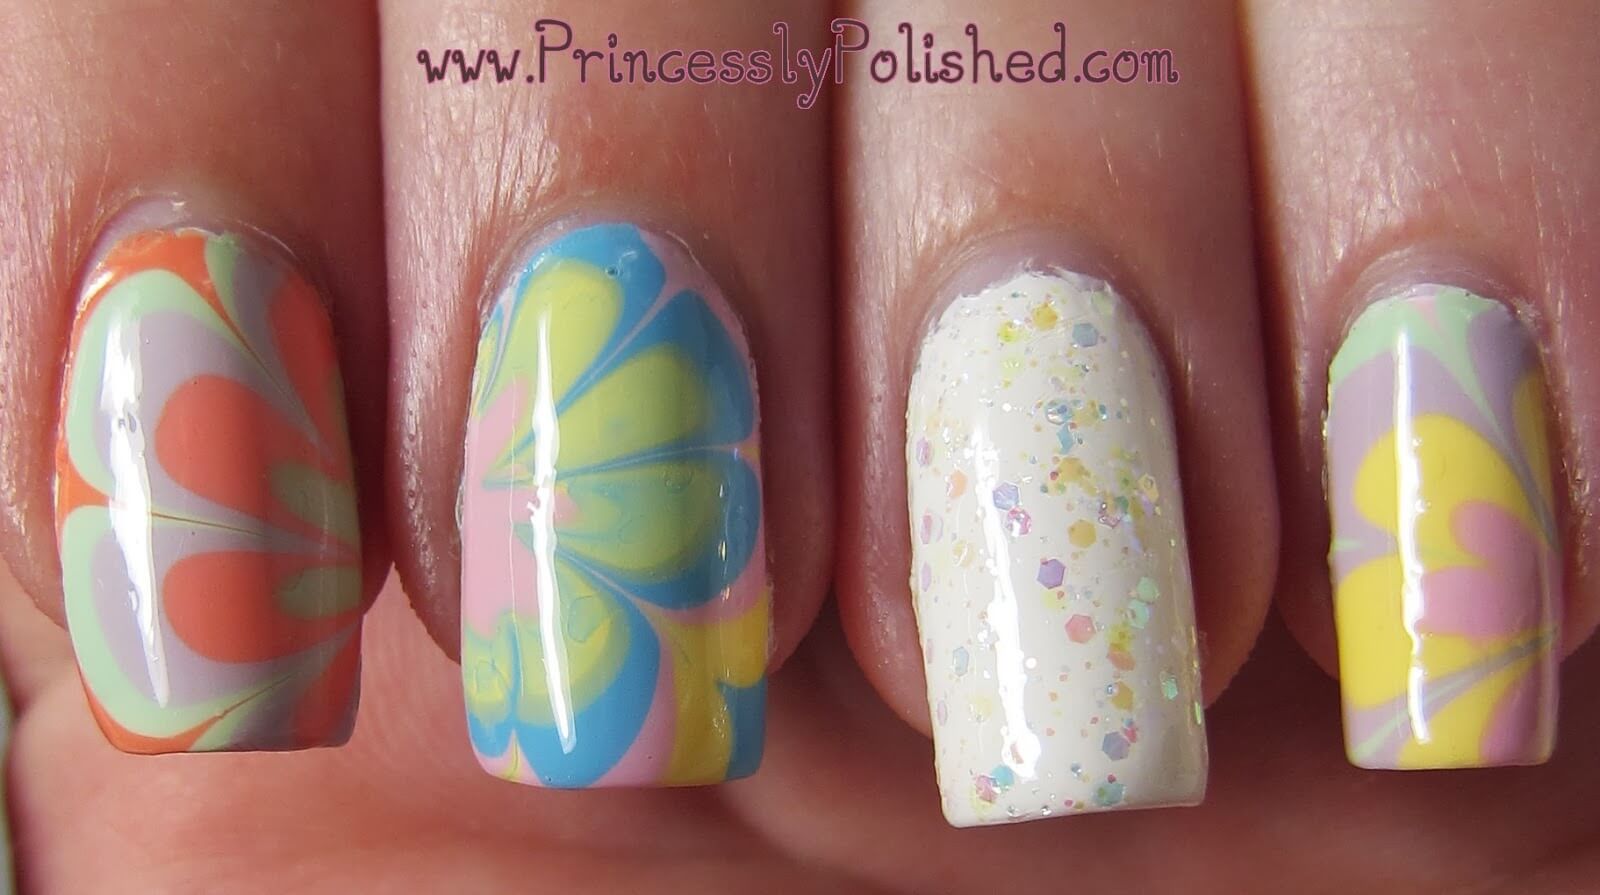
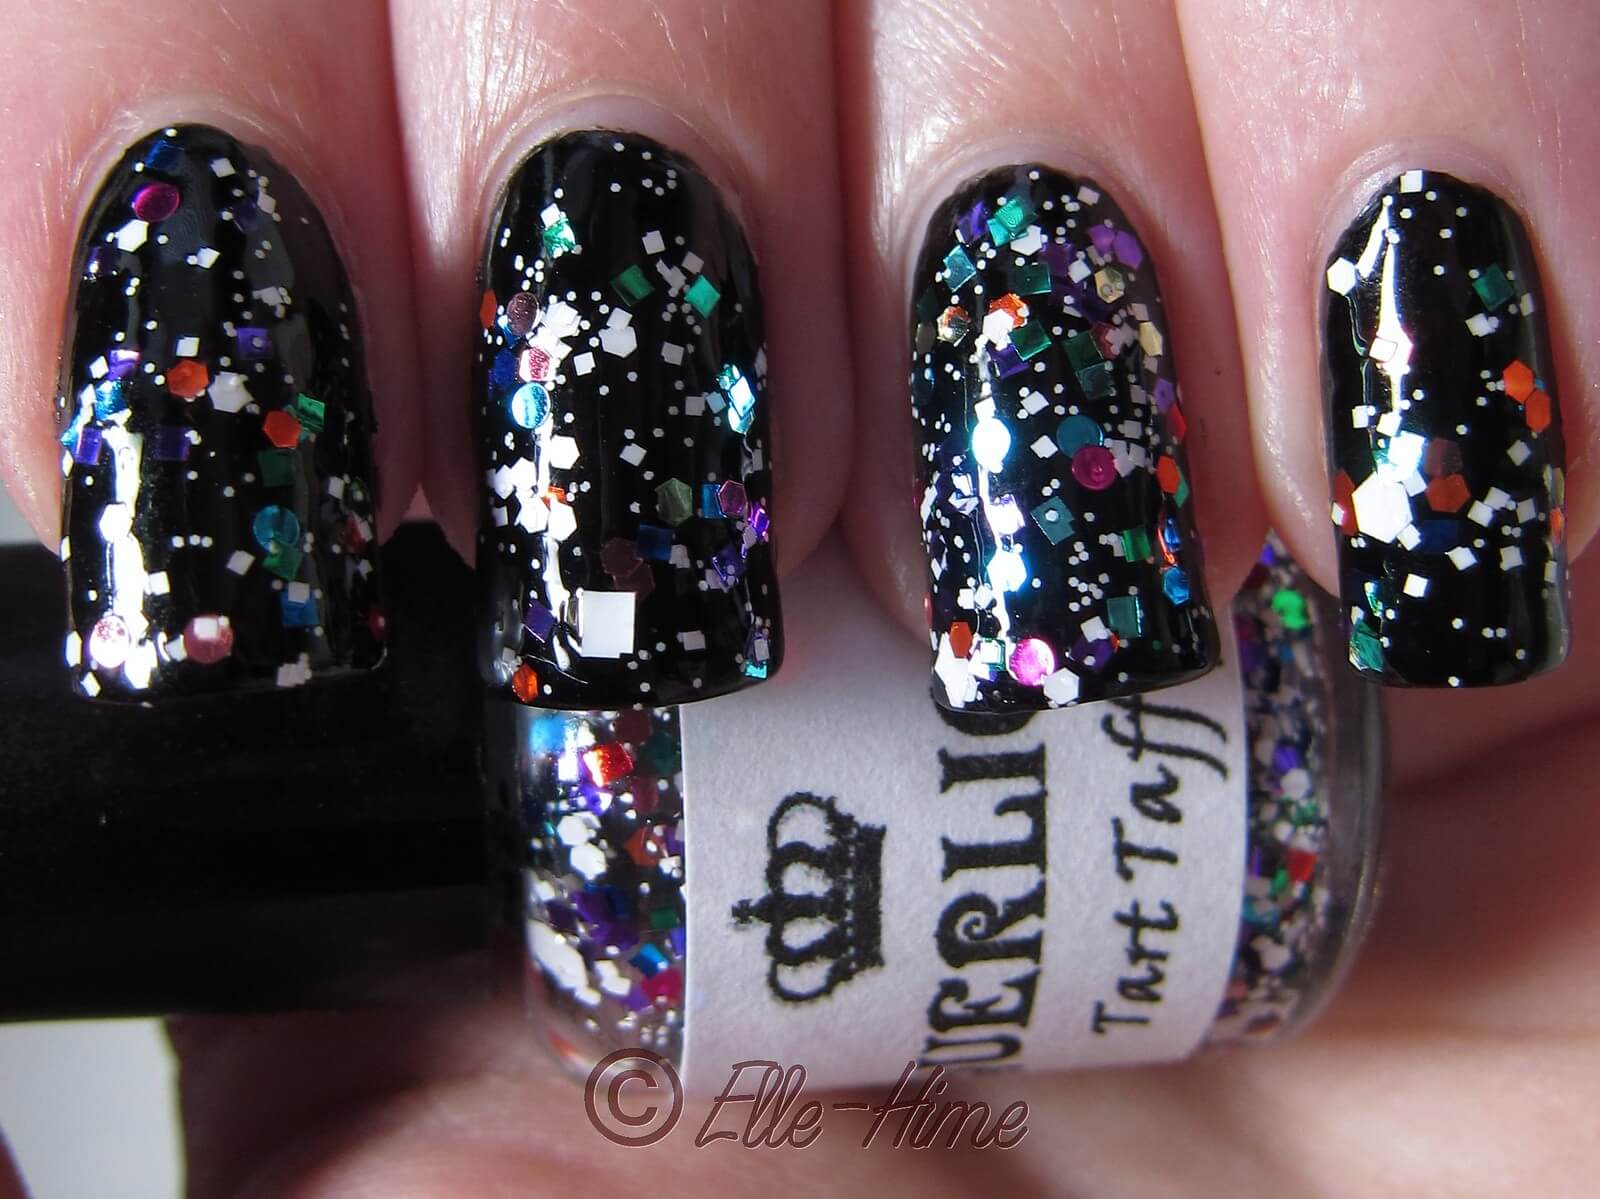
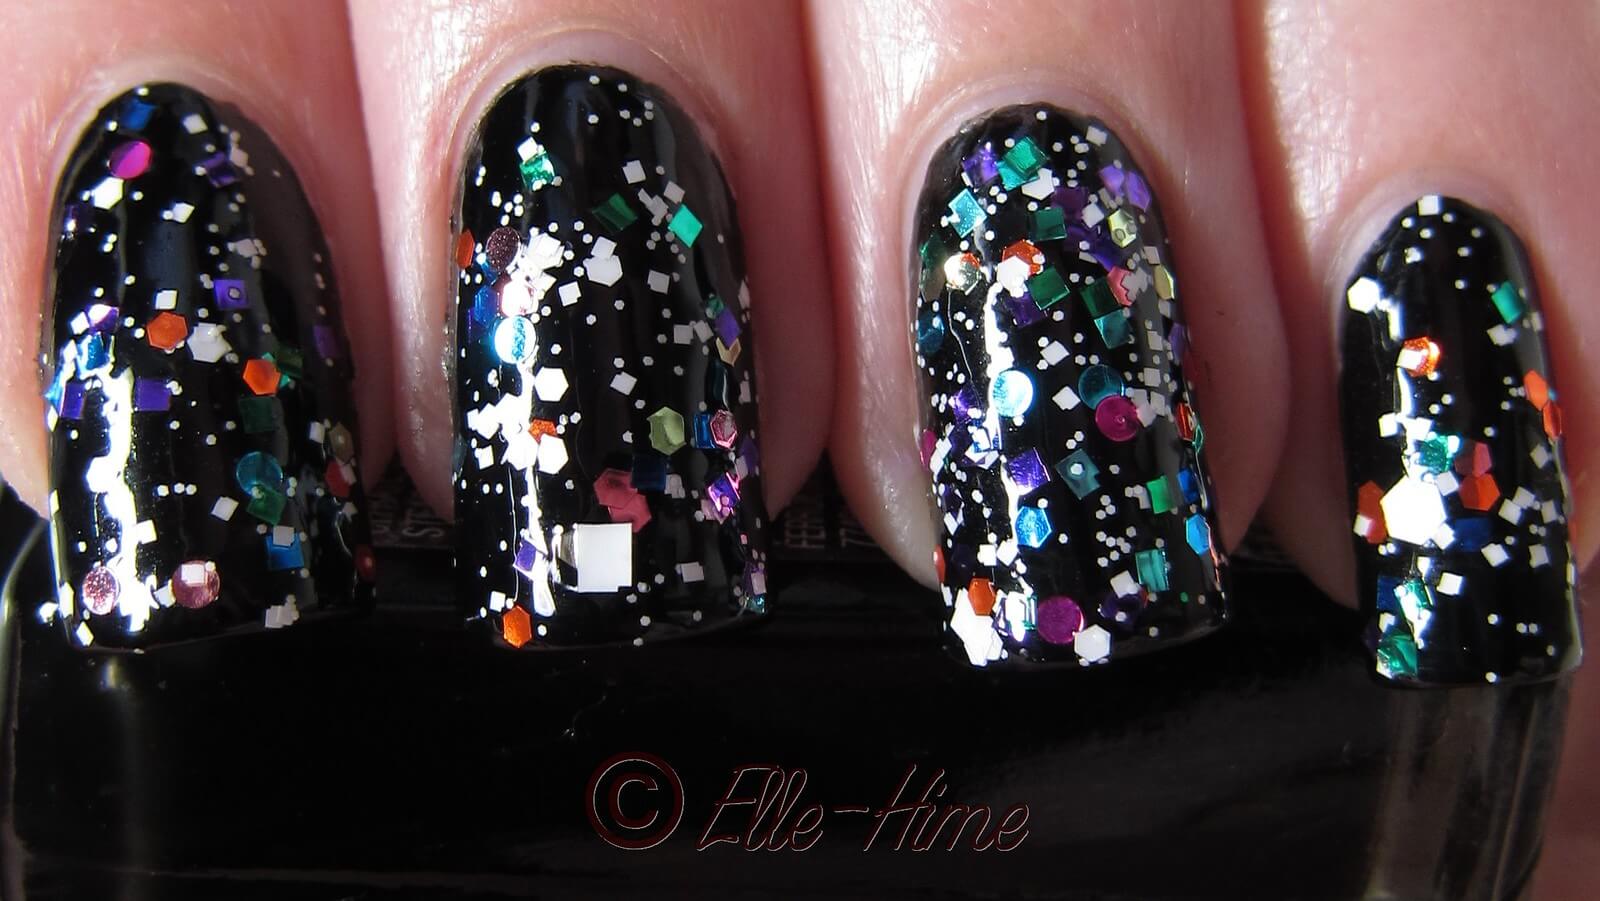
Rainbow Iridescent:


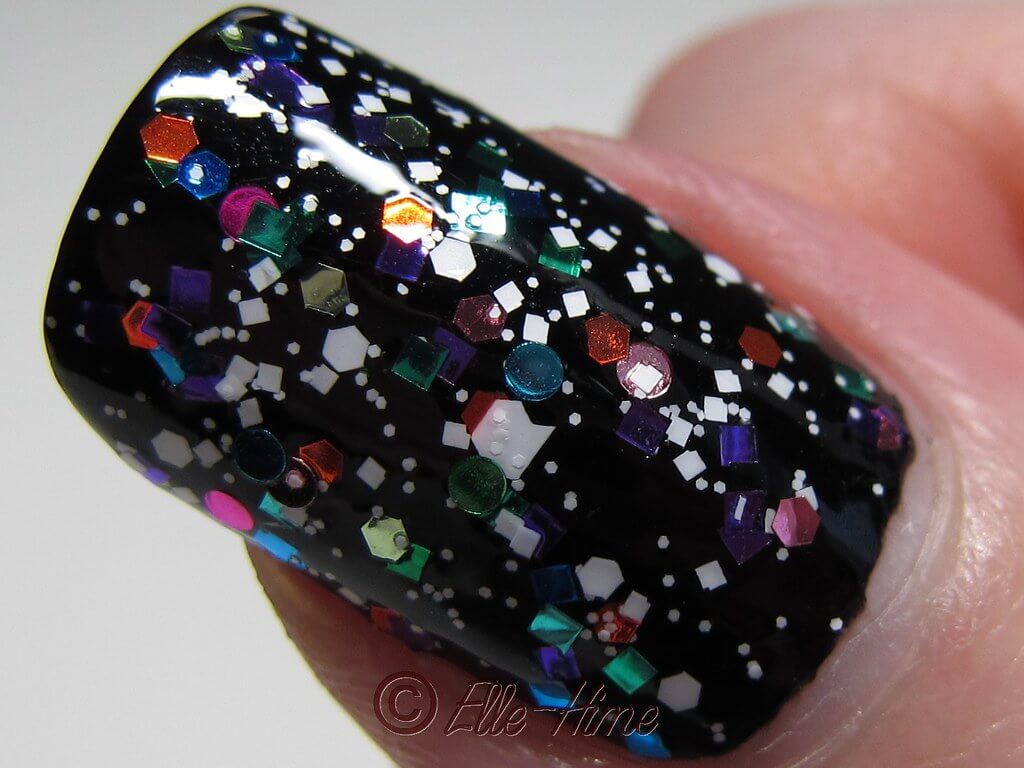
   Swatched last and expected to be least favorite out of the set, this polish was a surprise winner.  I swatched it over a half-black nail, but what I really want to try this over is white, because the large glitter pieces reflect a whole rainbow of pastel colors.  I only bothered doing one coat because I don't think this polish would benefit from layering like the others do.


   It's quite packed with glitter!  I spot the full roygbiv of iridescent glitter in there, and in a pretty even ratio, too.  Generally these polishes lean distinctly toward one color, and it gets a little boring.  The clear base makes it very versatile, so this one is a keeper!


   This set ended up being fantastic, and I would recommend picking it up even if it is only marked down to $5.00. Claire's mini size is 7.5ml, pretty generous, and these don't seem to be available in full size as singles.  I was leery of the polishes being low quality, gloopy messes but that wasn't the case at all.  My one peeve would be that these don't contain any mixing balls to stir the polish, but so far there haven't been settling issues.  These are definitely candidates for using on my Peel-Off Aqua Base Coat for easy removal.  These aren't gritty but they do have glitter texture, so use topcoat accordingly.  Hopefully you can find them if you fall in love with them like I did!

Monday, January 21, 2013

Laquerlicious: Tart Taffy over Wet 'n Wild: Black Creme

Swatch & Review


   Of the three Laquerlicious mini polishes I received to review, Tart Taffy has to be my favorite.  A metallic rainbow and matte white glitter polish in a clear base, it hits all the right notes.  I chose to layer it over Wet 'n Wild Black Creme to really make it pop.  I can't figure out what this combination reminds me of, but I love it!


   I only used one coat on my nails except for my ring finger, which got two.  This glitter spreads very well and I didn't have issues with it clumping or dragging to the edge.  It's like a paint splatter manicure without all the mess!


   The mix of glitters are so perfect, too.  The matte white comes in tiny hexes, small and medium squares, and medium hexes.  The rainbow colors are all medium size, and they come in hexes, squares, and circles!  Yes, circles!  I can't get enough of how nicely this has been blended.


   I wouldn't have thought this glitter was so great from the bottle picture Online; getting a mini to swatch was my eye-opener.  I hope my swatches were able to do the same for you!  This glitter is a stunner and I recommend it to any fan of rainbow glitter, white glitter, and rainbow-and-white glitter!  As always Laquerlicious polishes are sold on etsy - go check them out!